Singer SEQS-6700 FUTURA QUARTET Instruction Manual - Page 14
Control Panel Functions
 |
View all Singer SEQS-6700 FUTURA QUARTET manuals
Add to My Manuals
Save this manual to your list of manuals |
Page 14 highlights
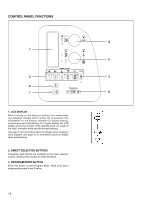
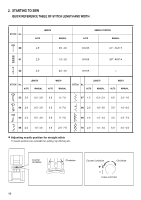
CONTROL PANEL FUNCTIONS 4 1 5 2 3 6 7 8 1. LCD DISPLAY When turning on the machine without the embroidery unit attached, straight stitch number 00, is selected. The information on the display changes for regular sewing, programming and embroidering. For regular sewing, the LCD display shows the number of the selected stitch, an image of the stitch, and stitch width and stitch length settings. See page 13 for information about the display when creating a stitch program, and page 52 for information about the display when embroidering. 2. DIRECT SELECTION BUTTONS Frequently used stitches are available by the direct selection buttons. Simply press a button to select that stitch. 3. PROGRAM MODE BUTTON Press this button to enter Program Mode. Read more about programming under 4 and 5 below. 12
-
 1
1 -
2
-
3
-
4
-
5
-
6
-
7
-
8
-
 9
9 -
 10
10 -
 11
11 -
 12
12 -
 13
13 -
 14
14 -
 15
15 -
 16
16 -
 17
17 -
 18
18 -
 19
19 -
20
-
21
-
22
-
23
-
24
-
25
-
26
-
27
-
28
-
29
-
30
-
31
-
32
-
33
-
34
-
35
-
36
-
37
-
38
-
39
-
40
-
41
-
42
-
43
-
44
-
45
-
46
-
47
-
48
-
49
-
50
-
51
-
52
-
53
-
54
-
55
-
56
-
57
-
58
-
59
-
60
-
61
-
62
-
63
-
64
-
65
-
66
-
67
-
68
 |
 |
