Singer Simple 3223BY Instruction Manual
Singer Simple 3223BY Manual
 |
View all Singer Simple 3223BY manuals
Add to My Manuals
Save this manual to your list of manuals |
Singer Simple 3223BY manual content summary:
- Singer Simple 3223BY | Instruction Manual - Page 1
3223 / 3229 Instruction Manual Manual de Instrucciones Manuel d'Instruction - Singer Simple 3223BY | Instruction Manual - Page 2
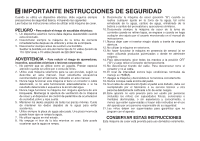
area, such as threading needle, changing needle, threading bobbin, or changing presser foot, and the like. 10. Always unplug sewing machine from the electrical outlet when removing covers, lubricating, or when making any other user servicing adjustments mentioned in the instruction manual. 11. Never - Singer Simple 3223BY | Instruction Manual - Page 3
de coser de la toma de corriente cuando se retiren tapas, se engrase o cuando se haga cualquier otro ajuste por el usuario mencionado en el manual de instrucciones. 11. Nunca dejar caer ni insertar ningún objeto a través de ninguna abertura. 12. No utilizar la máquina en exteriores. 13. No hacer - Singer Simple 3223BY | Instruction Manual - Page 4
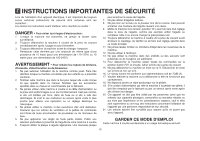
le cordon d'alimentation qui relie la machine à la pédale est abîmé, il doit être remplacé par le fabricant ou par un service après vente agrée afin d'éviter , sauf si elles sont supervisées ou ont reçu des instructions concernant l'utilisation de l'appareil par une personne responsable de leur - Singer Simple 3223BY | Instruction Manual - Page 5
instruction book, step by step, seated at your machine. To ensure that you are always provided with the most modern sewing capabilities, the manufacturer reserves the right to change the appearance, design or accessories of this sewing machine when considered necessary. SINGER este manual de - Singer Simple 3223BY | Instruction Manual - Page 6
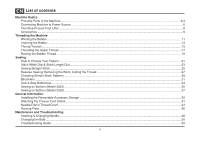
...9 Threading the Machine Winding the Bobbin...11 Inserting the Bobbin...13 Thread Tension...15 Threading the Upper Thread ...17 Raising the Bobbin Thread ...19 Sewing How to Choose Your Pattern ...21 Stitch Width Dial & Stitch Length Dial...23 Sewing Straight Stitch...25 Reverse Sewing/ Removing - Singer Simple 3223BY | Instruction Manual - Page 7
cortar el hilo ...28 Selección de puntadas elásticas ...30 Dobladillo invisible ...32 Costura de ojales en 4 pasos ...34 Pegado de botones (Modelo 3223) ...36 Pegado de botones (Modelo 3229) ...38 Información general Instalación de la cubierta removible ...40 Cambio de porta prensatelas...42 Guía de - Singer Simple 3223BY | Instruction Manual - Page 8
invisible ...32 Couture de boutonnières en 4 étape ...34 Couture de boutons (Modèle 3223) ...36 Couture de boutons (Modèle 3229) ...38 Informations générales Installation du bras amovible ...40 Fixez le support du pied presseur...42 Table de correspondance de l'aiguille, du tissu et du fil ...45 - Singer Simple 3223BY | Instruction Manual - Page 9
Principal Parts of the Machine 1. Thread tension dial 2. Thread take-up lever 3. Thread cutter 1 7 4. Presser foot 8 5. Needle plate 9 6. Removable accessory storage 2 7. Reverse sewing lever 10 8. Bobbin stopper 3 9. Stitch width dial (Model 3229) 11 10. Stitch length dial 4 11 - Singer Simple 3223BY | Instruction Manual - Page 10
ancho de puntada (Modelo 3229) 10. Disco selector de largo de puntada 11. Disco selector de puntadas F Composants principaux de la machine à coudre 1. Réglage de la tension 2. Releveur du fil 3. Coupe fil 4. Pied presseur 5. Plaque a aiguille 6. Bras amovible / rangement des accessoires 7. Levier - Singer Simple 3223BY | Instruction Manual - Page 11
EN Principal Parts of the Machine 12. Horizontal spool pin 13. Bobbin winding spindle 14. Hole for second spool pin 12 18 15. Handwheel 13 16. Power and light switch 19 17. Main plug socket 14 20 18. Bobbin thread guide 15 21 19. Upper thread guide 22 20. Face plate 21. Handle 22. - Singer Simple 3223BY | Instruction Manual - Page 12
de transporte 22. Palanca del prensatelas 23. Control de la velocidad 24. Cable de alimentación F Composants principaux de la machine à coudre 12. Porte bobine de branchement du fil d'alimentation 18. Guide remplissage de canette 19. Guide-fil supérieur 20. Plaque frontale 21. Poignée de transport - Singer Simple 3223BY | Instruction Manual - Page 13
is not in use. Foot control The foot control pedal regulates the sewing speed. (3) Attention: Consult a qualified electrician if in doubt of how to connect machine to power source. Unplug power cord when machine is not in use. The foot control must be used with the appliance by KD-1902 (110 - Singer Simple 3223BY | Instruction Manual - Page 14
normes en vigueur. (2) Atención: Desenchufe el cable de alimentación cuando la máquina no esté en uso. Attention: Débrancher le fil d'alimentation lorsque la machine n'est pas utilisée. Control de pedal El pedal de control regula la velocidad de la máquina. (3) Rhéostat Le rhéostat contrôle la - Singer Simple 3223BY | Instruction Manual - Page 15
EN Two Step Presser Foot Lifter When sewing several layers or thick fabrics, the presser foot can be raised to a higher position for easy positioning of the work. (A) E Elevador del prensatelas de dos - Singer Simple 3223BY | Instruction Manual - Page 16
b. Zipper foot c. Buttonhole foot d. Button sewing foot e. Seam ripper/ brush f. Edge/ quilting guide g. Pack of needles h. Spool holder i. supplied with this machine; they are however available as special accessories from your local dealer.) m. Auxiliary spool pin n. Satin stitch foot o. Overcasting - Singer Simple 3223BY | Instruction Manual - Page 17
pour boutonnière d. Pied pour pose de bouton e. Brosse/ Découseur f. Guide couture/ matelassage g. Étui à aiguilles h. Arrêt bobine i. Canette (3x 10 accessoires ne sont pas fournis avec la machine. cependant, ils sont disponibles dans votre magasin SINGER®) m. Porte-bobine auxiliaire n. Pied bourdon - Singer Simple 3223BY | Instruction Manual - Page 18
Push bobbin spindle to right. (6) 1 - Hold thread end. (7) 2 - Step on foot control pedal. (8) - Cut thread. (9) - Push bobbin spindle to left (10) and remove. 4 Please Note: When the bobbin winder spindle is in "bobbin winding" position, the machine will not sew and the hand wheel will not turn - Singer Simple 3223BY | Instruction Manual - Page 19
de la canette - Placer le fil et le support correspondant sur le porte bobine. (1/2) - Retire el Corte el hilo. (9) - Glisser le fil dans le guide. (3) - Enroulez le fil dans le sens horaire mité du fil. (7) - Appuyez sur le rhéostat de la machine. (8) - Coupez le fil. (9) - Repoussez l'axe du dé - Singer Simple 3223BY | Instruction Manual - Page 20
. (2) - Hold the bobbin case with one hand. Insert the bobbin so that the thread runs in a clockwise direction (arrow). (3) 1 - Pull the thread through the slit and under the finger. (4) Leave a 6 inch tail of thread. - Hold the bobbin case by the hinged latch. (5) - Insert it into the shuttle - Singer Simple 3223BY | Instruction Manual - Page 21
E Colocación de la bobina La aguja tiene que estar siempre en la posición más alta al colocar y quitar la bobina. - Abrir la tapa con bisagras. (1) - Abrir tapa de la caja de bobina (a) y quitar la caja de bobina. (2) - Sujetar la caja bobina con una mano. Colocar la bobina de manera que el hilo - Singer Simple 3223BY | Instruction Manual - Page 22
too tight for straight stitch sewing. Turn dial to lower number. D. Normal thread tension for zig zag and decorative sewing. Correct thread tension is when a small amount of the upper thread appears on the bottom side of fabric. Lower thread tension To test the bobbin thread tension, remove the - Singer Simple 3223BY | Instruction Manual - Page 23
E Tensión del hilo Tensión del hilo superior Adjuste de la tensión del hilo básica: "4" Para aumentar la tensión, girar el disco al siguiente número más alto. Para reducir la tensión, girar el disco al siguiente número más bajo. A. Tensión normal del hilo para cosido de puntos rectos. B. Tensión - Singer Simple 3223BY | Instruction Manual - Page 24
Threading the Upper Thread This is a simple operation but it is important to carry out correctly as by not doing so several sewing problems thread from spool through the upper thread guide (3) and pulling thread through pre-tension spring as illustrated. (4) - Thread tension module by leading thread - Singer Simple 3223BY | Instruction Manual - Page 25
F Enfilage supérieur Cette opération est simple. Il est important de l'exécuter correctement curité, il est fortement recommandé d'éteindre la machine avant de l'enfiler. - Levez le porte nouveau vers le bas. (6) - Passez le fil dans le guide-fil horizontal qui se trouve sur le pince aiguille. (7) - - Singer Simple 3223BY | Instruction Manual - Page 26
: If it is difficult to raise the bobbin thread, check to make sure the thread is not trapped by the hinged cover or the removable accessory storage. 1 Gently pull on the upper thread to bring the bobbin thread up through the needle plate hole. (2) Lay both threads to the back under the presser foot - Singer Simple 3223BY | Instruction Manual - Page 27
E Elevación del hilo de la bobina Sujete el hilo superior con la mano izquierda. Gire el volante (1) hacia usted hasta que baje totalmente la aguja, siga girando hasta volver a subir la aguja. F Pour remonter le fil de canette Tenir le fil supérieur avec la main gauche. Tourner le volant (1) vers - Singer Simple 3223BY | Instruction Manual - Page 28
"S1" or "S2", select the pattern desired with pattern selector dial, and adjust the stitch width with the stitch width dial. a. Reverse lever b. Stitch width dial (Model 3229) c. Stitch length dial d. Pattern selector dial Model 3223 3 4 2 1 Model 3229 3 4 2 1 S1 S1 21 a b c d S2 S2 - Singer Simple 3223BY | Instruction Manual - Page 29
E Cómo seleccionar su puntada? Para seleccionar una costura, simplemente gire el dial selector de diseños. El dial selector de diseños puede ser girado en ambas direcciones. F Comment choisir votre motif Pour sélectionner un point, il suffit de tourner le bouton de sélection de points. Le sélecteur - Singer Simple 3223BY | Instruction Manual - Page 30
increase as the dial approaches "4". Generally speaking, use a longer stitch length when sewing heavier weight fabrics or when using a thicker needle or thread. Use a shorter stitch length when sewing lighter weight fabrics or when using a finer needle or thread. 4 32 1 0.5 2 4 3 2 1 0.5 3 23 - Singer Simple 3223BY | Instruction Manual - Page 31
realiza el zigzag Gire el selector a la posición " ". (2) (Modelo 3223) Seleccione el selector de puntadas en la posición de zig zag. (Modelo en zigzag Tourner le cadran de sélection de motifs sur " ". (2) (Modèle 3223) Régler le cadran de sélection de motifs sur zigzag. (Modèle 3229) La - Singer Simple 3223BY | Instruction Manual - Page 32
EN Sewing Straight Stitch To begin sewing, set the machine for straight stitch. (1) Place the fabric under the presser foot with the fabric edge lined up with the desired seam guide line on the needle plate. (2) Lower the presser foot lifter, and then step on the foot controller to start sewing. (3) - Singer Simple 3223BY | Instruction Manual - Page 33
velocidades para comenzar a coser. (3) F Couture de points droits Pour commencer à coudre, régler la machine sur le point droit. (1) Placer le tissu sous le pied presseur avec le bord du tissu aligné au guide de couture souhaité sur la plaque à aiguilles. (2) Abaisser le releveur du pied presseur - Singer Simple 3223BY | Instruction Manual - Page 34
and the end of a seam, press down the reverse sewing lever (A). Sew a few reverse stitches. A Release the lever and the machine will sew forward again. (1) Removing the Work Turn the handwheel toward you (counterclockwise) to bring the thread take up lever to its highest position, raise the - Singer Simple 3223BY | Instruction Manual - Page 35
une couture, abaisser le bouton marche arrière en le poussant ver le bas. Faire quelques points en sens inverse. Lâcher le bouton et la machine reprendra la couture vers l'avant (A). (1) Cómo sacar la tela Gire el volante hacia usted para llevar la palanca tira-hilo a su posición más alta, eleve el - Singer Simple 3223BY | Instruction Manual - Page 36
triple reinforcement to stretch and hardwearing seams. The machine sews two stitches forward and one stitch backwards. 1 Ric Rac Set the pattern selector dial to " ". Adjust the stitch width dial to between "3" and "5". (Model 3229) Ric rac stitch is suitable for firm fabrics like denim, corduroy - Singer Simple 3223BY | Instruction Manual - Page 37
droit Régler le cadran de sélection de motifs sur " " ou " ". Utilisé pour ajouter un triple renforcement aux coutures extensibles et résistant à l'usure. La machine coud deux points en avant et un point en arrière. Croquet Régler le cadran de sélection de motifs sur " ". Régler le cadran de largeur - Singer Simple 3223BY | Instruction Manual - Page 38
the range shown in the diagram on the right of the page. Generally, a narrower stitch is used for lighter weight fabrics, and a wider stitch is used for heavier weight fabrics. Sew a test first to make sure the machine settings are appropriate for the fabric. Blind Hem: Turn up the hem to the - Singer Simple 3223BY | Instruction Manual - Page 39
plus large est utilisé pour les tissus plus lourds. Faire un test en premier pour assurer que les réglages de la machine conviennent au tissu. Ourlet invisible : Rabattre l'ourlet à la largeur ourlet invisible, disponible auprès de votre revendeur SINGER®. (Voir page 9 pour le numéro de pièce) 32 - Singer Simple 3223BY | Instruction Manual - Page 40
the pattern selector dial to the next step. Take care not to sew too many stitches in steps 1 and 3. Use seam ripper and cut buttonhole open from both ends towards the middle. Tips: - Slightly reducing upper thread tension will produce better results. - Use a stabilizer for fine or stretchy fabrics - Singer Simple 3223BY | Instruction Manual - Page 41
E Costura de ojales en 4 pasos F Couture de boutonnières en 4 étape Preparación 1. Quite el prensatelas de usos múltiples y coloque el prensatelas para hacer ojales. 2. Mida el diámetro y el espesor del botón y añada 0.3 cm (1/8") para hilvanes. Marca el tamaño del ojal en la tela. 3. Coloque la - Singer Simple 3223BY | Instruction Manual - Page 42
on Buttons (Model 3223) Install the darning plate. (1) Change the all purpose foot to button sewing foot. (2) Position the work under the foot. Place the button in the desired position and lower the foot. Set the pattern selector dial on " " and sew a few securing stitches. Select one of the two - Singer Simple 3223BY | Instruction Manual - Page 43
la placa cubre impelentes. (1) Cambie el prensatelas al especial para coser botones. (2) F Couture de boutons (Modèle 3223) Placez la plaque de reprisage sur la plaque à aiguille. (1) Installez le pied pose de boutons. (2) Coloque la tela bajo el prensatelas. Coloque el selector de - Singer Simple 3223BY | Instruction Manual - Page 44
. (1) Change the all purpose foot to the button sewing foot. (2) Set the stitch length to "0". To sew a few securing stitches, set the machine for straight stitch, with the stitch width set at "0". Raise the needle out of the fabric. Set the machine for zigzag stitch, then set the width to number - Singer Simple 3223BY | Instruction Manual - Page 45
lentement le bouton avec environ 10 points. Relever l'aiguille du tissu. Régler à nouveau la machine sur point droit, avec la largeur sur "0" coudre quelques points de fixation pour finir. Si un support est nécessaire, placer une aiguille à repriser en haut du bouton et coudre. Pour les boutons - Singer Simple 3223BY | Instruction Manual - Page 46
EN Installing the Removable Accessory Storage Hold the removable accessory storage horizontally, and push it in the direction of the arrow. (1) To remove the accessory storage, pull it toward the left. 1 The standard accessories are contained inside the removable accessory storage compartment. To - Singer Simple 3223BY | Instruction Manual - Page 47
E Instalación de la cubierta removible Coloque la máquina en una superficie estable, empuje la cubierta removible como indica la flecha, y luego jale hacia afuera. (1) F Installation du bras amovible Maintenir le bras amovible en position horizontal et le pousser comme indiqué ci-contre. (1) El - Singer Simple 3223BY | Instruction Manual - Page 48
foot lifer. Removing the presser foot (3) Push the pin (d) of the presser foot forward to separate. Attaching the edge/quilting guide (4) Attach the edge/quilting guide (f) in the slot as illustrated. b Adjust as needed for hems, pleats, quilting, etc. 1 Attention: Turn power switch to off - Singer Simple 3223BY | Instruction Manual - Page 49
(d) sur le pied presseur (e), dans l'encavure du support du pied pressuer (c). Retirer le pied presseur (3) Poussez la tige (d) du pied presseur vers l'avant pour le retirer. Poser le guide-bord/guide pour courte-pointe (4) Poser le guide-borde/guide pour courte-pointe (f) dans la rainure, comme - Singer Simple 3223BY | Instruction Manual - Page 50
Lycra®, swimsuit fabric, elastic. Leather, vinyl, upholstery. (Leaves smaller hole than standard large needle.) Note : 1. For best sewing results always use genuine SINGER® needles. 2. Replace needle often (approximately every other garment ) and/ or at first thread breakage or skipped stitches. 43 - Singer Simple 3223BY | Instruction Manual - Page 51
y al peso del la tela. SELECCIÓN DE AGUJA Y DE TELA AGUJAS SINGER® 2020 SINGER® 2045 SINGER® 2032 EXPLICACION Agujas de afilado normal. Gama de tamaño desde delgada a poliester, tejodos de punto poliester entrelazados, tricots, puntos simples y dobles. También puntos de jerseys, Licra®, tejidos - Singer Simple 3223BY | Instruction Manual - Page 52
du tissu et du fil GUIDE DE SÉLECTION DE L'AIGUILLE du tissu. SÉLECTION DE L'AIGUILLE ET DU TISSU AIGUILLES SINGER® 2020 SINGER® 2045 EXPLICATIONS Aiguille pointue réglementaire. La dimension varie de , tricots en polyester, tissus interlock, jerseys simples et doubles. Également, tissus en Lycra - Singer Simple 3223BY | Instruction Manual - Page 53
plate must be used. Install the darning plate as illustrated. For normal sewing, remove the darning plate. For free-motion sewing it is recommended to use a darning/embroidery foot, available as an optional accessory from SINGER® retailers. (See page 9 for part number of darning/embroidery foot ) 46 - Singer Simple 3223BY | Instruction Manual - Page 54
la plaque à repriser. Pour la couture en piqué libre, il est recommandé d'utiliser un pied de reprisage/broderie, disponible comme accessoire optionnel auprès des revendeurs SINGER®. (Voir page 9 pour le numéro de pièce du pied de reprisage/broderie) 47 - Singer Simple 3223BY | Instruction Manual - Page 55
EN Inserting & Changing Needles Change the needle regularly, especially if it is showing signs of wear and causing problems. For best sewing results always use SINGER® brand needles. Insert the needle as illustrated as follows: A. Loosen the needle clamp screw and tighten again after inserting the - Singer Simple 3223BY | Instruction Manual - Page 56
l'aiguille régulièrement, plus particulièrement si elle indique des signes d'usure et cause des problemès. Pour obtenir les meilleurs résultats, toujours utiliser des aiguilles fabriquées par SINGER®. Inserta la aguja como se ilustra: Insérer l'aiguille tel qu'indiqué ci-contre. (1) A. Afloje - Singer Simple 3223BY | Instruction Manual - Page 57
EN Changing the Bulb Disconnect the machine from the power supply by removing the plug from the electrical socket! Replace bulb - Unscrew the bulb and install a new one (C). (2) - Replace the face plate and tighten screw. B A Should there be any problem, consult your SINGER® retailer. 1 C 2 50 - Singer Simple 3223BY | Instruction Manual - Page 58
Si surge algún problema, consulte con su distribuidor local. F Changement de l'ampoule Débrancher la machine de l'alimentation électrique en retirant la prise! Remplacer l'ampoule par une ampoule du même type visser la vis. En cas des problèmes, vous adresser au magasin SINGER® le plus proche. 51 - Singer Simple 3223BY | Instruction Manual - Page 59
EN Troubleshooting Guide Problem Upper thread breaks Lower thread breaks Skipped stitches Needle breaks Loose stitches Seams gather or pucker Uneven stitches, uneven feed The machine is noisy The machine jams Cause Correction 1. The machine is not threaded correctly. 2. The thread tension is too - Singer Simple 3223BY | Instruction Manual - Page 60
E Problemas y soluciones Problema Causa El hilo superior se rompe 1. La máquina está mal enhebrada. 2. La tensión del hilo es demasiado fuerte. 3. El hilo es demasiado grueso para la aguja. 4. La aguja no está colocada correctamente. 5. El hilo se ha enredado en la caja bobina. 6. La aguja está - Singer Simple 3223BY | Instruction Manual - Page 61
F Guide de dépannage Problème Le fil supérieur casse Cause 1. La machine n'est pas correctement machine entraîner le tissu. 1. Demander un entretien à un magasin SINGER® . 2. Nettoyer le crochet et ses griffes d'entraînement comme décrit. 3. Utilisez de l'huile SINGER®. 4. Remplacer. La machine - Singer Simple 3223BY | Instruction Manual - Page 62
bénéficier d'un recyclage sécurisé, conforme à la législation nationale applicable aux produits électriques/électroniques. En cas de doute, veuillez contacter votre distributeur agréé. 021K6D0108( ) Dec/11 SINGER 3223/3229(K45D/K65D)/A5
-
 1
1 -
 2
2 -
 3
3 -
 4
4 -
 5
5 -
 6
6 -
 7
7 -
8
-
9
-
10
-
11
-
12
-
13
-
14
-
15
-
16
-
17
-
18
-
19
-
20
-
21
-
22
-
23
-
24
-
25
-
26
-
27
-
28
-
29
-
30
-
31
-
32
-
33
-
34
-
35
-
36
-
37
-
38
-
39
-
40
-
41
-
42
-
43
-
44
-
45
-
46
-
47
-
48
-
49
-
50
-
51
-
52
-
53
-
54
-
55
-
56
-
57
-
58
-
59
-
60
-
61
-
62
 |
 |

3223 / 3229
Manuel d'Instruction
Instruction Manual
Manual de Instrucciones