Sony AC-VQH10 Operating Instructions - Page 1
Sony AC-VQH10 Manual
 |
View all Sony AC-VQH10 manuals
Add to My Manuals
Save this manual to your list of manuals |
Page 1 highlights
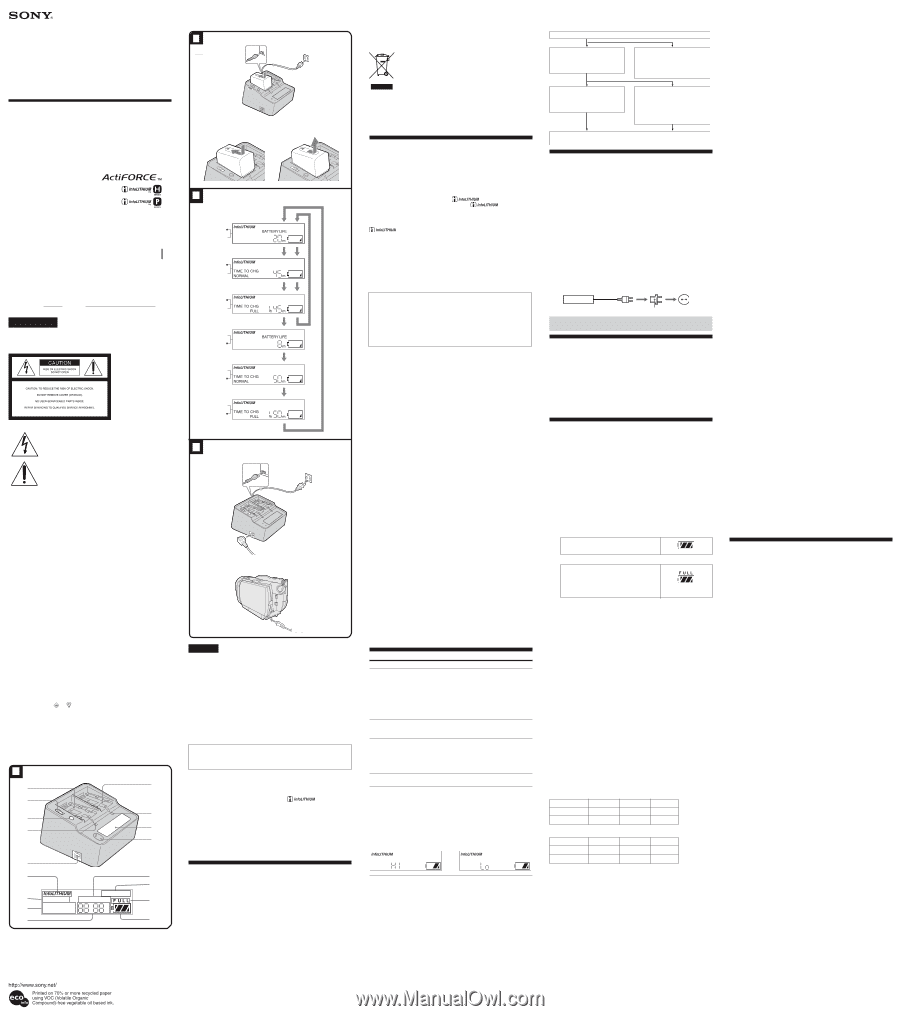
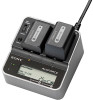
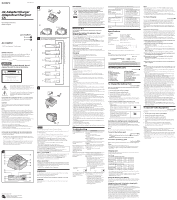
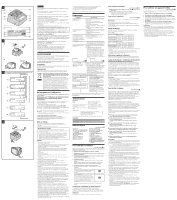
3-095-580-11(1) AC Adaptor/Charger Adaptateur/Chargeur CA Operating Instructions Mode d'emploi AC-VQH10 © 2007 Sony Corporation Printed in Japan Owner's Record The model and serial numbers are located on the bottom of the unit. Record the serial number in the space provided below. Refer to these numbers whenever you call upon your Sony dealer regarding this product. Model No. AC- Serial No. WARNING To reduce fire or shock hazard, do not expose the unit to rain or moisture. This symbol is intended to alert the user to the presence of uninsulated "Dangerous voltage" within the product's enclosure that may be of sufficient magnitude to constitute a risk of electric shock to persons. This symbol is intended to alert the user to the presence of important operating and maintenance (servicing) instructions in the literature accompanying the appliance. NOTICE FOR THE CUSTOMERS IN THE U.S.A. AND CANADA The Graphical Symbols with Supplemental Marking is located on the bottom of the unit. CAUTION You are cautioned that any changes or modifications not expressly approved in this manual could void your authority to operate this equipment. Note: This equipment has been tested and found to comply with the limits for a Class B digital device, pursuant to Part 15 of the FCC Rules. These limits are designed to provide reasonable protection against harmful interference in a residential installation. This equipment generates, uses, and can radiate radio frequency energy and, if not installed and used in accordance with the instructions, may cause harmful interference to radio communications. However, there is no guarantee that interference will not occur in a particular installation. If this equipment does cause harmful interference to radio or television reception, which can be determined by turning the equipment off and on, the user is encouraged to try to correct the interference by one or more of the following measures: - Reorient or relocate the receiving antenna. - Increase the separation between the equipment and receiver. - Connect the equipment into an outlet on a circuit different from that to which the receiver is connected. - Consult the dealer or an experienced radio/TV technician for help. NOTICE FOR THE CUSTOMERS IN THE UNITED KINGDOM A moulded plug complying with BS 1363 is fitted to this equipment for your safety and convenience. Should the fuse in the plug supplied need to be replaced, a fuse of the same rating as the supplied one and approved by ASTA or BSI to BS1362 (i.e., marked with or mark) must be used. If the plug supplied with this equipment has a detachable fuse cover, be sure to attach the fuse cover after you change the fuse. Never use the plug without the fuse cover. If you should lose the fuse cover, please contact your nearest Sony service station. A 6 1 2 7 3 4 8 9 5 q; qf qg VCR/CAMERA qa WARNING BATTERY LIFE qh TIME TO CHG qs NORMAL FULL h m qd qj B 1 2 2 3 4 1 To remove Two battery packs installed in Slot 1 and Slot 2 A battery pack installed in Slot 1 only C The contents of the display window change each time you press the DISPLAY change button. 1 1 2 1 2 2 1 3 2 1 4 2 1 5 2 1 6 2 D 2 3 1 4 5 English Thank you for purchasing the Sony AC Adaptor/Charger. Before operating the unit, please read this manual thoroughly and retain it for future reference. The AC-VQH10 AC Adaptor/Charger can be used as follows: •Connection cords are included with this unit to operate Sony equipment (video camera, etc.). •For charging Sony rechargeable battery packs (H series, P series). The following functions are available when charging "InfoLITHIUM" battery packs. Being an "InfoLITHIUM" battery pack, it works with the following functions. If an "ActiFORCE" is used, an even higher control is possible. - Quick charging (Faster than charging with your video camera, etc.) - Approximate charging time and battery life can be displayed. •For charging lithium ion type battery packs. Cannot be used to recharge Ni-Cd or Ni-MH type batteries. •Cannot be used with some models of equipment (camcorder, etc.). Confirm the compatibility of your equipment before use. What is "InfoLITHIUM" ? "InfoLITHIUM" is a lithium ion battery pack which can exchange data with compatible electronic equipment about its battery consumption. We recommend that you use an "InfoLITHIUM" battery pack (H series, P series) with electronic equipment that has the mark. "InfoLITHIUM" is a trademark of Sony Corporation. What is "ActiFORCE"? "ActiFORCE" is the functional name for the next generation power system. "ActiFORCE" has a higher capacity, quicker recharge, and faster and more accurate calculation of remaining battery capacity compared to our existing "InfoLITHIUM" battery pack P series power system. "ActiFORCE" is a trademark of Sony Corporation. WARNING To reduce fire or shock hazard, do not expose the unit to rain or moisture. To avoid electrical shock, do not open the cabinet. Refer servicing to qualified personnel only. The AC Power cord must only be changed at a qualified service shop. CAUTION Replace the battery with the specified type only. Otherwise, fire or injury may result. PRECAUTION The set is not disconnected from the AC power source (mains) as long as it is connected to the wall outlet, even if the set itself has been turned off. Disposal of Old Electrical & Electronic Equipment (Applicable in the European Union and other European countries with separate collection systems) This symbol on the product or on its packaging indicates that this product shall not be treated as household waste. Instead it shall be handed over to the applicable collection point for the recycling of electrical and electronic equipment. By ensuring this product is disposed of correctly, you will help prevent potential negative consequences for the environment and human health, which could otherwise be caused by inappropriate waste handling of this product. The recycling of materials will help to conserve natural resources. For more detailed information about recycling of this product, please contact your local Civic Office, your household waste disposal service or the shop where you purchased the product. Notes on Use This unit does not have dust-proof, splash-proof or water-proof specifications. Notes on the battery life indicator (Read carefully before use.) While charging the battery pack, this unit shows the battery life if used with your video equipment, etc. so long as the following conditions are met. •Using the "InfoLITHIUM" battery pack •Using electronic equipment with the mark Make sure that you use a battery pack with the mark. Check in the operating instructions supplied with your video equipment whether it is "InfoLITHIUM" compatible. If you use a battery pack with electronic equipment that does not have the mark, the battery life will not be indicated in minutes.* * The indication may not be accurate due to the conditions and environment of use. Compensation for Recorded Content We will not provide compensation for a failure to record or play back images, sound or other content due to a malfunction of the battery pack, AC adapter/charger. Charging •Designed for use with compatible Sony battery packs. •Only charge recommended battery packs with this unit. •Attach the battery pack firmly. Charging temperature • To provide maximum battery efficiency, the recommended temperature range when charging is 10 °C to 30 °C (50 °F to 86 °F). • This unit complies with quick charging, but charging outside the recommended temperature range will lead to longer charging times in order to protect the battery pack. Once the charging time has been extended, it will not return to quick charging even if the temperature is brought within the recommended temperature range. Reattach the battery pack and then recharge it. Others •Do not place the unit in a location where it is: - Extremely hot or cold Placing this unit in locations subject to the direct sunlight such as on dashboards or near heating apparatus may cause this unit to deform or malfunction. - Dusty or dirty In locations such as the seashore and other sandy areas or where dust clouds occur, protect the unit from sand and dust. There is risk of break down. - Very humid - Vibrating Charge the battery pack on a flat surface without vibration. •Do not use the unit placed in a narrow space, such as between a wall and furniture. •Attach the battery pack firmly. The battery terminal may be damaged if the battery pack is not attached correctly. •Do not use this unit in a place with strong radio waves or radiation. Video cameras etc. may not be able to record or play back correctly. •To protect the battery pack, remove the battery pack from the unit as soon as the charging is completed. •Do not apply mechanical shock or drop the unit. •Keep the unit away from a TV or AM receivers. In particular, noise from the device may enter a TV or radio if it is placed nearby. •Use this unit near to a wall outlet. This is to ensure that the power plug can be immediately unplugged from the wall outlet to turn the power off if some abnormality occurs during use. •Be sure that nothing metallic comes into contact with the metal parts of the unit or connecting plate. If it does, a short may occur and the unit may be damaged. •Do not connect this unit to a voltage adaptor (travel converter) for overseas travel. This may result in overheating or other malfunction. •While the unit is in use, it gets warm. But this is normal. •Unplug the unit from the wall outlet after use. To disconnect the cord, pull it out by the plug. Never pull the cord itself. •Connect this unit to an available wall socket. Even though the CHARGE lamp of this unit is off, it is not disconnected from the power source. If any trouble occurs while the unit is in use, unplug it from the wall socket to disconnect the power source. •The negligible amount of electric current will flow into the AC adaptor/ charger as long as the AC adaptor/charger is plugged into the wall outlet. •Unplug the unit from the wall outlet if it will not be used for extended period of time. To disconnect the cord, pull it out by the plug. Never pull the cord itself. •Do not operate the unit with a damaged cord or if it has been dropped or damaged. •The nameplate indicating operating voltage, power consumption, etc. is located on the bottom. •Always keep the metal contacts clean. •Do not disassemble or convert the unit. If any difficulty should arise, unplug the unit and contact your nearest Sony dealer. Troubleshooting Symptom Cause/Solution Video equipment does not work. •The power plug is disconnected from the wall outlet. t Insert into a wall outlet. •The connector cable is not properly connected. t Connect properly. •The mode change switch is set to CHARGE. t Set the mode change switch to VCR/ CAMERA. The battery pack is not charged. •The mode change switch is set to VCR/ CAMERA. t Set the mode change switch to CHARGE. Power immediately turns •Run down the battery pack and then fully off even though there is charge it again. sufficient battery life, or the t The battery life will be correctly displayed battery life displayed. differs from the actual battery life. The display is not changed. t Refer to "Notes on the battery life indicator (Read carefully before use.)". Quick charging is not performed. •The temperature of the battery pack is too high or too low. t The display shown below may appear if a battery pack with a high or low temperature is attached, or if charging is performed outside the recommended charging temperature range of 10 °C to 30 °C (50 °F to 86 °F). Although charging can still be performed in these cases, quick charging is not performed in order to protect the battery pack. The CHARGE lamp blinks and "WARNING" is displayed in the display window. •When charging a battery pack after a long period of non-use. t A battery that has not been used for a long time may lack the minimum required remaining capacity for the unit and battery pack to recognize each another. In this case, remove the battery pack from the unit and then install and charge it again. If "WARNING" is still displayed, check according to the following procedure. Remove the battery pack from the unit and then reinstall it. If the CHARGE lamp flashes again: Install a different "InfoLITHIUM" battery pack. If the CHARGE lamp lights up and does not flash again: If the CHARGE lamp goes out because the charging time has passed, there is no problem. If the CHARGE lamp flashes again: There is a problem with the unit. If the CHARGE lamp lights up and does not flash again: If the CHARGE lamp goes out because the charging time has passed, there is a problem with the first battery pack installed. Please contact your nearest Sony dealer regarding the product that has a problem. Specifications AC-VQH10 Input Output Operating temperature Storage temperature Dimensions (excluding the projecting parts) Mass 100 - 240 V AC 50/60 Hz 8.4 V DC 1.7 A (VCR) 8.4 V DC 2.2 A (BATT) 0 °C to 40 °C (32 °F to 104 °F) -20 °C to +60 °C (-4 °F to +140 °F) Approx. 100 × 67 × 111 mm (w/h/d) (4 × 2 3/4 × 4 3/8 in.) Approx. 330 g (11.70 oz.) Included items AC Adaptor/Charger (AC-VQH10 1) AC Power cord 1) Connecting cord (DK-225 1) Set of printed documentation Design and specifications are subject to change without notice. Note Use a commercially available AC plug Adaptor (not supplied), if necessary, depending on the design of the wall outlet. Wall outlet AC-VQH10 AC plug Adaptor (not supplied) Do not connect this unit to a voltage Adaptor (travel converter) for overseas travel. This may result in overheating or other malfunction. Identifying the parts See illustration A. 1 Slot 1 2 Mode change switch 3 DISPLAY change button 4 CHARGE lamp 1 5 DC OUT connector 6 Slot 2 7 CHARGE lamp 2 8 Display window 9 Slot indicator lamp Display window q; "InfoLITHIUM" indicator qa WARNING indicator qs TIME TO CHG (charge) indicator qd Time indicator qf BATTERY LIFE indicator qg VCR/CAMERA indicator qh Full charge indicator qj Battery life indicator To Charge the Battery Pack See illustration B-1. Also refer to the operating instructions of your device (video camera etc,) and battery pack. 1 Set the mode change switch to CHARGE. 2 Connect the AC Power cord to this unit. 3 Connect the AC Power cord to a wall outlet. There is a beep and the display window comes on. 4 Install the battery Pack Refer to "To install the battery pack" when installing the battery pack. When charging starts, the battery mark in the display window blinks in order, and the charging lamp lights. 5 When charging is complete, remove the battery pack. There are two levels of charge completion: "Normal charge" and "Full charge." •Normal charge When charge is completed, the battery mark will be displayed as illustrated to the right. •Full charge If you continue to charge after normal charging is complete until the battery mark shows "FULL," the battery pack can be used slightly longer than when in the normal charged state. Refer to "To remove the battery pack" when removing the battery pack. Installing two battery packs simultaneously This unit allows installation of two battery packs simultaneously. Charging starts with the battery pack installed in Slot 1. When two battery packs are installed but not simultaneously, charging starts with the battery pack installed first regardless of whether it is in Slot 1 or 2. Note This unit cannot charge two battery packs simultaneously. To install the battery pack See illustration B-2. 1 Place the battery pack on this unit with the b mark facing the terminal. 2 Slide the battery pack in the direction of the arrow. To remove the battery pack See illustration B-2. Slide the battery pack in the direction of the arrow and lift it straight out. Notes •Do not lift the unit by holding the battery pack. •Be particularly careful not to hit it when installing the battery pack etc. •Be careful not to pinch your fingers while installing or removing the battery pack. Charging time The following tables show the charging time for a main battery pack that has been completely discharged. Quick Charge "InfoLITHIUM" battery pack H series NP-FH100 NP-FH70 NP-FH50 Normal charge 125 min 60 min 55 min Full charge 185 min 120 min 115 min "InfoLITHIUM" battery pack P series NP-FP90 NP-FP71 Normal charge 115 min 80 min Full charge 175 min 140 min NP-FP50 65 min 125 min •The charging time may differ depending on the condition of the battery pack or the ambient temperature. •The times shown are for charging an empty battery pack which has been run down with a video camera etc., using this unit at an ambient temperature of 25 °C (77 °F). Using the battery pack quickly If necessary, you can remove the battery pack and use it before charging is complete. However, the available battery time differs depending on the charging time. Charging time and "10-minute charging/65minute (approx.) recording" The times shown are the approximate continuous recording times at an ambient temperature of 25 °C (77 °F) when using an NP-FH70 rechargeable battery pack (not supplied) and a video camera that has a power consumption of 1.8 W when used without its LCD display. When using a battery pack immediately after running it down with a video camera. Except a battery pack that has deteriorated, for example because it has not been used for a long time. There are two kinds of charging, normal charge and full charge. The approximately 25% increase compared to existing products means the rate of improvement in complete normal charging time compared to our existing AC adapter/charger AC-VQP10. Generally, the charging time and available recording time depend on the battery pack and the conditions of use. Notes • If the mode change switch is set to VCR/CAMERA during charging, charging stops. • If the CHARGE lamp does not light up or flash, check that the battery pack is correctly attached to the AC Adaptor/Charger. If it is not attached correctly, it will not be charged. • If anything goes wrong during charging, the charge lamp blinks and "WARNING" appears on the display. For details, see "Troubleshooting". To Check Charging See illustration C. You can check the charging time on the display during charging. When charging starts, BATTERY LIFE lights up in the display window. The battery life displayed is the approximate time remaining for taking photographs using the viewfinder. The battery life is shorter if the LCD display is used. The battery life may not be displayed with certain video equipment. For details, refer to "Notes on the battery life indicator (Read carefully before use.)". Press DISPLAY during charging. During charging, the contents of the display window change each time you press the DISPLAY change button. The slot indicator lamp shows the slot number for the battery information displayed. When two battery packs are installed simultaneously, the time display of the battery pack not being charged returns automatically after about 10 seconds to the time display of the battery pack being charged. Here is an example of installing a battery pack in Slot 1 followed by another in Slot 2. The slot indicator lamp corresponds to the slot number. 1 Battery life if the first installed battery pack is installed in your "InfoLITHIUM" electronic equipment. 2 Remaining time until normal charging of the first installed battery pack is complete. The normal charge time is not displayed after normal charging is complete. 3 Remaining time until full charging of the first installed battery pack is complete. The full charge time is not displayed after full charging is complete. 4 Battery life if the last installed battery pack is installed in your "InfoLITHIUM" electronic equipment. 5 Remaining time until normal charging of the last installed battery pack is complete. The normal charge time is not displayed after normal charging is complete. 6 Remaining time until full charging of the last installed battery pack is complete. Notes • The time display shows the approximate time when charging at 25 °C (77 °F). The time display may differ from the actual charging time due to the environment of use. • The time display of the battery pack on the side not being charged may take some time to appear. • The time display may show "- - - -" in the following cases. This is not a malfunction. - There is a difference between the displayed time and actual charging time. Even if this happens, continue charging. - When charging a battery other than an "InfoLITHIUM" battery pack (Battery life display and other functions are not available.) • Full charging requires about one hour after normal charging is complete. If you remove the battery pack between normal charge and full charge, the charging time may not be displayed properly in the next charging. • When charging a battery that has not been used for a long time, the displayed battery life and full charge time sometimes differ from the actual times. This is not a malfunction. If this happens, fully charge the battery pack. The correct times can then be displayed. • If you install a fully charged battery pack in this unit, "TIME TO CHG FULL 1h" may appear on the display. This is not a malfunction. • It may take some time after pressing DISPLAY for the time to be displayed. • To display the battery life of a new battery pack, first install it in your video camera recorder and use it for about 20 seconds, and then charge it with this unit. • It may take some time for the time to be displayed for the battery pack that is not being charged. Sometimes the time may not be displayed at all due to the condition of the battery pack. Neither case is a malfunction. • In the following cases, some deviance may occur in the time displayed. This is not due to any malfunction. - If the battery pack is removed from this unit after normal charge is finished but before full charge is finished. (It takes about one hour from when normal charge is complete to when full charge is complete.) - When charging a battery pack that has not been use for a long time. (Fully charge once first.) - When charging a P series "InfoLITHIUM" battery pack, it may take about one minute after installing the battery pack for the time to appear in the display window. To Operate Video Equipment See illustration D. For details of connection, refer to the operating instructions of the video equipment. 1 Set the mode change switch to VCR/CAMERA. 2 Connect the AC Power cord to this unit. 3 Connect the AC Power cord to a wall outlet. There is a beep and the display window comes on. 4 Connect the connecting cord to the DC OUT connector of this unit. 5 Connect the connecting cord to the video equipment. For the direction in which to fit the connecting cord, refer to the operating instructions of video camera etc. Notes • Setting the mode change switch to CHARGE while operating the video equipment cuts the power supply to the video equipment. • You cannot charge a battery pack installed in this unit when in VCR/ CAMERA mode. • Keep this unit away from your video equipment if the image is distorted. • The connecting cord supplied with this unit may be unusable with your video camera. In this case, use the connecting cord supplied with your video camera. • The illustrated example is of connection to an HDR-UX7 digital HD video camera recorder.
-
 1
1 -
 2
2
 |
 |