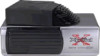
Sony CDX-757MX Operating & Installation Instructions - Page 3
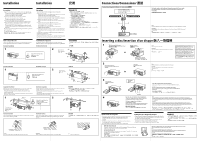
Connections/Connexions, Installation, Inserting a disc/Insertion d'un disque
 |
View all Sony CDX-757MX manuals
Add to My Manuals
Save this manual to your list of manuals |
Page 3 highlights
Installation Installation τༀ Precautions • Choose the mounting location carefully, observing the following: - The unit is not subject to temperatures exceeding 55°C (131°F) (such as in a car parked in direct sunlight). - The unit is not subject to direct sunlight. - The unit is not near heat sources (such as heaters). - The unit is not exposed to rain or moisture. - The unit is not exposed to excessive dust or dirt. - The unit is not subject to excessive vibration. - The fuel tank should not be damaged by the tapping screws. - There should be no wire harnesses or pipes under the place where you are going to install the unit. - The spare tire, tools or other equipment in or under the trunk should not be interfered with or damaged by the screws or the unit itself. • Be sure to use only the supplied mounting hardware for a safe and secure installation. • Use only the supplied screws. • Make holes of ø 3.5 mm (5/32 in.) only after making sure there is nothing on the other side of the mounting surface. Précautions • Choisir l'emplacement de montage en tenant compte des observations suivantes : - Appareil non soumis à des températures dépassant 55°C (131°F) (comme dans une voiture garée au soleil). - Appareil non soumis au rayonnement solaire direct. - Appareil à l'écart de sources de chaleur (comme des radiateurs). - Appareil non exposé à la pluie ou à l'humidité. - Appareil non exposé à des poussières ou à des souillures en excès. - Appareil non exposé à des vibrations excessives. - Vérifier que le réservoir d'essence ne risque pas d'être endommagé par les vis taraudeuses. - Il ne doit pas y avoir de faisceau de fils ou de tuyaux à l'emplacement du montage. - Vérifier que l'appareil ou les vis ne risquent pas d'endommager ou de gêner la roue de secours, les outils, ou autre objet dans le coffre. • Pour garantir la sécurité de l'installation, utiliser uniquement le matériel de montage fourni. • Utilisez uniquement les vis fournies. • Ne percez les trous de 3,5 mm (5/32 po.)ø qu'après vous être assuré qu'il n'y avait rien de l'autre côté de la surface de montage. j f f f f f f f f d f d f f f How to install the unit The brackets 1 provide two positions for mounting, high and low. Use the appropriate screw holes according to your preference. Horizontal installation Installation de l'appareil Les supports 1 offrent deux positions de montage, haut et bas. Utilisez les trous de vissage appropriés en fonction de vos préférences. Installation horizontale ˕ݖ1 d৷ձЭf d f ˥̻τༀ 1 2 Unit: mm (in.) 3 Unité : mm (po.) ఊЗj㖝㖝 HORIZONTAL Align with the marked position. Aligner sur le repère. 2 3 f 1 2 1 ø 3.5 (5/32) Vertical installation 1 Installation verticale VERTICAL Align with the marked position. Aligner sur le repère f ሤٜτༀ 2 Unit: mm (in.) 3 Unité : mm (po.) ఊЗj㖝㖝 2 3 1 2 1 ø 3.5 (5/32) Suspended installation When the unit is to be installed under the rear tray etc. in the trunk compartment, make sure the following provisions are made. • Choose the mounting location carefully so that the unit can be installed horizontally. • Make sure the unit does not hinder the movement of the torsion bar spring etc. of the trunk lid. Installation suspendue Si l'appareil doit être installé sous la plage arrière dans le coffre, par exemple, observer les précautions suivantes. • Bien choisir l'emplacement pour pouvoir installer l'appareil à l'horizontale. • Vérifier que l'appareil ne gêne pas les mouvements du ressort de fermeture du coffre, entre autres. 1 1 2 ø 3.5 (5/32) 2 HORIZONTAL Align with the marked position. Aligner sur le repère. Alinee en la posición marcada f Unit: mm (in.) Unité : mm (po.) Unidad: mm ఊЗj㖝㖝 2 1 Inclined installation After installing the unit, align the dials with one of the marks so that the arrows are as vertical as possible. Installation inclinée Après avoir installé l'appareil, alignez les disques sur un repère de façon à ce que les flèches soient dans la position la plus verticale possible. d f f f 3 3 d f HORIZONTAL VERTICAL HORIZONTAL HORIZONTAL VERTICAL VERTICAL Note Be sure to align the left and right dials with the same mark. Remarque Veillez à aligner les disques gauche et droite sur le même repère. ൗ ̸e f Connections/Connexions/ ஹટ Connection diagram/Schéma de connexion/ટᇞྡ Sony BUS compatible car audio Autoradio compatible BUS Sony BUS AUDIO IN BUS CONTROL IN For details, refer to the Installation/Connections manual of the car audio. Pour plus de détails, consulter le manuel d'installation/connexions de l'autoradio. f 4 5 CDX-757MX Note For connecting two or more changers, the XA-C30 source selector (optional) is necessary. Remarque Pour raccorder deux ou plusieurs changeurs, le sélecteur de source XA-C30 (en option) est nécessaire. d f Inserting a disc/Insertion d'un disque 1 With the arrow side facing up Labeled surface up Avec la partie fléchée tournée vers le haut Etiquette vers le haut Tab Onglet ʃᑈ c 10 discs, one in each tray 10 disques, un par plateau d Note You cannot play 8cm (3 in.) CDs. Remarque Vous ne pouvez pas écouter de CD de 8 cm (3po.) sur ce lecteur. f Use the supplied disc magazine or the disc magazine XA-250.The disc magazine XA-10B/XA350 can not be used with this unit.If you use any other magazine,it may cause a malfunction. Utilisez le magasin à disques fourni ou un magasin à disques XA-250. Vous ne pouvez pas utiliser de magasin à disques XA-10B/XA-350 avec cet appareil. L'utilisation d'un autre type de magasin à disques risque de provoquer un dysfonctionnement. f f d f 2 Push to unlock the door Poussez pour déverrouiller la porte c Slide open Coulissez pour ouvrir ක Note To prevent injury, do not insert your hand in the CD changer. Remarque Pour éviter toute blessure, ne pas introduire la main dans le changeur de CD. ൗ d˸ԣෆf 3 Disc magazine Chargeur de disques ਨဿт 4 To remove Retrait ՟̈ Z (EJECT) Use the unit with the door closed completely Otherwise, foreign matter may enter the unit and contaminate the lenses inside the changer. Utilisez cet appareil avec la fenêtre complètement fermée Sinon, des corps étrangers pourraient pénétrer dans l'appareil et encrasser les lentilles dans le lecteur d f If the disc magazine does not lock properly Take out the magazine, and after pressing the Z (EJECT) button, re-insert it. Si vous ne pouvez pas fermer le chargeur de disques Sortez le chargeur et, après avoir appuyé sur la touche Z (EJECT), réinsérez-le. dܲɨ㕐Z f Note When a disc magazine is inserted into the CD changer or the reset button of the connected car audio is pressed, the unit will automatically be activated and read the information on the CDs. When the information on all the CDs in the disc magazine has been read, the unit will automatically stop operation. The unit firstly reads all of the disc information in the disc magazine. Depending on the recording method, it may take some time to stop the operation even if you set the ignition key to OFF during disc reading. This is not a malfunction. Remarque Quand un chargeur de disques est inséré dans le changeur de CD ou si la touche de réinitialisation de l'autoradio raccordé est enclenchée, l'appareil se met automatiquement en marche et reproduit les CD. Lorsque tous les CD du chargeur ont été reproduits, l'appareil s'arrête automatiqement. L'appareil commence par lire toutes les informations relatives au disque dans le chargeur de disque. Selon la méthode d'enregistrement, l'arrêt de l'opération peut demander quelques instants avant de s'arrêter si vous tournez la clé de contact sur OFF au cours de la lecture du disque. Il ne s'agit pas d'un dysfonctionnement. ൗ d f d f f d d d f d f Notes on the disc magazine •Do not leave the disc magazine in locations with high temperatures and high humidity such as on a car dashboard or in the rear window where the disc magazine will be subjected to direct sunlight. •Do not place more than one disc at a time onto one tray, otherwise the changer and the discs may be damaged. •Do not drop the disc magazine or subject it to a violent shock. Remarques sur le chargeur de disques •Ne pas laisser le chargeur de disques dans un endroit très chaud ou très humide comme sur le tableau de bord ou sur la plage arrière de la voiture où il serait en plein soleil. •Ne pas insérer plus d'un disque à la fois sur le plateau, sinon le changeur et les disques risquent d'être endommagés. •Ne pas laisser tomber le chargeur de disques ni le cogner. d৷᐀ٙή˙f f fщۆd f f When the tray comes out Normally, the trays will not come out of the magazine. However, if they are pulled out of the magazine, it is easy to re-insert them. Lorsque le plateau sort En principe, les plateaux ne sortent pas du chargeur. Toutefois, s'ils sortent du chargeur, il est facile de les réinsérer. d f d f With the cut-away portion of the tray facing you, insert the right corner of the tray in the slot, then push in the left corner until it clicks. Note Do not insert the tray upside down or in the wrong direction. Avec la portion découpée du plateau vous faisant face, insérer le coin droit du plateau dans la fente, puis enfoncer le coin gauche jusqu'au déclic. Remarque Ne pas insérer le plateau à l'envers ou dans le mauvais sens. d f d f
-
 1
1 -
 2
2 -
 3
3
 |
 |
