Sony CDX-GT360MP Operating Instructions
Sony CDX-GT360MP Manual
 |
View all Sony CDX-GT360MP manuals
Add to My Manuals
Save this manual to your list of manuals |
Sony CDX-GT360MP manual content summary:
- Sony CDX-GT360MP | Operating Instructions - Page 1
in the space provided below. Refer to these numbers whenever you call upon your Sony dealer regarding this product. Model No. Serial No. To cancel the demonstration (DEMO) display, see page 5. Pour annuler l'affichage de démonstration (DEMO), reportezvous à la page 4. CDX-GT360MP/CDX-GT260MP - Sony CDX-GT360MP | Operating Instructions - Page 2
perchlorate CDX-GT360MP only SiriusXM subscriptions and Satellite Radio Tuner module sold separately. www.siriusxm.com. Sirius, XM and all related marks and logos are trademarks of Sirius XM Radio Inc. and its subsidiaries. All other marks and logos are the property of their respective owners. All - Sony CDX-GT360MP | Operating Instructions - Page 3
excessive heat such as direct sunlight, fire or the like. Warning if your car's ignition has no ACC position Be sure to set the Auto Off function (page 12). The unit will shut off completely and automatically in the set time after the unit is turned off, which prevents battery drain. If you do - Sony CDX-GT360MP | Operating Instructions - Page 4
Radio 8 Storing and receiving stations 8 RDS 9 CD 10 Playing a disc 10 Playing tracks in various modes 10 Sound Settings and Setup Menu 11 Changing the sound settings 11 Adjusting setup items 12 Using optional equipment 13 Auxiliary audio equipment 13 SiriusXM tuner (CDX-GT360MP only 13 - Sony CDX-GT360MP | Operating Instructions - Page 5
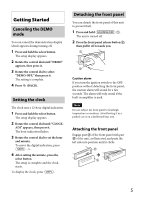
DEMO mode You can cancel the demonstration display which appears during turning off. 1 Press and hold the select button. The setup display appears. 2 Rotate the control dial until "DEMO" appears, then press it. 3 Rotate the control dial to select "DEMO-OFF," then press it. The setting parked car or - Sony CDX-GT360MP | Operating Instructions - Page 6
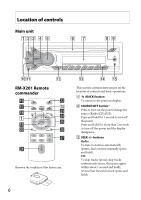
instructions on the location of controls and basic operations. (BACK) button To return to the previous display. SOURCE/OFF button*1 Press to turn on the power/change the source (Radio/CD +/- buttons Radio: To tune in stations automatically (press); find a station manually (press and hold). CD: To - Sony CDX-GT360MP | Operating Instructions - Page 7
(FM/AM). Front panel release button page 5 PTY/CAT*2 button (CDX-GT360MP) page 9, 13 To select PTY in RDS. PTY button (CDX-GT260MP) page 9 To select PTY in RDS. Number buttons Radio: To receive stored stations (press); store stations (press and hold). CD ALBUM / (during MP3/ WMA playback - Sony CDX-GT360MP | Operating Instructions - Page 8
press it. The unit stores stations in order of frequency on the number buttons. Storing manually 1 While receiving the station that you want to store, press and hold a number button ( to ) until "MEM" or "MEMORY" appears. Receiving the stored stations 1 Select the band, then press a number - Sony CDX-GT360MP | Operating Instructions - Page 9
COLLEGE (College), WEATHER (Weather) Note You may receive a different radio program from the one you select. Setting CT (Clock Time) The CT data from the RDS transmission sets the clock. 1 Set "CT-ON" in setup (page 12). Note The CT function may not work properly even though an RDS station is being - Sony CDX-GT360MP | Operating Instructions - Page 10
) and CD-R/CD-RW (MP3/ WMA files (page 15)). 1 Insert the disc (label side up). Playback starts automatically. To eject the disc, press . Changing display items Displayed items may differ depending on the model, disc type, recording format and settings. Press Playing tracks in various modes You - Sony CDX-GT360MP | Operating Instructions - Page 11
selected item, then press it. The volume level is adjustable in 1 dB steps, from -10 dB to +10 dB. Example: CDX-GT360MP Repeat steps 2 and 3 to adjust the equalizer curve. To restore the factory-set equalizer curve, press and hold the select button before the setting is complete. 5 Press (BACK). 11 - Sony CDX-GT360MP | Operating Instructions - Page 12
SUB-OUT" (subwoofer). DEMO (Demonstration) Activates the demonstration: "ON," "OFF." 12 DIMMER Changes the display brightness: "ON," "OFF." M.DISPLAY (Motion Display) CDX-GT360MP - "SA": to show moving patterns and spectrum analyzer. - "OFF": to deactivate the Motion Display. CDX-GT260MP - "ON": to - Sony CDX-GT360MP | Operating Instructions - Page 13
the input level (page 11). SiriusXM tuner (CDXGT360MP only) By connecting an optional SiriusXM tuner, you can use the features and functions of the SiriusXM satellite radio (Sirius and XM subscriptions sold separately). For more details on the services, visit the following web site: http://www - Sony CDX-GT360MP | Operating Instructions - Page 14
passcode 1 On the set up menu (page 12 sunlight or heat sources such as hot air ducts, nor leave it in a car parked in direct sunlight. • Before playing, wipe the discs with a cleaning play back discs that conform to the Compact Disc (CD) standard. DualDiscs and some of the music discs encoded with - Sony CDX-GT360MP | Operating Instructions - Page 15
elapsed playing time may not display accurately. * only for 64 kbps Note Playback of the following WMA files is not supported. - lossless compression - copyright-protected If you have any questions or problems concerning your unit that are not covered in this manual, consult your nearest Sony dealer - Sony CDX-GT360MP | Operating Instructions - Page 16
when installing the Ohms) Tuner section FM Tuning range stereo) Separation: 50 dB at 1 kHz Frequency response: 20 - 15,000 Hz AM Tuning range: 530 - 1,710 kHz Antenna (aerial) terminal: External antenna (aerial) connector Intermediate frequency: 9,115 kHz or 9,125 kHz/5 kHz Sensitivity: 26 μV CD - Sony CDX-GT360MP | Operating Instructions - Page 17
in) (w/h/d) Mounting dimensions: Approx. 182 × 53 × 162 mm (7 1/4 × 2 1/8 × 6 1/2 in) (w/h/d) Mass: Approx. 1.2 kg (2 lb 11 oz) Supplied accessories: Remote commander: RM-X201 Parts for installation and connections (1 set) Optional accessories/equipment: for CDX-GT360MP SiriusXM tuner: SXV100 Your - Sony CDX-GT360MP | Operating Instructions - Page 18
/CD-RWs are not for audio use (page 15). MP3/WMA files cannot be played back. The disc is incompatible with the MP3/WMA format and version (page 15). MP3/WMA files take longer to play back than others. The following discs take a longer time to start playback. - a disc recorded with a complicated - Sony CDX-GT360MP | Operating Instructions - Page 19
displayed with the unit. For SiriusXM (CDX-GT360MP only): CH LOCKD (Channel Locked) button. If these solutions do not help improve the situation, consult your nearest Sony dealer. If you take the unit to be repaired because of CD playback trouble, bring the disc that was used at the time the problem - Sony CDX-GT360MP | Operating Instructions - Page 20
au manuel d'installation et de raccordement fourni. ATTENTION L'utilisation d'instruments optiques avec ce produit augmente les risques pour les yeux. CDX-GT360MP uniquement Les abonnements SiriusXM et le module de syntoniseur radio satellite sont vendus séparément. www.siriusxm.com. Sirius, XM et - Sony CDX-GT360MP | Operating Instructions - Page 21
9 CD 10 Lecture d'un disque 10 Lecture des plages dans divers modes 11 Réglages du son et menu de configuration 11 Changement des réglages du son 11 Réglage des paramètres de configuration 12 Utilisation d'un appareil en option 14 Appareil audio auxiliaire 14 Récepteur SiriusXM (CDX-GT360MP - Sony CDX-GT360MP | Operating Instructions - Page 22
mode DEMO Vous pouvez désactiver l'affichage de démonstration qui apparaît lors de l'arrêt de l'appareil. 1 Appuyez sur la touche de sélection et maintenez-la enfoncée. L'écran de configuration apparaît. 2 Tournez la molette de réglage jusqu'à ce que « DEMO jusqu'à ce que « CLOCK-ADJ » apparaisse, - Sony CDX-GT360MP | Operating Instructions - Page 23
et maintenez-la enfoncée. L'appareil s'éteint. 2 Appuyez sur la touche de déverrouillage de la façade , puis sortez la façade en tirant vers vous. 1 Installation de la façade Insérez la partie de la façade dans la partie de l'appareil, tel qu'illustré, puis poussez sur le côté gauche - Sony CDX-GT360MP | Operating Instructions - Page 24
de protection avant l'utilisation. 6 Cette section contient les instructions relatives à l'emplacement des commandes et aux opérations de SOURCE/OFF*1 Appuyez pour mettre l'appareil en marche/changer la source (Radio/CD/ AUX). Appuyez et maintenez enfoncée pendant 1 seconde pour éteindre l'appareil - Sony CDX-GT360MP | Operating Instructions - Page 25
mode RDS. Touche PTY (CDX-GT260MP) page 9 Permet de sélectionner PTY en mode RDS. Touches numériques Radio : Permettent de capter les stations enregistrées (appuyez) ; de mémoriser des stations (appuyez sur la touche et maintenez-la enfoncée). CD ALBUM / (pendant la lecture de fichiers MP3/WMA - Sony CDX-GT360MP | Operating Instructions - Page 26
vous appuyez sur vous pouvez commuter la bande du récepteur SiriusXM (CDX-GT360MP uniquement). *2 Lorsqu'un récepteur SiriusXM est raccordé. *3 Cette automatique - BTM 1 Appuyez plusieurs fois sur jusqu'à ce que « TUNER » apparaisse. Pour changer de bande, appuyez plusieurs fois sur Vous pouvez - Sony CDX-GT360MP | Operating Instructions - Page 27
précision (syntonisation manuelle). RDS Les stations de radio FM dotées des services RDS (Système de radiocommunication de données) transmettent la région, certaines fonctions RDS peuvent ne pas être accessibles. • Le service RDS ne fonctionnera pas si le signal est trop faible ou si la station - Sony CDX-GT360MP | Operating Instructions - Page 28
CT peut ne pas fonctionner correctement même si une station RDS est captée. CD Lecture d'un disque Cet appareil peut lire des CD-DA (y compris ceux qui contiennent des informations CD TEXT) et des CD-R/ CD-RW (fichiers MP3/WMA (page 16)). 1 Insérez le disque (côté imprimé vers le haut). La lecture - Sony CDX-GT360MP | Operating Instructions - Page 29
plusieurs fois sur (REP) ou (SHUF) jusqu'à ce que le mode de lecture souhaité apparaisse. Lecture répétée Sélectionnez TRACK ALBUM* OFF Pour lire ordre normal (Lecture normale). * Lors de la lecture d'un fichier MP3/WMA. Réglages du son et menu de configuration Changement des réglages du - Sony CDX-GT360MP | Operating Instructions - Page 30
par incréments de 1 dB, de -10 dB à +10 dB. Exemple : CDX-GT360MP Répétez les étapes 2 et 3 pour régler la courbe de l'égaliseur. Pour pas nécessaire pour les réglages CLOCK-ADJ et BTM. Les paramètres suivants peuvent être réglés, selon la source et le réglage : CLOCK-ADJ (Réglage de l'horloge) ( - Sony CDX-GT360MP | Operating Instructions - Page 31
de puissance), « SUB-OUT » (caisson de graves). DEMO (Démonstration) Permet d'activer la démonstration : « ON », « OFF ». DIMMER Permet de modifier la luminosité de la fenêtre d'affichage : « ON », « OFF ». M.DISPLAY (Affichage animé) CDX-GT360MP - « SA » : pour afficher les motifs animés et - Sony CDX-GT360MP | Operating Instructions - Page 32
(page 12). Récepteur SiriusXM (CDXGT360MP uniquement) En raccordant un récepteur SiriusXM en option, vous pouvez utiliser les fonctionnalités et fonctions de la radio satellite SiriusXM (abonnements Sirius et XM vendus séparément). Pour plus de détails sur les services, visitez le site Web suivant - Sony CDX-GT360MP | Operating Instructions - Page 33
soleil, laissez l'appareil refroidir avant de l'utiliser. • Ne laissez pas la façade ou les appareils audio à l'intérieur du véhicule car la température élevée résultant du rayonnement direct du soleil pourrait causer un problème de fonctionnement. • L'antenne électrique se déploie automatiquement - Sony CDX-GT360MP | Operating Instructions - Page 34
autres que ceux enregistrés au format CD audio ou MP3 conformément à la norme ISO9660 niveau 1/niveau 2, Joliet/ Romeo ou multisession. 16 Ordre de lecture des fichiers MP3/WMA MP3/WMA Dossier (album) Fichier MP3/ WMA (plage) À propos des fichiers MP3 • MP3, qui est l'abréviation de MPEG-1 Audio - Sony CDX-GT360MP | Operating Instructions - Page 35
CD audio à environ 1/22e* de leur taille d'origine. • L'étiquette WMA compte 63 caractères. • Lorsque vous nommez un fichier WMA, veillez à ajouter l'extension « .wma ce mode d'emploi, contactez votre détaillant Sony. installation de la pile. • Ne tenez pas la pile avec des pinces métalliques, car - Sony CDX-GT360MP | Operating Instructions - Page 36
Lecteur CD Rapport Dimensions de montage : Environ 182 × 53 × 162 mm (7 1/4 × 2 1/8 × 6 1/2 po) (l/h/p) Poids : Environ 1,2 kg (2 lb 11 oz) Accessoires fournis : Télécommande : RM-X201 Composants destinés à l'installation et aux raccordements (1 jeu) Accessoires/appareils en option : pour CDX-GT360MP - Sony CDX-GT360MP | Operating Instructions - Page 37
de l'appareil du tableau de bord, reportez-vous au manuel d'installation/ raccordement fourni avec cet appareil. Généralités L'appareil n'est pas minutes alors que le réglage « DEMO-ON » est sélectionné, l'écran du mode de démonstration apparaît. - Sélectionnez le réglage « DEMO-OFF » (page 13). L' - Sony CDX-GT360MP | Operating Instructions - Page 38
CD-R/CD-RW ne sont pas destinés à un usage audio (page 16). Impossible de lire des fichiers MP3/WMA. Le disque n'est pas compatible avec le format et la version MP3/WMA (page 16). 20 Certains fichiers MP3/WMA ée. Le son est saccadé. L'installation est incorrecte. - Installez l'appareil suivant - Sony CDX-GT360MP | Operating Instructions - Page 39
d'installation/ Insérez un CD audio dans cet votre détaillant Sony le plus mode de retour ou d'avance rapide, vous avez atteint le début ou la fin du disque et vous ne pouvez pas aller plus loin. «» Le caractère ne peut pas être affiché sur l'appareil. Pour SiriusXM (CDX-GT360MP Le service est - Sony CDX-GT360MP | Operating Instructions - Page 40
If you have any questions/problems regarding this product, try the following: 1 Read Troubleshooting in these Operating Instructions. 2 Please contact (U.S.A. only); Call 1-800-222-7669 URL http://www.SONY.com http://www.sony.net/ ©2011 Sony Corporation Printed in Thailand
-
 1
1 -
 2
2 -
 3
3 -
 4
4 -
 5
5 -
 6
6 -
 7
7 -
8
-
9
-
10
-
11
-
12
-
13
-
14
-
15
-
16
-
17
-
18
-
19
-
20
-
21
-
22
-
23
-
24
-
25
-
26
-
27
-
28
-
29
-
30
-
31
-
32
-
33
-
34
-
35
-
36
-
37
-
38
-
39
-
40
 |
 |
4-284-509-
12
(1)
CDX-GT360MP/CDX-GT260MP
FM/AM
Compact Disc
Player
Owner’s Record
The model and serial numbers are located on the bottom of the unit.
Record the serial number in the space provided below.
Refer to these numbers whenever you call upon your Sony dealer
regarding this product.
Model No.
Serial No.
To cancel the demonstration (DEMO) display, see page 5.
Pour annuler l’affichage de démonstration (DEMO), reportez-
vous à la page 4.
Operating Instructions
US
Mode d’emploi
FR