Sony CDX-GT41UW Operating Instructions
Sony CDX-GT41UW - Usb Receiver Manual
 |
View all Sony CDX-GT41UW manuals
Add to My Manuals
Save this manual to your list of manuals |
Sony CDX-GT41UW manual content summary:
- Sony CDX-GT41UW | Operating Instructions - Page 1
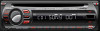
below. Refer to these numbers whenever you call upon your Sony dealer regarding this product. Model No. Serial No. To cancel the demonstration (DEMO) display, see page 11. Pour annuler l'affichage de démonstration (DEMO), reportez-vous à la page 11. CDX-GT410U CDX-GT41UW © 2006 Sony Corporation - Sony CDX-GT41UW | Operating Instructions - Page 2
in accordance with the instructions, may cause harmful the equipment off and on, the user is encouraged to try to correct the modifications not expressly approved in this manual could void your authority to separately). Please see your nearest authorized Sony dealer for details on the satellite radio - Sony CDX-GT41UW | Operating Instructions - Page 3
and shuffle play 8 Radio Storing and receiving stations 8 Storing automatically - BTM 8 Storing manually 8 Receiving the stored stations 8 Tuning automatically 9 USB devices Playback USB devices 9 15 Removing the unit 16 Specifications 16 Troubleshooting 17 Error displays/Messages 18 3 - Sony CDX-GT41UW | Operating Instructions - Page 4
Device) can be connected to the front USB terminal. For details on a usable devices, please refer to About USB devices (page 14) or the Sony support website (page 19). - Portable audio device: An AUX input jack on the front of the unit allows connection of a portable audio device (analog connection - Sony CDX-GT41UW | Operating Instructions - Page 5
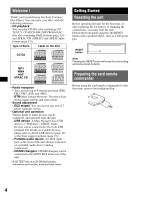
Setting the clock The clock uses a 12-hour digital indication. 1 Press and hold the select button. The setup display appears. 2 Press the select button repeatedly until "CLOCK-ADJ" appears. 3 Press (SEEK) +. The hour indication flashes. 4 Rotate the volume control dial to set the hour and minute. To - Sony CDX-GT41UW | Operating Instructions - Page 6
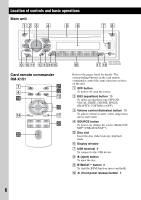
DSPL 1 2 3 4 5 6 SCRL AUX 9 q; qa qs qdqfqg qh CDX-GT410U qj qk CDX-GT41UW Card remote commander RM-X151 1 4 ql qf OFF ATT SOURCE SEL MODE + the source. B EQ3 (equalizer) button 10 To select an equalizer type (XPLOD, VOCAL, EDGE, CRUISE, SPACE, GRAVITY, CUSTOM or OFF). C Volume - Sony CDX-GT41UW | Operating Instructions - Page 7
press again within about 1 second and hold); reverse/fastforward a track (press and hold). Radio: To tune in stations automatically (press); find a station manually (press and hold). L Receptor for the card remote commander M MODE button 8, 10, 12 To select the radio band (FM/AM); select the SAT - Sony CDX-GT41UW | Operating Instructions - Page 8
1 above, press and hold the select button. The setup display appears. 2 Press the select button repeatedly until "BTM" appears. 3 Press (SEEK) +. Storing manually 1 While receiving the station that you want to store, press and hold a number button ((1) to (6)) until "MEM" appears. The number button - Sony CDX-GT41UW | Operating Instructions - Page 9
to listen to, press and hold (SEEK) -/+ to locate the approximate frequency, then press (SEEK) -/+ repeatedly to fine adjust to the desired frequency (manual tuning). USB devices Playback USB devices 1 Connect the USB device to the USB terminal. Playback starts. If a USB device is already connected - Sony CDX-GT41UW | Operating Instructions - Page 10
Listening to music on a Mass Storage Class type audio device Repeat and shuffle play 1 During playback, press (3) (REP) or (4) (SHUF) repeatedly until the desired setting appears. Select TRACK ALBUM SHUF ALBUM SHUF DEVICE To play track repeatedly. album repeatedly. album in random order. device - Sony CDX-GT41UW | Operating Instructions - Page 11
With the card remote commander In step 3, to adjust the selected item, press - Sony CDX-GT41UW | Operating Instructions - Page 12
AUX AUX Connecting cord* (not supplied) * Be sure to use a straight type plug. Adjust the volume level Be sure to adjust the volume for each connected audio device before playback. 1 Turn down the volume on the unit. 2 Press (SOURCE) repeatedly until "AUX" appears. "AUX FRONT IN" appears. 3 Start - Sony CDX-GT41UW | Operating Instructions - Page 13
Additional Information Precautions • If your car has been parked in direct sunlight, allow the unit to cool off before operating it. • Power antenna (aerial) will extend automatically while the unit is operating. Moisture condensation On a rainy day or in a very damp area, moisture condensation may - Sony CDX-GT41UW | Operating Instructions - Page 14
a USB HUB, and is not compatible with devices that have a HUB function. For details on the compatibility of your USB device, visit the Sony support website (page 19). • Corresponding codec is different according to device type. - Mass Storage Class: MP3/WMA/AAC - ATRAC Audio Device: ATRAC/MP3/WMA - Sony CDX-GT41UW | Operating Instructions - Page 15
or problems concerning your unit that are not covered in this manual, consult your nearest Sony dealer. Maintenance Replacing the lithium battery of the card remote commander Under normal conditions, the battery will last approximately 1 year. (The service - Sony CDX-GT41UW | Operating Instructions - Page 16
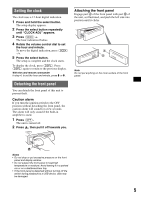
Removing the unit 1 Remove the protection collar. 1 Detach the front panel (page 5). 2 Engage the release keys together with the protection collar. Orient the release keys as shown. 3 Pull out the release keys to remove the protection collar. 2 Remove the unit. continue to next page t 1 Insert both - Sony CDX-GT41UW | Operating Instructions - Page 17
printed wiring boards. • Halogenated flame retardants are not used in cabinets. • Cushions made from paper. • VOC (Volatile Organic Compound)-free vegetable oil based ink is used for printing the carton. (CDX-GT41UW only) Troubleshooting The following checklist will help you remedy problems you - Sony CDX-GT41UW | Operating Instructions - Page 18
inserted. • The disc cannot play due to a problem. t Insert another disc. • USB device was amplifiers is incorrect. t See the installation guide manual of this model to check the connection HUB or devices that have a HUB function are not supported on this unit. LOAD The changer is loading the disc - Sony CDX-GT41UW | Operating Instructions - Page 19
the unit to be repaired because of CD playback trouble, bring the disc that was used at the time the problem began. Support site If you have any questions or for the latest support information on this product, please visit the web site below: http://esupport.sony.com http://www.sony.com/xplod 19 - Sony CDX-GT41UW | Operating Instructions - Page 20
contact. Le logo « SAT Radio Ready » indique que ce produit commande un module tuner radio satellite (vendu séparément). Consultez votre détaillant agréé Sony le plus proche pour en savoir plus sur le fonctionnement du module tuner radio satellite. « SAT Radio », « SAT Radio Ready », les logos SAT - Sony CDX-GT41UW | Operating Instructions - Page 21
Table des matières Félicitations 4 Préparation Réinitialisation de l'appareil 4 Préparation de la mini-télécommande 4 Réglage de l'horloge 5 Retrait de la façade 5 Installation de la façade 5 Emplacement des commandes et opérations de base Appareil principal 6 Mini-télécommande RM-X151 6 CD - Sony CDX-GT41UW | Operating Instructions - Page 22
). - Changeurs CD/MD : les changeurs CD/ MD peuvent être raccordés au SONY BUS à l'arrière de l'appareil. * Un disque CD TEXT est un CD des plages. Préparation Réinitialisation de l'appareil Avant la première mise en service de l'appareil, après avoir remplacé la batterie du véhicule ou modifié les - Sony CDX-GT41UW | Operating Instructions - Page 23
Réglage de l'horloge L'horloge numérique fonctionne suivant un cycle de 12 heures. 1 Appuyez sur la touche de sélection et maintenez-la enfoncée. L'écran de configuration apparaît. 2 Appuyez plusieurs fois sur la touche de sélection jusqu'à ce que « CLOCKADJ » apparaisse. 3 Appuyez sur (SEEK) +. L' - Sony CDX-GT41UW | Operating Instructions - Page 24
DSPL 1 2 3 4 5 6 SCRL AUX 9 q; qa qs qdqfqg qh CDX-GT410U qj qk CDX-GT41UW Mini-télécommande RM-X151 1 4 ql qf OFF ATT SOURCE SEL MODE + - source. B Touche EQ3 (égaliseur) 10 Sélection d'un type d'égaliseur (XPLOD, VOCAL, EDGE, CRUISE, SPACE, GRAVITY, CUSTOM ou OFF). C Molette - Sony CDX-GT41UW | Operating Instructions - Page 25
K Touches SEEK -/+ CD/MD*1/USB*3 : Saut de plages (appuyez) ; saut de plages en continu (appuyez, puis appuyez de nouveau sur la touche dans un délai d'environ 1 seconde et maintenez-la enfoncée) ; retour/ avance rapide dans une plage (appuyez sur la touche et maintenez-la enfoncée). Radio : Réglage - Sony CDX-GT41UW | Operating Instructions - Page 26
CD Pour plus de détails sur la sélection d'un changeur CD/MD, reportez-vous à la page 12. Rubriques d'affichage A Indication AAC/WMA/ATRAC/MP3 B Source C Numéro de plage/temps de lecture écoulé, nom du disque/de l'artiste, numéro d'album/ de groupe*, nom d'album/de groupe, nom de plage, - Sony CDX-GT41UW | Operating Instructions - Page 27
Réception des stations mémorisées 1 Sélectionnez la bande, puis appuyez sur une touche numérique ((1) à (6)). Syntonisation automatique 1 Sélectionnez la bande, puis appuyez sur (SEEK) -/+ pour rechercher la station. Le balayage s'interrompt lorsque l'appareil capte une station. Répétez cette procé - Sony CDX-GT41UW | Operating Instructions - Page 28
Écoute de musique sur un périphérique audio de stockage de masse Lecture répétée et lecture aléatoire 1 En cours de lecture, appuyez sur (3) (REP) ou sur (4) (SHUF) de façon répétée jusqu'à ce que le réglage de votre choix apparaisse. Sélectionnez TRACK Pour lire une plage en boucle. ALBUM un - Sony CDX-GT41UW | Operating Instructions - Page 29
Répétez les étapes 2 et 3 pour régler la courbe de l'égaliseur. Pour restaurer la courbe de l'égaliseur par défaut, appuyez sur la touche de sélection et maintenez-la enfoncée avant la fin du réglage. Après 3 secondes, le réglage est terminé et l'écran d'affichage revient en mode de lecture/ré - Sony CDX-GT41UW | Operating Instructions - Page 30
Utilisation d'un équipement en option Appareils audio auxiliaires En raccordant un appareil audio portatif en option à la prise d'entrée AUX (mini-prise stéréo) de l'appareil, puis en sélectionnant simplement la source, vous pouvez écouter le son par l'intermédiaire des haut-parleurs de votre - Sony CDX-GT41UW | Operating Instructions - Page 31
Informations complémentaires Précautions • Si votre véhicule est resté stationné en plein soleil, laissez refroidir l'appareil avant de l'utiliser. • L'antenne électrique se déploie automatiquement lorsque l'appareil fonctionne. Condensation Par temps de pluie ou dans des régions très humides, de la - Sony CDX-GT41UW | Operating Instructions - Page 32
riphériques dotés d'une fonction de HUB. Pour plus de détails sur la compatibilité de votre périphérique USB, visitez le site Web d'assistance de Sony (page 20). • Le codec correspondant dépend du type de périphérique. - Stockage de masse : MP3/WMA/AAC - Périphérique audio ATRAC : ATRAC/MP3/ WMA/AAC - Sony CDX-GT41UW | Operating Instructions - Page 33
. Si vous avez des questions ou des problèmes concernant cet appareil qui ne sont pas abordés dans ce mode d'emploi, communiquez avec votre détaillant Sony. 2c 1 Remarques sur la pile au lithium • Tenez la pile au lithium hors de portée des enfants. En cas d'ingestion de la pile, consultez imm - Sony CDX-GT41UW | Operating Instructions - Page 34
pour retirer le tour de protection. 16 2 Tirez sur les clés de déblocage pour dégager l'appareil. 3 Faites glisser l'appareil en dehors de son support. Caractéristiques techniques Lecteur CD Rapport signal/bruit : 120 dB Réponse en fréquence : 10 à 20 000 Hz Pleurage et scintillement : en dessous - Sony CDX-GT41UW | Operating Instructions - Page 35
XPLOD) Aigus : ±10 dB à 10 kHz (XPLOD) Alimentation requise : batterie de voiture 12 V CC (masse négative) Dimensions : environ 178 × 50 × 179 mm (7 1/8 × 2 × 7 1/8 po) (l/h/p) Dimensions du support tale sans COV (composés organiques volatils). (CDX-GT41UW uniquement) Dépannage La liste de contrôle - Sony CDX-GT41UW | Operating Instructions - Page 36
Les stations mémorisées sont effacées et l'heure est remise à zéro. Le fusible a fondu. Émission de bruits lorsque la position de la clé de contact est modifiée. Les câbles ne sont pas raccordés correctement au connecteur d'alimentation du véhicule destiné aux accessoires. L'affichage disparaît de - Sony CDX-GT41UW | Operating Instructions - Page 37
haut-parleurs ou des amplificateurs est incorrect. t Reportez-vous au guide d'installation de cet appareil et vérifiez le raccordement. FAILURE ( le message d'erreur ne disparaît pas de l'affichage, contactez votre détaillant Sony le plus proche. OVERLOAD Le périphérique USB est saturé. t Débranchez - Sony CDX-GT41UW | Operating Instructions - Page 38
s'affiche à l'écran. Si ces solutions ne permettent pas d'améliorer la situation, contactez votre détaillant Sony le plus proche. Si vous portez l'appareil à réparer en raison d'un problème de lecture de CD , visitez les sites Web suivants : http://esupport.sony.com http://www.sony.com/xplod 20 - Sony CDX-GT41UW | Operating Instructions - Page 39
- Sony CDX-GT41UW | Operating Instructions - Page 40
If you have any questions/problems regarding this product, try the following: 1 Read Troubleshooting in these Operating Instructions. 2 Reset the unit. Note: Stored data may be erased. 3 Please contact (U.S.A. only); Call 1-800-222-7669 URL http://www.SONY.com Support site If you have any questions
-
 1
1 -
 2
2 -
 3
3 -
 4
4 -
 5
5 -
 6
6 -
 7
7 -
8
-
9
-
10
-
11
-
12
-
13
-
14
-
15
-
16
-
17
-
18
-
19
-
20
-
21
-
22
-
23
-
24
-
25
-
26
-
27
-
28
-
29
-
30
-
31
-
32
-
33
-
34
-
35
-
36
-
37
-
38
-
39
-
40
 |
 |
© 2006 Sony Corporation
Owner’s Record
The model and serial numbers are located on the bottom of the unit.
Record these numbers in the space provided below.
Refer to these numbers whenever you call upon your Sony dealer regarding this product.
Model No.
Serial No.
CDX-GT410U
CDX-GT41UW
To cancel the demonstration (DEMO) display, see page 11.
Pour annuler l’affichage de démonstration (DEMO), reportez-vous à la page 11.
Operating Instructions
Mode d’emploi
2-890-967-
21
(1)
US
FR
FM
/
AM
Compact Disc Player