Sony CX777ES Operating Instructions (DVD Player DVPCX777ES) - Page 78
Adjusting the brightness of, selected areas Gamma, Correction, items in MEMORY, press
 |
UPC - 027242621046
View all Sony CX777ES manuals
Add to My Manuals
Save this manual to your list of manuals |
Page 78 highlights
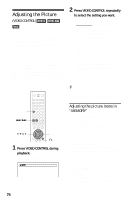
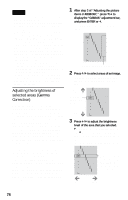
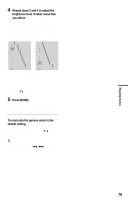
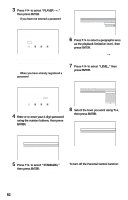
Notes • If the outlines of images on your screen become blurred, set "BNR" to "OFF." • Depending on the disc or the scene being played, the "BNR," "Y NR," or "C NR" effect may be hard to discern. • Depending on the disc or the scene being played, noise found in the disc may become more apparent. If this happens, it is recommended that you use the BNR function with the DVE function. If the condition still does not improve, reduce the DVE level, or select "SOFT" (DVD only). • Some DVDs contain both video based and film based sections. For example, a DVD may contain a movie taken on film, and a "Making of" sequence taken on video. • If the progressive format image becomes unclear or unnatural when "MEMORY" is set to "PROGRESSIVE 1" or "PROGRESSIVE 2," try viewing with "PROGRESSIVE 1" set to "VIDEO." If this does not improve the picture, view the images in Interlace format through the COMPONENT VIDEO OUT jacks (page 90), or switch to another jack. Adjusting the brightness of selected areas (Gamma Correction) Depending on your TV or viewing environment, images on the screen may lose definition when a certain area of the image is so light that it appears washed out, or so dark that it blends into the surrounding dark areas. By correcting the Gamma value, you can adjust the brightness of selected areas to get a clearer image. While the "BRIGHTNESS" adjustment controls the brightness of the entire image, the "GAMMA" adjustment is useful when only some portions of the image need adjusting. Example: You are watching a movie that is rich in shadows and you want to see the hidden details of the scenery. If you use the "BRIGHTNESS" adjustment, the entire image will become brighter, losing definition in the areas that were initially bright. The "GAMMA" adjustment enables you to select the dark part and gradually increase its brightness without sacrificing the overall definition. 1 After step 3 of "Adjusting the picture items in MEMORY," press X/x to display the "GAMMA" adjustment bar, and press ENTER or c. The "GAMMA" adjustment display appears. 0% 32 64 1: ENGLISH 96 5O0FF 128 1: ENGLISH 160 2: FRENCH 192 3: SPANISH 224 100 RESET Current Gamma setup value 2 Press X/x to select areas of an image. The upper region adjusts the dark areas and the lower region adjusts the light areas. Dark areas Selected areas of an image Light areas 0% 32 64 1: ENGLISH 96 5O0FF 128 1: ENGLISH 160 2: FRENCH 192 3: SPANISH 224 100 RESET 3 Press C/c to adjust the brightness level of the area that you selected. C decreases the level (darkens the area), and c increases the level (lightens the area). The level can be adjusted between 16 and 235. The level for the dark areas can never be greater than the light areas. 0% 32 64 1: ENGLISH 120 5O0FF 128 1: ENGLISH 160 2: FRENCH 192 3: SPANISH 224 100 RESET Gamma value and the position of the bar change in accordance with your adjustment Darken Lighten 78
-
 1
1 -
2
-
3
-
4
-
5
-
6
-
7
-
8
-
9
-
10
-
11
-
12
-
13
-
14
-
15
-
16
-
17
-
18
-
19
-
20
-
21
-
22
-
23
-
24
-
25
-
26
-
27
-
28
-
29
-
30
-
31
-
32
-
33
-
34
-
35
-
36
-
37
-
38
-
39
-
40
-
41
-
42
-
43
-
44
-
45
-
46
-
47
-
48
-
49
-
50
-
51
-
52
-
53
-
54
-
55
-
56
-
57
-
58
-
59
-
60
-
61
-
62
-
63
-
64
-
65
-
66
-
67
-
68
-
69
-
70
-
71
-
72
-
 73
73 -
 74
74 -
 75
75 -
 76
76 -
 77
77 -
 78
78 -
 79
79 -
 80
80 -
 81
81 -
 82
82 -
 83
83 -
84
-
85
-
86
-
87
-
88
-
89
-
90
-
91
-
92
-
93
-
94
-
95
-
96
-
97
-
98
-
99
-
100
-
101
-
102
-
103
-
104
-
105
-
106
-
107
-
108
 |
 |
