Sony DAV-DZ170 Quick Setup Guide - Page 2
Performing the Quick Setup/Exécution de l'Installation rapide
 |
UPC - 027242781672
View all Sony DAV-DZ170 manuals
Add to My Manuals
Save this manual to your list of manuals |
Page 2 highlights
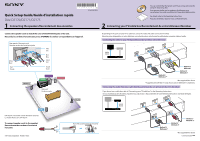
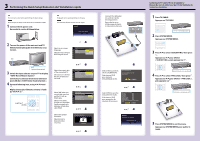
3 Performing the Quick Setup/Exécution de l'Installation rapide Note Do not insert a disc before performing the Quick Setup. Remarque N'insérez pas de disque avant d'exécuter l'Installation rapide. 1 Connect the AC power cord. Raccordez le cordon d'alimentation. Note Displayed items vary depending on the area. Remarque Les éléments affichés varient selon la région. Home Theatre System FRONT R FROSNPTELAKSEUBRWSOOFER CENTER 2 Turn on the power of the main unit and TV. Mettez l'unité principale et le téléviseur sous tension. / / (power/alimentation) 3 Switch the input selector on your TV to display "SONY Home Theatre System." Commutez le sélecteur d'entrée du téléviseur pour afficher « SONY Home Theatre System ». 4 Set each following item, using and . Réglez chacun des éléments suivants à l'aide de et . ENTER) Select an on-screen language. Sélectionnez la langue d'affichage à l'écran. LANGUAGE SETUP OSD: MENU: AUDIO: SUBTITLE: ENGLISH ENGLISH FRENCH SPANISH PORTUGUESE Select the aspect ratio of the connected TV. Sélectionnez le format d'écran du téléviseur raccordé. /, VIDEO SETUP TV TYPE: 16:9 PROGRESSIVE (COMPONENT OUT): 16:9 4:3 OUTPUT: 4:3 LETTER BOX BLACK LEVEL: 4:3 PAN SCAN BLACK LEVEL (COMPONENT OUT): OFF PAUSE MODE: AUTO /, Select [ON] when you connect the main unit and the TV with an HDMI cable. Sélectionnez [OUI] lorsque vous raccordez l'unité principale et le téléviseur à l'aide d'un câble HDMI. HDMI SETUP HDMI RESOLUTION: CONTROL FOR HDMI: VOLUME LIMIT: YCBCR/RGB(HDMI): AUDIO(HDMI): JPEG RESOLUTION: AUTO(1920x1080p) ON ON OFF OFF SD /, Select the speaker formation. Sélectionnez la disposition des enceintes. SPEAKER FORMATION STANDARD /, Connect the calibration mic and set it at the listening position. Raccordez le micro d'étalonnage et placezle à la position d'écoute. A.CAL MIC AUDIO IN Select [YES] to perform [AUTO CALIBRATION]. Sélectionnez [OUI] pour exécuter [ETALONNAGE AUTO]. AUTO CALIBRATION Connect calibration mic. Start measurement? YES NO /, Select [YES] to save the measurement results. Sélectionnez [OUI] pour enregistrer les résultats de la mesure. Measurement complete. FRONT L : YES FRONT R : YES CENTER : YES SUBWOOFER : YES SURROUND L : YES SURROUND R : YES If OK, unplug calibration mic and select "YES". YES NO /, QUICK SETUP is complete. Home Theatre System Listening to TV sound from all speakers/ Ecoute du son du téléviseur par l'intermédiaire de toutes les enceintes 1 Press TV/CABLE. Appuyez sur TV/CABLE. 2 Press SYSTEM MENU. Appuyez sur SYSTEM MENU. 3 Press / to select "SUR.SETTING," then press . Appuyez sur / pour afficher « SUR.SETTING », puis appuyez sur . 4 Press / to select "PRO LOGIC," then press . Appuyez sur / pour afficher « PRO LOGIC », puis appuyez sur . 5 Press SYSTEM MENU to exit the menu. Appuyez sur SYSTEM MENU pour quitter le menu.
-
 1
1 -
 2
2
 |
 |