Sony DAV-DZ175 Quick Setup Guide - Page 2
Performing the Quick Setup/Realización del ajuste rápido
 |
View all Sony DAV-DZ175 manuals
Add to My Manuals
Save this manual to your list of manuals |
Page 2 highlights
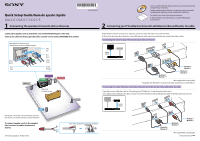
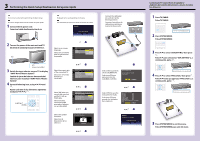
3 Performing the Quick Setup/Realización del ajuste rápido Note Do not insert a disc before performing the Quick Setup. Nota No inserte ningún disco antes de realizar el ajuste rápido. 1 Connect the AC power cord. Conecte el cable de alimentación de ca. Note Displayed items vary depending on the area. Nota Los elementos que aparecen varían en función de la zona. Home Theatre System FRONT R FROSNPTELAKSEUBRWSOOFER CENTER 2 Turn on the power of the main unit and TV. Encienda la unidad principal y el televisor. / Select an on-screen language. Seleccione un idioma para las indicaciones en pantalla. LANGUAGE SETUP OSD: MENU: AUDIO: SUBTITLE: ENGLISH ENGLISH FRENCH SPANISH PORTUGUESE / (power/encendido) 3 Switch the input selector on your TV to display "SONY Home Theatre System." Cambie el ajuste del selector de entrada del televisor para visualizar "SONY Home Theatre System". 4 Set each following item, using and . Ajuste cada uno de los elementos siguientes mediante y . ENTER) Select the aspect ratio of the connected TV. Seleccione el formato del televisor conectado. /, VIDEO SETUP TV TYPE: 16:9 PROGRESSIVE (COMPONENT OUT): 16:9 4:3 OUTPUT: 4:3 LETTER BOX BLACK LEVEL: 4:3 PAN SCAN BLACK LEVEL (COMPONENT OUT): OFF PAUSE MODE: AUTO Select [ON] when you connect the main unit and the TV with an HDMI cable. Seleccione [SI] si conecta la unidad principal y el televisor con un cable HDMI. Select the speaker formation. Seleccione la disposición de los altavoces. /, HDMI SETUP HDMI RESOLUTION: CONTROL FOR HDMI: VOLUME LIMIT: YCBCR/RGB(HDMI): AUDIO(HDMI): JPEG RESOLUTION: AUTO(1920x1080p) ON ON OFF OFF SD /, SPEAKER FORMATION STANDARD /, Connect the calibration mic and set it at the listening position. Conecte el micrófono de calibración y ajústelo en la posición de escucha. A.CAL MIC AUDIO IN Select [YES] to perform [AUTO CALIBRATION]. Seleccione [SI] para ejecutar la función [CALIBRAC. AUTOM.]. AUTO CALIBRATION Connect calibration mic. Start measurement? YES NO /, Select [YES] to save the measurement results. Seleccione [SI] para guardar los resultados de la medición. Measurement complete. FRONT L : YES FRONT R : YES CENTER : YES SUBWOOFER : YES SURROUND L : YES SURROUND R : YES If OK, unplug calibration mic and select "YES". YES NO /, QUICK SETUP is complete. Home Theatre System Listening to TV sound from all speakers/ Audición del sonido del televisor a través de todos los altavoces 1 Press TV/CABLE. Pulse TV/CABLE. 2 Press SYSTEM MENU. Pulse SYSTEM MENU. 3 Press / to select "SUR.SETTING," then press . Pulse / para seleccionar "SUR.SETTING" y, a continuación, pulse . 4 Press / to select "PRO LOGIC," then press . Pulse / hasta que aparezca "PRO LOGIC" y, a continuación, pulse . 5 Press SYSTEM MENU to exit the menu. Pulse SYSTEM MENU para salir del menú.
-
 1
1 -
 2
2
 |
 |
