Sony DAV HDX678WF Operating Instructions - Page 92
Controlling the TV with the Supplied Remote, Preparing the remote for controlling the TV - remote codes
 |
UPC - 027242727571
View all Sony DAV HDX678WF manuals
Add to My Manuals
Save this manual to your list of manuals |
Page 92 highlights
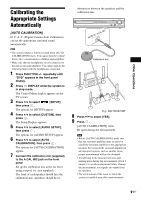
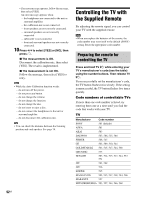
• If an error message appears, follow the message, then select [YES]. An error message appears when: - the headphones are connected to the unit or surround amplifier. - the calibration mic is not connected. - front speakers are not correctly connected. - surround speakers are not correctly connected. - subwoofer is not connected. - front and surround speakers are not correctly connected. 10 Press C/c to select [YES] or [NO], then press . x The measurement is OK. Disconnect the calibration mic, then select [YES]. The result is implemented. x The measurement is not OK. Follow the message, then select [YES] to retry. Note • While the Auto Calibration function works: - do not turn off the power. - do not press any button. - do not change the volume. - do not change the function. - do not change the disc. - do not insert or eject a disc. - do not connect the headphones to the unit or surround amplifier. - do not disconnect the calibration mic. Tip • You can check the distance between the listening position and each speaker. See page 74. 92US Controlling the TV with the Supplied Remote By adjusting the remote signal, you can control your TV with the supplied remote. Note • When you replace the batteries of the remote, the code number may reset itself to the default (SONY) setting. Reset the appropriate code number. Preparing the remote for controlling the TV Press and hold TV [/1 while entering your TV's manufacturer's code (see the table) using the number buttons. Then release TV [/1. If you successfully set the manufacturer's code, the TV button flashes twice slowly. If the setting is unsuccessful, the TV button flashes five times quickly. Code numbers of controllable TVs If more than one code number is listed, try entering them one at a time until you find the code that works with your TV. TV Manufacturer Code number SONY 501 (default) AIWA 501 AKAI 503 DAEWOO 503, 506, 515, 544 FISHER 508, 545 GE 503, 509, 510, 544 GOLDSTAR/LG 503, 515, 517, 544, 568 GRUNDIG 533 HITACHI 503, 514, 515, 517, 544, 557, 571 ITT 521, 522 JVC 516 LOEWE 515 MAGNAVOX 503, 515, 517, 518, 544, 566 MARANTZ 527 MITSUBISHI/MGA 503, 527, 544, 566, 568
-
 1
1 -
2
-
3
-
4
-
5
-
6
-
7
-
8
-
9
-
10
-
11
-
12
-
13
-
14
-
15
-
16
-
17
-
18
-
19
-
20
-
21
-
22
-
23
-
24
-
25
-
26
-
27
-
28
-
29
-
30
-
31
-
32
-
33
-
34
-
35
-
36
-
37
-
38
-
39
-
40
-
41
-
42
-
43
-
44
-
45
-
46
-
47
-
48
-
49
-
50
-
51
-
52
-
53
-
54
-
55
-
56
-
57
-
58
-
59
-
60
-
61
-
62
-
63
-
64
-
65
-
66
-
67
-
68
-
69
-
70
-
71
-
72
-
73
-
74
-
75
-
76
-
77
-
78
-
79
-
80
-
81
-
82
-
83
-
84
-
85
-
86
-
 87
87 -
 88
88 -
 89
89 -
 90
90 -
 91
91 -
 92
92 -
 93
93 -
 94
94 -
 95
95 -
 96
96 -
 97
97 -
98
-
99
-
100
-
101
-
102
-
103
-
104
-
105
-
106
-
107
-
108
-
109
-
110
-
111
-
112
-
113
-
114
-
115
-
116
-
117
-
118
-
119
-
120
-
121
-
122
-
123
-
124
-
125
-
126
-
127
-
128
 |
 |