Sony DCR DVD505 Operating Guide - Page 41
To check or delete the last recording, Review/Review deleting, To record the high resolution still - reviews
 |
UPC - 027242688612
View all Sony DCR DVD505 manuals
Add to My Manuals
Save this manual to your list of manuals |
Page 41 highlights
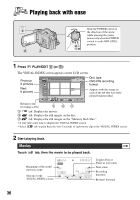
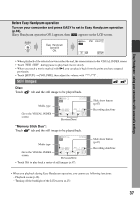
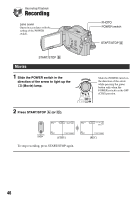
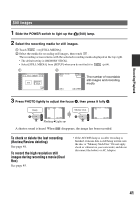
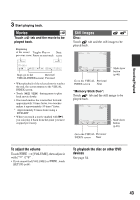
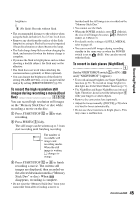
Recording/Playback Still Images 1 Slide the POWER switch to light up the (Still) lamp. 2 Select the recording media for still images. 1 Touch t [STILL MEDIA]. 2 Select the media for recording still images, then touch . The recording screen returns with the selected recording media displayed at the top right. • The default setting is [MEMORY STICK]. • Select [STILL MEDIA] from [SETUP] when you do not find it in (p.64). 1 2 The number of recordable still images and recording media 3 Press PHOTO lightly to adjust the focus A, then press it fully B. Flashing bLights up A shutter sound is heard. When disappears, the image has been recorded. To check or delete the last recording (Review/Review deleting) See page 48. To record the high resolution still images during recording a movie (Dual Rec) See page 45. • If the ACCESS lamp is on after recording is finished, it means data is still being written onto the disc or "Memory Stick Duo." Do not apply shock or vibration to your camcorder, and do not disconnect the battery or AC Adaptor. 41
-
 1
1 -
2
-
3
-
4
-
5
-
6
-
7
-
8
-
9
-
10
-
11
-
12
-
13
-
14
-
15
-
16
-
17
-
18
-
19
-
20
-
21
-
22
-
23
-
24
-
25
-
26
-
27
-
28
-
29
-
30
-
31
-
32
-
33
-
34
-
35
-
 36
36 -
 37
37 -
 38
38 -
 39
39 -
 40
40 -
 41
41 -
 42
42 -
 43
43 -
 44
44 -
 45
45 -
 46
46 -
47
-
48
-
49
-
50
-
51
-
52
-
53
-
54
-
55
-
56
-
57
-
58
-
59
-
60
-
61
-
62
-
63
-
64
-
65
-
66
-
67
-
68
-
69
-
70
-
71
-
72
-
73
-
74
-
75
-
76
-
77
-
78
-
79
-
80
-
81
-
82
-
83
-
84
-
85
-
86
-
87
-
88
-
89
-
90
-
91
-
92
-
93
-
94
-
95
-
96
-
97
-
98
-
99
-
100
-
101
-
102
-
103
-
104
-
105
-
106
-
107
-
108
-
109
-
110
-
111
-
112
-
113
-
114
-
115
-
116
-
117
-
118
-
119
-
120
-
121
-
122
-
123
-
124
-
125
-
126
-
127
-
128
-
129
-
130
-
131
-
132
-
133
-
134
-
135
-
136
-
137
-
138
-
139
-
140
-
141
-
142
-
143
-
144
-
145
-
146
-
147
-
148
-
149
-
150
-
151
-
152
 |
 |
