Sony DCR-HC28 Operating Guide - Page 50
Recording pictures from a TV or VCR/DVD device, etc - computer cables
 |
View all Sony DCR-HC28 manuals
Add to My Manuals
Save this manual to your list of manuals |
Page 50 highlights
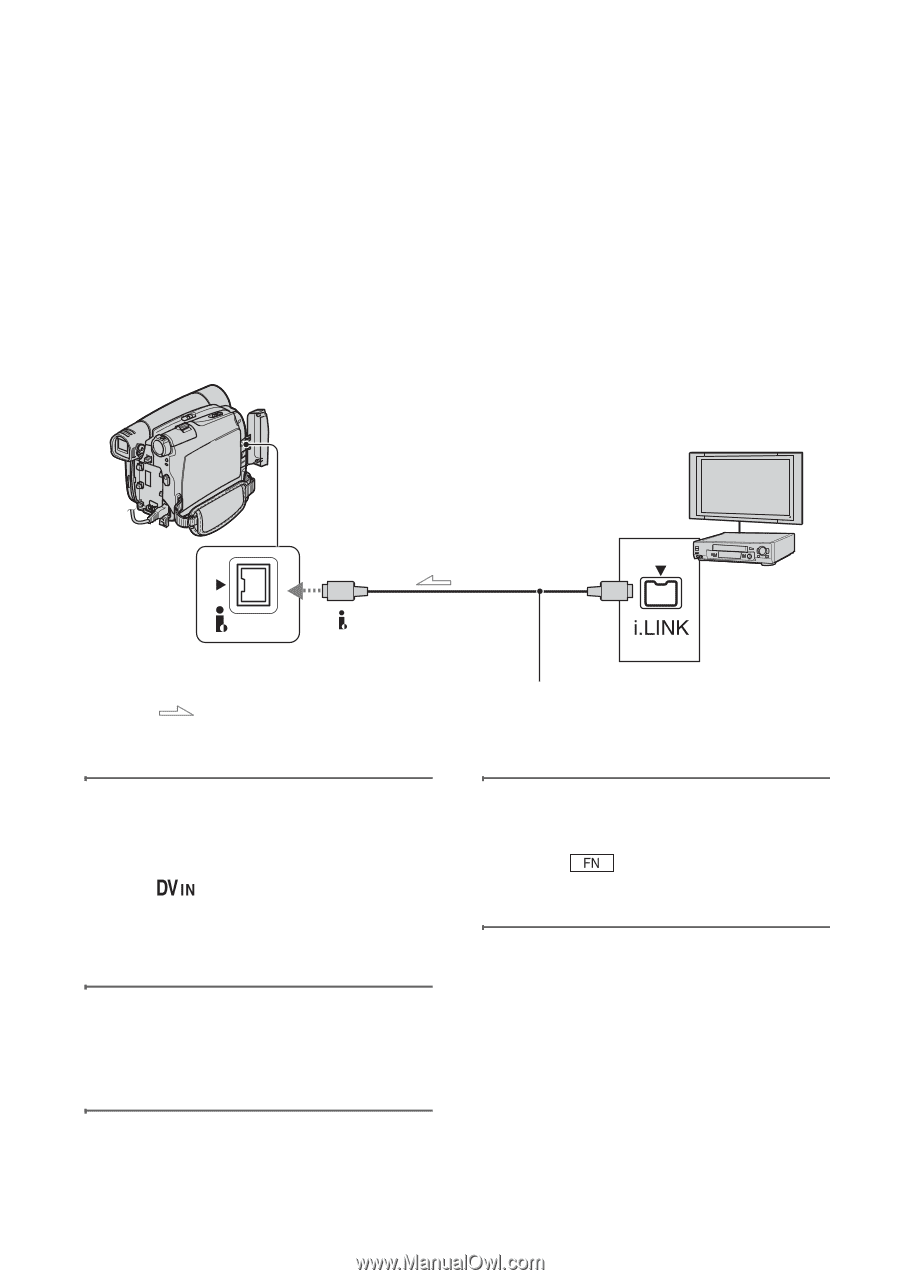
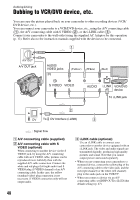
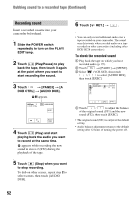
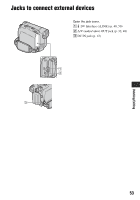
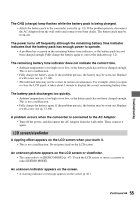
Recording pictures from a TV or VCR/DVD device, etc. Using an i.LINK cable (optional), you can record pictures or TV programs from a TV or VCR/DVD device, etc., on a tape. Be sure to insert a cassette for recording in your camcorder beforehand. You can connect your camcorder to a TV, VCR/DVD or an i.LINK-compatible device using the i.LINK cable (optional). Connect your camcorder to the wall outlet using the supplied AC Adaptor for this operation (p. 12). Refer also to the instruction manuals supplied with the devices to be connected. • You cannot record pictures on your camcorder from a TV or VCR/DVD device that does not have an i.LINK jack. • You cannot input picture and sound separately. To i.LINK jack DV To DV Interface (i.LINK) TVs or VCR/ DVD devices : Signal flow i.LINK cable (optional) 1 Connect your TV or VCR/DVD device to your camcorder with an i.LINK cable. • The indicator appears when you connect your camcorder and other devices via an i.LINK cable. (This indicator may also appear on the connected device.) 2 If you are recording from a VCR/ DVD device, insert a cassette or a DVD. 3 Slide the POWER switch repeatedly to turn on the PLAY/ EDIT lamp. 50 4 Set your camcorder to recording pause mode. Touch t [PAGE3] t [REC CTRL] t [REC PAUSE]. 5 When recording pictures from a VCR/DVD device: Start playing the cassette or the disc on the VCR/DVD device. When recording pictures from a TV: Select a TV program. The picture played on the connected device appears on the LCD screen of your camcorder.
-
 1
1 -
2
-
3
-
4
-
5
-
6
-
7
-
8
-
9
-
10
-
11
-
12
-
13
-
14
-
15
-
16
-
17
-
18
-
19
-
20
-
21
-
22
-
23
-
24
-
25
-
26
-
27
-
28
-
29
-
30
-
31
-
32
-
33
-
34
-
35
-
36
-
37
-
38
-
39
-
40
-
41
-
42
-
43
-
44
-
 45
45 -
 46
46 -
 47
47 -
 48
48 -
 49
49 -
 50
50 -
 51
51 -
 52
52 -
 53
53 -
 54
54 -
 55
55 -
56
-
57
-
58
-
59
-
60
-
61
-
62
-
63
-
64
-
65
-
66
-
67
-
68
-
69
-
70
-
71
-
72
-
73
-
74
-
75
-
76
-
77
-
78
-
79
-
80
-
81
-
82
-
83
-
84
-
85
-
86
-
87
-
88
-
89
-
90
-
91
-
92
 |
 |