Sony DCR-TRV70 PIXELA ImageMixer v1.5 Instruction Manual - Page 62
Capturing movie scenes - specs
 |
View all Sony DCR-TRV70 manuals
Add to My Manuals
Save this manual to your list of manuals |
Page 62 highlights
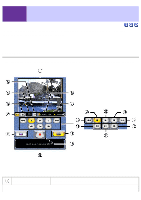
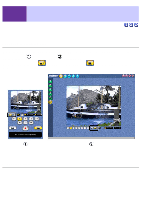
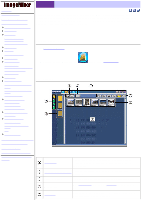
2-7-3 DV Camcorder Capture Mode (Windows Only) Capturing movie scenes Follow the steps below to capture movie scenes. 1. Select an album. Designate an album from the album list window into which to save the captured movie file. 2. Click the [Movie Scene Capture] Capturing a movie scene is now possible. button. 3. Click the [Play] button to start the movie in the monitor window. You can also fast forward, rewind, pause, etc., to find the point at which you plan to begin recording. 4. Adjust sound volume if necessary. This setting does not effect the original sound level of the captured movie scene. To prevent frame jumping on low-spec machines, it may be impossible to hear sound. In such cases, the volume should be adjusted during playback. 5. Click the [Capture] button at the desired point to begin capturing. 6. Click the [Stop] button at the point you wish to end the capture. If the 'Capture as MPEG1' box is checked in the Capturing/Recording Preferences, the status box below will be shown. After the capture is complete, the movie file will be automatically added to the album designated in step 1. To view the newly captured file, double click its thumbnail to open the view window. This function cannot be
-
 1
1 -
2
-
3
-
4
-
5
-
6
-
7
-
8
-
9
-
10
-
11
-
12
-
13
-
14
-
15
-
16
-
17
-
18
-
19
-
20
-
21
-
22
-
23
-
24
-
25
-
26
-
27
-
28
-
29
-
30
-
31
-
32
-
33
-
34
-
35
-
36
-
37
-
38
-
39
-
40
-
41
-
42
-
43
-
44
-
45
-
46
-
47
-
48
-
49
-
50
-
51
-
52
-
53
-
54
-
55
-
56
-
 57
57 -
 58
58 -
 59
59 -
 60
60 -
 61
61 -
 62
62 -
 63
63 -
 64
64 -
 65
65 -
 66
66 -
 67
67 -
68
-
69
-
70
-
71
-
72
-
73
-
74
-
75
-
76
-
77
-
78
-
79
-
80
-
81
-
82
-
83
-
84
-
85
-
86
-
87
-
88
-
89
-
90
-
91
-
92
-
93
-
94
-
95
-
96
-
97
-
98
-
99
-
100
-
101
-
102
-
103
-
104
-
105
-
106
-
107
-
108
-
109
-
110
-
111
-
112
-
113
-
114
-
115
-
116
-
117
-
118
-
119
-
120
-
121
-
122
-
123
-
124
-
125
-
126
-
127
-
128
-
129
-
130
-
131
-
132
-
133
-
134
-
135
-
136
-
137
-
138
-
139
-
140
-
141
-
142
-
143
-
144
-
145
-
146
-
147
-
148
-
149
-
150
-
151
-
152
-
153
-
154
-
155
-
156
-
157
-
158
-
159
-
160
-
161
-
162
-
163
-
164
-
165
-
166
-
167
-
168
-
169
-
170
-
171
-
172
-
173
-
174
-
175
-
176
-
177
-
178
-
179
-
180
-
181
-
182
-
183
-
184
-
185
-
186
-
187
-
188
-
189
-
190
-
191
-
192
-
193
-
194
-
195
-
196
-
197
-
198
-
199
-
200
-
201
-
202
-
203
-
204
-
205
-
206
-
207
-
208
-
209
-
210
-
211
-
212
-
213
-
214
-
215
-
216
-
217
-
218
-
219
-
220
-
221
-
222
-
223
-
224
-
225
-
226
-
227
-
228
-
229
-
230
-
231
-
232
-
233
-
234
-
235
-
236
-
237
 |
 |