Sony DCRHC52E User Manual - Page 44
Dubbing to VCR or DVD/HDD recorders Continued, connecting cable supplied
 |
UPC - 411378074423
View all Sony DCRHC52E manuals
Add to My Manuals
Save this manual to your list of manuals |
Page 44 highlights
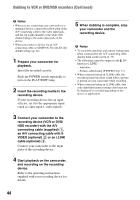
Dubbing to VCR or DVD/HDD recorders (Continued) b Notes • When you are connecting your camcorder to a monaural device, connect the yellow plug of the A/V connecting cable to the video input jack, and the red (right channel) or the white (left channel) plug to the audio input jack on the device. • When you connect a device via an A/V connecting cable, set [DISP OUT] to [LCD] (the default setting) (p. 42). 1 Prepare your camcorder for playback. Insert the recorded cassette. Slide the POWER switch repeatedly to turn on the PLAY/EDIT lamp. 2 Insert the recording media in the recording device. If your recording device has an input selector, set it to the appropriate input (such as video input1, video input2). 3 Connect your camcorder to the recording device (VCR or DVD/ HDD recorder) with the A/V connecting cable (supplied) 1, an A/V connecting cable with S VIDEO (optional) 2 or an i.LINK cable (optional) 3. Connect your camcorder to the input jacks of the recording device. 4 Start playback on the camcorder, and recording on the recording device. Refer to the operating instructions supplied with your recording device for details. 5 When dubbing is complete, stop your camcorder and the recording device. b Notes • To record the date/time and camera settings data when connected by the A/V connecting cable, display them on the screen (p. 33). • The following cannot be output via the DV Interface (i.LINK): - Indicators - Pictures edited using [P EFFECT] (p. 37) • When connected using an i.LINK cable, the recorded picture becomes rough when a picture is paused on your camcorder while recording. • When connected using an i.LINK cable, data code (date/time/camera settings data) may not be displayed or recorded depending on the device or application. 44
-
 1
1 -
2
-
3
-
4
-
5
-
6
-
7
-
8
-
9
-
10
-
11
-
12
-
13
-
14
-
15
-
16
-
17
-
18
-
19
-
20
-
21
-
22
-
23
-
24
-
25
-
26
-
27
-
28
-
29
-
30
-
31
-
32
-
33
-
34
-
35
-
36
-
37
-
38
-
 39
39 -
 40
40 -
 41
41 -
 42
42 -
 43
43 -
 44
44 -
 45
45 -
 46
46 -
 47
47 -
 48
48 -
 49
49 -
50
-
51
-
52
-
53
-
54
-
55
-
56
-
57
-
58
-
59
-
60
-
61
-
62
-
63
-
64
-
65
-
66
-
67
-
68
-
69
-
70
-
71
-
72
-
73
-
74
-
75
-
76
 |
 |
