Sony DG510 Operating Instructions - Page 19
Notes on HDMI connections, Getting Started, Notes - instructions
 |
UPC - 027242705685
View all Sony DG510 manuals
Add to My Manuals
Save this manual to your list of manuals |
Page 19 highlights
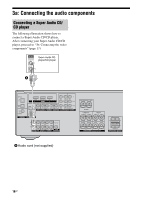
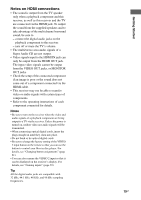
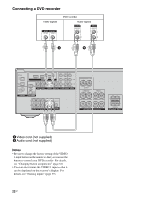
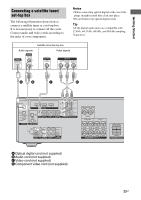
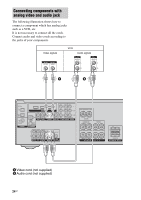
Getting Started Notes on HDMI connections • The sound is output from the TV speaker only when a playback component and this receiver, as well as this receiver and the TV are connected via the HDMI jack. To output the sound from the supplied speakers and to take advantage of the multi channel surround sound, be sure to - connect the digital audio jacks on the playback component to the receiver. - turn off or mute the TV's volume. • The multi/stereo area audio signals of a Super Audio CD are not output. • Video signals input to the HDMI IN jack can only be output from the HDMI OUT jack. The input video signals cannot be output from the VIDEO OUT jacks, or MONITOR OUT jacks. • Check the setup of the connected component if an image is poor or the sound does not come out of a component connected via the HDMI cable. • This receiver may not be able to transfer video or audio signals with certain types of components. • Refer to the operating instructions of each component connected for details. Notes • Be sure to turn on the receiver when the video and audio signals of a playback component are being output to a TV via the receiver. Unless the power is turned on, neither video nor audio signals will be transmitted. • When connecting optical digital cords, insert the plugs straight in until they click into place. • Do not bend or tie optical digital cords. • Be sure to change the factory setting of the VIDEO 2 input button on the remote so that you can use the button to control your blu-ray disc player. For details, see "Changing button assignments" (page 61). • You can also rename the VIDEO 2 input so that it can be displayed on the receiver's display. For details, see "Naming inputs" (page 59). Tip All the digital audio jacks are compatible with 32 kHz, 44.1 kHz, 48 kHz, and 96 kHz sampling frequencies. 19GB
-
 1
1 -
2
-
3
-
4
-
5
-
6
-
7
-
8
-
9
-
10
-
11
-
12
-
13
-
 14
14 -
 15
15 -
 16
16 -
 17
17 -
 18
18 -
 19
19 -
 20
20 -
 21
21 -
 22
22 -
 23
23 -
 24
24 -
25
-
26
-
27
-
28
-
29
-
30
-
31
-
32
-
33
-
34
-
35
-
36
-
37
-
38
-
39
-
40
-
41
-
42
-
43
-
44
-
45
-
46
-
47
-
48
-
49
-
50
-
51
-
52
-
53
-
54
-
55
-
56
-
57
-
58
-
59
-
60
-
61
-
62
-
63
-
64
-
65
-
66
-
67
-
68
-
69
-
70
-
71
-
72
 |
 |
