Sony DPT-S1 Startup Guide - Page 2
Getting Started, Step 3: Setting up the device, Step 1: Checking the supplied items - battery replacement
 |
View all Sony DPT-S1 manuals
Add to My Manuals
Save this manual to your list of manuals |
Page 2 highlights
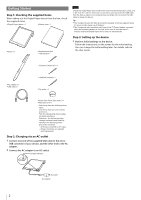
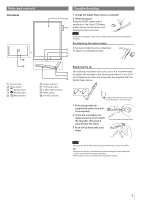
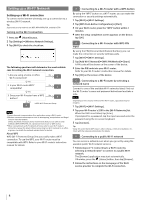
Getting Started Step 1: Checking the supplied items When taking out the Digital Paper device from the box, check the supplied items. ˎˎDigital Paper device × 1 ˎˎSleeve case × 1 ˎˎStylus × 1 ˎˎReplacement tips* ˋˋFelt (black) × 1 Note Charge the Digital Paper device within the recommended temperature range of 5 °C (41 °F) to 35 °C (95 °F). If the room is too hot or cold, disconnect the USB cable from the device, adjust room temperature accordingly, then reconnect the USB cable to charge the device. Tip ˎˎThe Charge indicator will light up red while charging. It will take approximately 2.5 hours to fully charge via AC Adapter. ˎˎThe Charge indicator may blink red 3 times if the (Power) button is pressed when the remaining battery is very low. In this case, it may take up to 5 minutes before the Digital Paper device turns on automatically. Step 3: Setting up the device 1 Perform initial settings on the device. Follow the instructions on the screen for the initial setting. You can change the initial setting later. For details, refer to the User Guide. ˋˋElastomer (white tip) × 1 ˎˎAC adapter × 1 ˎˎUSB cable × 1 ˋˋHard felt (orange) × 1 ˎˎTip puller × 1 ˎˎQuick Start Guide (this guide) × 1 ˎˎWarranty card × 1 * Select a tip from the following three types. Use the tip that suits your writing preference. Felt: The standard tip that provides moderate resistance. Elastomer: The tip that provides stronger resistance and elasticity. Hard felt: The tip that provides pencil-like resistance. ˋˋA felt tip is attached to the stylus. ˋˋReplacement tips are available (sold separately). Step 2: Charging via an AC outlet 1 Connect one end of the supplied USB cable to the micro USB connector of your device, and the other end to the AC adapter. 2 Connect the AC adapter to an AC outlet. Charge indicator AC outlet AC adapter 2
-
 1
1 -
 2
2 -
 3
3 -
 4
4 -
 5
5 -
 6
6 -
 7
7 -
 8
8 -
9
-
10
-
11
-
12
 |
 |
