Sony DSC-P7 Operating Instructions (primary manual) - Page 67
For the Index (three images) screen, screen
 |
View all Sony DSC-P7 manuals
Add to My Manuals
Save this manual to your list of manuals |
Page 67 highlights
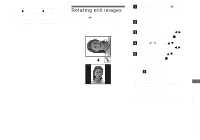
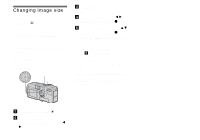
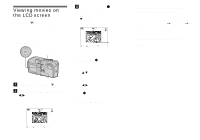
f To protect other images, repeat Step 5. g Press MENU. The menu appears. h Select [OK] using the B, then press the center z. The selected image is protected. To cancel the protection Select [CANCEL] in Step 4 or select [EXIT] in Step 8. To release protection In Step 5, using v/V/b/B, select an image for which you want to release protection, and press the center z. Repeat this operation for all the images for which you want to release protection. Then, press MENU, select [OK], and press the center z. To protect all your images In Step 4, select [ALL], then press the center z. Next, select [ON], then press the center z. To release all protection In Step 4, select [ALL], and press the center z. Then select [OFF], and press the center z. For the Index (three images) screen a Set the mode dial to , press the zoom W button twice to switch to the Index (three images) screen. b Move the image you want to protect to the center using b/ B. c Press MENU. The menu appears d Select [PROTECT] using v/V, then press the center z. The center image is protected, and a - (Protect) mark is placed on that image. PRINT PROTECT DELETE 100-0005 2002 7 4 10:30PM • OK e To protect other images, move the image you want to protect to the center using b/B, and repeat Step 4. To release protection In Step 4, select the image from which you want to release protection, and press the center z. To release protection from all of your images, repeat this process for each of them. 67 Still image editing
-
 1
1 -
2
-
3
-
4
-
5
-
6
-
7
-
8
-
9
-
10
-
11
-
12
-
13
-
14
-
15
-
16
-
17
-
18
-
19
-
20
-
21
-
22
-
23
-
24
-
25
-
26
-
27
-
28
-
29
-
30
-
31
-
32
-
33
-
34
-
35
-
36
-
37
-
38
-
39
-
40
-
41
-
42
-
43
-
44
-
45
-
46
-
47
-
48
-
49
-
50
-
51
-
52
-
53
-
54
-
55
-
56
-
57
-
58
-
59
-
60
-
61
-
 62
62 -
 63
63 -
 64
64 -
 65
65 -
 66
66 -
 67
67 -
 68
68 -
 69
69 -
 70
70 -
 71
71 -
 72
72 -
73
-
74
-
75
-
76
-
77
-
78
-
79
-
80
-
81
-
82
-
83
-
84
-
85
-
86
-
87
-
88
-
89
-
90
-
91
-
92
-
93
-
94
-
95
-
96
-
97
-
98
-
99
-
100
-
101
-
102
-
103
-
104
 |
 |
