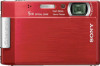
Sony DSC-T100/R Instruction Manual
Sony DSC-T100/R - Cyber-shot Digital Still Camera Manual
 |
View all Sony DSC-T100/R manuals
Add to My Manuals
Save this manual to your list of manuals |
Sony DSC-T100/R manual content summary:
- Sony DSC-T100/R | Instruction Manual - Page 1
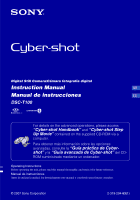
Digital Still Camera/Cámara fotografía digital Instruction Manual GB Manual de instrucciones ES DSC-T100 For details on the advanced operations, please access "Cyber-shot Handbook" and "Cyber-shot Step Up Movie" contained on the supplied CD-ROM via a computer. Para obtener más información - Sony DSC-T100/R | Instruction Manual - Page 2
whenever you call upon your Sony dealer regarding this product. Model No. DSC-T100 Serial No WARNING To reduce user to the presence of important operating and maintenance (servicing) instructions to operate from battery power, or other sources, refer to the operating instructions. [ Polarization - Sony DSC-T100/R | Instruction Manual - Page 3
where the cord exits from the appliance. [ Accessories Do not place the set on an unstable cart cable system. This will prevent damage to the set due to lightning and power-line surges. Service [ Damage Requiring Service Unplug the set from the wall outlet and refer servicing to qualified service - Sony DSC-T100/R | Instruction Manual - Page 4
damaged or leaking Lithium-Ion batteries. Battery charger This power unit is intended : SONY Model No.: DSC-T100 Responsible Party: Sony Electronics approved in this manual could void your for a Class B digital device, pursuant to Part with the instructions, may off and on, the user is encouraged to try - Sony DSC-T100/R | Instruction Manual - Page 5
help. The supplied interface cable must be used with the equipment in order to comply with the limits for a digital device pursuant to Subpart cables shorter than 3 meters (9.8 feet). [ Attention The electromagnetic fields at the specific frequencies may influence the picture Sony service station. 5 - Sony DSC-T100/R | Instruction Manual - Page 6
camera [ Internal memory and "Memory Stick Duo" back up Do not turn off the camera or remove the battery pack or "Memory Stick Duo" while the access lamp is lighted, as the internal memory data or "Memory , there may be some tiny black points and/or bright points (white, red, blue or green in color) - Sony DSC-T100/R | Instruction Manual - Page 7
software (supplied 21 Viewing "Cyber-shot Handbook" or "Cyber-shot Step-up Guide 22 Indicators on the screen 23 Battery life and memory capacity 25 Battery life and number of images that can be recorded/viewed .......... 25 Number of still images and recording time of movies 26 Troubleshooting - Sony DSC-T100/R | Instruction Manual - Page 8
) • Rechargeable battery pack NP-BG1 (1)/ Battery case (1) • Wrist strap (1) • CD-ROM (Cyber-shot application software/ "Cyber-shot Handbook"/"Cyber-shot Step-up Guide") (1) • Instruction Manual (this manual) (1) Attach the strap and pass your hand through it, to prevent the camera from damage by - Sony DSC-T100/R | Instruction Manual - Page 9
disconnected from the AC power source (mains) as long as it is connected to the wall outlet (wall socket). If some trouble occurs while using the battery charger, immediately shut off the power by disconnecting the plug from the wall outlet (wall socket). • When charging is finished, disconnect the - Sony DSC-T100/R | Instruction Manual - Page 10
the tip of the battery pack. 1Open the battery/"Memory Stick Duo" cover. 2Insert the "Memory Stick Duo" (not supplied) all the way in until it clicks. 3Insert the battery pack. 4Close the battery/"Memory Stick Duo" cover. [ When there is no "Memory Stick Duo" inserted The camera records/plays back - Sony DSC-T100/R | Instruction Manual - Page 11
correct under certain circumstances. • The Clock Set screen appears when the camera is turned on for the first time (page 12). [ To remove the battery pack/"Memory Stick Duo" Open the battery/"Memory Stick Duo" cover. "Memory Stick Duo" Battery pack GB Make sure that the access lamp is not lit - Sony DSC-T100/R | Instruction Manual - Page 12
change the date and time Press the HOME button, and select [ Clock Settings] in (Settings) (page 17). [ When you turn on the power • Once the battery is installed in the camera, it may take time before operation becomes possible. • If the camera is running on battery power and you do not operate the - Sony DSC-T100/R | Instruction Manual - Page 13
receptacle (bottom) HOME button Lens cover DISP button Lens Flash button Macro button Self-timer button GB 1 Slide the lens cover downward. 2 Hold the camera steady, keeping your arm AE/AF lock indicator Movie: Press the HOME button, and select [ Movie Mode] in (Shooting) (page 17). 13 - Sony DSC-T100/R | Instruction Manual - Page 14
W side: Approx. 1 to 20 cm (13/32 to 7 7/8 inches)) [ Using the self-timer Press V ( ) on the control button repeatedly until the desired mode is selected. : Not using the self-timer : Setting the 10-second delay self-timer : Setting the 2-second delay self-timer Press the shutter button, the self - Sony DSC-T100/R | Instruction Manual - Page 15
Multi connector (bottom) HOME button 1 Press (Playback). If you press when the camera is powered off, the camera is turned on automatically and set to playback mode. To switch to the shooting mode, press again. GB 2 Select an image with b/B on the control button. Movie: Press z to play back - Sony DSC-T100/R | Instruction Manual - Page 16
index screen by selecting [ Index Display] on the HOME screen. • Each time you press , the number of pictures on the index Select [ Slide Show] in (View Images) on the HOME screen, and then select [Start] with v, then press z. [ To view images on TV screen Connect the camera to the TV with the cable - Sony DSC-T100/R | Instruction Manual - Page 17
screen is the gateway screen for all the functions of your camera. You can select the shooting mode or playback mode, or change the settings from Guide 2 Select a category with b/B. 3 Select an item with v/V, then press z. [ When you select the (Manage Memory) or (Settings) category 1 Select - Sony DSC-T100/R | Instruction Manual - Page 18
guide. Category Shooting View Images Printing, Other Manage Memory Settings Items Auto Adjustment Scene Selection Program Auto Movie Mode Single Image Index Display Slide Show Print Music Tool Download Music Memory Tool Memory Copy Function Guide COMPONENT Grid Line Digital Zoom Auto Review 18 - Sony DSC-T100/R | Instruction Manual - Page 19
Control button GB 1 Press MENU to display the menu. Function Guide • The menu can be displayed only when the camera is in shooting mode or playback mode. • Different items are available, depending on the selected mode. 2 Select the desired item with v/V on the control button. If the desired - Sony DSC-T100/R | Instruction Manual - Page 20
items are available depending on the selected shooting mode (such as Auto Adjustment, Scene Selection, Program Auto, Movie Mode) on the HOME screen. Menu for shooting Scene Selection Selects the preset settings according to the scene. Image Size Selects the still image quality. Face Detection - Sony DSC-T100/R | Instruction Manual - Page 21
images and movies from the camera more than ever by taking advantage of the software. For details, refer to "Cyber-shot Handbook." Supported Operating Systems for USB connection and application software (supplied) For Windows users For Macintosh users USB connection Windows 2000 Professional - Sony DSC-T100/R | Instruction Manual - Page 22
Step-up Guide" will be installed. 3 After the installation is complete, double- click the shortcut created on the desktop. [ For Macintosh users Turn on your computer and insert the CDROM (supplied) into the CD-ROM drive. Follow the instructions below. To view the "Cyber-shot Handbook" 1 Select the - Sony DSC-T100/R | Instruction Manual - Page 23
) button, the A display changes (page 14). [ When shooting still images E Battery remaining Low battery warning Image size [ When shooting movies [ When playing back WB DPOF 1.3 1.3 VOL. Shooting mode (Scene Selection) Shooting mode (Program) White balance Recording mode Metering mode GB - Sony DSC-T100/R | Instruction Manual - Page 24
number Recorded date/time of the playback image Guide to play back images Select images Adjust volume Recording/Playback media Recording folder recorded in selected folder Remaining recordable time Change folder AF illuminator SL WB C:32:00 ISO400 +2.0EV 500 F3.5 D C:32:00 + Red-eye reduction - Sony DSC-T100/R | Instruction Manual - Page 25
measurement method is based on the CIPA standard. (CIPA: Camera & Imaging Products Association) • The number of images/battery life does not change, regardless of image size. [ When viewing still images No. of Images Approx. 6600 Battery life (min.) Approx. 330 • Viewing single images in order - Sony DSC-T100/R | Instruction Manual - Page 26
and/or the recording media used. • You can select the image size to be used when shooting from the menu (page 19, 20). [ The approximate number of still images (Units: Images) Internal Capacity memory "Memory Stick Duo" formatted with this camera Size Approx. 31 MB 128 MB 256 MB 512 MB - Sony DSC-T100/R | Instruction Manual - Page 27
Troubleshooting If you experience trouble with your camera, try the following solutions. 1 Check the items below, and refer to "Cyber-shot Handbook (PDF)". If a code such as "C/E:ss:ss" appears on the screen, refer to "Cyber-shot Handbook". 2 Remove the battery pack, and insert the battery pack - Sony DSC-T100/R | Instruction Manual - Page 28
the date inserted using "Picture Motion Browser". Vertical streaks appear when you are shooting a very bright subject. • The smear phenomenon is occurring and white, black, red, or purple streaks appear on the image. This phenomenon is not a malfunction. Viewing images Your camera cannot play back - Sony DSC-T100/R | Instruction Manual - Page 29
not to let sand or dust get into the camera. This may cause the camera to malfunction, and in some cases this malfunction cannot be repaired. [ On carrying lens, you will be unable to record clear images. [ On the internal rechargeable backup battery This camera has an internal rechargeable battery - Sony DSC-T100/R | Instruction Manual - Page 30
8 286 000 pixels Effective pixel number of camera: Approx. 8 083 000 pixels Lens: Carl Zeiss Vario-Tessar 5× zoom lens f = 5.8 - 29.0 mm (35 - 175 mm when converted to a 35 mm still camera) F3.5 - 4.4 Exposure control: Automatic exposure, Scene Selection (9 modes) White balance: Automatic, Daylight - Sony DSC-T100/R | Instruction Manual - Page 31
- Sony DSC-T100/R | Instruction Manual - Page 32
Nombre del producto: Cámara Digital Modelo: DSC-T100 POR FAVOR LEA DETALLADAMENTE ESTE MANUAL DE INSTRUCCIONES ANTES DE CONECTAR ha probado y cumple con la normativa que establece la Directiva EMC si se utiliza un cable de conexión de menos de 3 metros de longitud. [ Atención Los campos electromagn - Sony DSC-T100/R | Instruction Manual - Page 33
1 Preparación de la batería 6 2 Inserción de la batería o de un "Memory Stick Duo" (no suministrado 7 3 Encendido de la cámara y ajuste del reloj 9 USB y software de aplicación (suministrado 18 Visualización de la "Guía práctica de Cyber-shot" o "Guía avanzada de Cyber-shot 19 Indicadores de - Sony DSC-T100/R | Instruction Manual - Page 34
lo contrario, es posible que los datos de la memoria interna o del "Memory Stick Duo" se destruyan. Realice siempre una copia de seguridad de sus datos cámara cumple con la norma universal DCF (Design rule for Camera File system) definida por la JEITA (Japan Electronics and Information Technology - Sony DSC-T100/R | Instruction Manual - Page 35
(1) • Cable de alimentación (suministro eléctrico) (1) (no suministrado en EE. UU. ni Canadá) • Batería recargable NP-BG1 (1)/ Funda de la batería (1) • Correa de la muñeca (1) • CD-ROM (software de aplicación Cyber-shot/ "Guía práctica de Cyber-shot"/"Guía avanzada de Cyber-shot") (1) • Manual de - Sony DSC-T100/R | Instruction Manual - Page 36
de EE. UU. ni Canadá ɟ ɟ Indicador luminoso CHARGE Indicador luminoso CHARGE Cable de alimentación 1Introduzca la batería en el cargador. 2Conecte el cargador de la la pared. • Cuando la batería esté cargada, desconecte el cable de alimentación de la toma de pared y retire la batería del cargador. - Sony DSC-T100/R | Instruction Manual - Page 37
la batería presionando la palanca de expulsión de la batería con la punta de ésta. 1 Abra la tapa de la batería/"Memory Stick Duo". ES 2 Introduzca el "Memory Stick Duo" (no suministrado) hasta que llegue al final y quede encajado. 3 Introduzca la batería. 4 Cierre la tapa de la bater - Sony DSC-T100/R | Instruction Manual - Page 38
. • La pantalla de ajuste del reloj aparece cuando se enciende la cámara por primera vez (página 9). [ Para retirar la batería/"Memory Stick Duo" Abra la tapa de la batería/"Memory Stick Duo". "Memory Stick Duo" Batería Compruebe que el indicador luminoso de acceso no esté encendido y empuje el - Sony DSC-T100/R | Instruction Manual - Page 39
3 Encendido de la cámara y ajuste del reloj Botón POWER Cubierta del objetivo ɟ Botón de control 1 2 Botón HOME 3 Botón z ES 1 Pulse el botón POWER o deslice la cubierta del objetivo hacia abajo. 2 Ajuste el reloj con el botón de control. 1 Seleccione el formato de visualización de la fecha - Sony DSC-T100/R | Instruction Manual - Page 40
Toma de imágenes fácilmente (modo de ajuste automático) El procedimiento siguiente es para tomar imágenes fijas. ɠ Botón del disparador Botón del zoom Botón MENU Micrófono Indicador Flash luminoso del autodisparador Botón de control Rosca para trípode (parte inferior) Botón HOME Botón de macro - Sony DSC-T100/R | Instruction Manual - Page 41
Zoom/Flash/Macro/Autodisparador/Pantalla [ Uso del zoom Pulse para aumentar el zoom y para disminuirlo. [ Flash (selección de un modo de flash para imágenes fijas) Pulse B ( ) del botón de control varias veces hasta que se seleccione el modo que desee. : Flash automático Destella cuando no hay - Sony DSC-T100/R | Instruction Manual - Page 42
Visualización/borrado de imágenes Botón (reproducción) Botón (índice)/ (zoom de reproducción) Botón (zoom de reproducción) Botón MENU ɟ Botón de control Conector múltiple (parte inferior) Botón HOME 1Pulse (reproducción). Si se pulsa cuando la cámara está apagada, la cámara se enciende automá - Sony DSC-T100/R | Instruction Manual - Page 43
HOME y seleccione [Inicio] con v; a continuación, pulse z. [ Para visualizar imágenes en la pantalla de un televisor Conecte la cámara al televisor mediante el cable para terminal multiuso (suministrado). Al conector múltiple Cable para terminal multiuso A las tomas de entrada de audio/vídeo 13 - Sony DSC-T100/R | Instruction Manual - Page 44
Explicación de las distintas funciones - HOME/Menú Uso de la pantalla HOME La pantalla HOME es la pantalla de acceso a todas las funciones de la cámara. Es posible seleccionar el modo de toma de imágenes o el modo de reproducción, o cambiar la configuración de la pantalla HOME. Botón z Botón de - Sony DSC-T100/R | Instruction Manual - Page 45
música Desc música Format músi Gestión de memoria Herramienta memoria Her Memory Stick ES Formatear CrearCarp. Grabación Camb. Carp. Grab Copiar Herr.memoria Modo AF Ajustes de toma de imagen 2 Orient. autom. Cuadrícula Zoom digital Revisión autom Ajustes del reloj Language Setting 15 - Sony DSC-T100/R | Instruction Manual - Page 46
Uso de los elementos de menú Botón MENU Botón z Botón de control 1Pulse MENU para visualizar el menú. Guía funciones • Sólo es posible mostrar el menú cuando la cámara está en el modo de toma de imágenes o en el modo de reproducción. • Hay diferentes elementos disponibles, en función del modo - Sony DSC-T100/R | Instruction Manual - Page 47
Para obtener más información acerca del funcionamiento 1 página 16 Elementos de menú Los elementos de menú disponibles varían en función del modo de la cámara. El menú para la toma de imágenes está disponible únicamente en el modo de toma de imágenes, mientras que el menú de visualización sólo est - Sony DSC-T100/R | Instruction Manual - Page 48
de la entrega. • Si el sistema operativo no admite conexiones USB, utilice un lector o grabador de Memory Stick disponible en el mercado. • Para obtener más detalles sobre el entorno operativo de la aplicación de software "Picture Motion Browser" para Cyber-shot, consulte la "Guía práctica de - Sony DSC-T100/R | Instruction Manual - Page 49
Cybershot" 1 Seleccione la carpeta [Handbook] y copie el archivo "Handbook.pdf" almacenado en la carpeta [ES] en su ordenador. 2 Una vez se haya completado la copia, haga doble clic en "Handbook.pdf". Visualización de la "Guía avanzada de Cyber- shot HQX, instale el software Stuffit Expander. 19 - Sony DSC-T100/R | Instruction Manual - Page 50
Indicadores de la pantalla Cada vez que se pulsa el botón v (DISP), A cambia la pantalla (página 11). [ Cuando se toman imágenes fijas E Batería restante Advertencia de poca batería Tamaño de imagen [ Cuando se filman películas [ Cuando se reproduce WB DPOF 1.3 1.3 VOL. Modo de toma de imá - Sony DSC-T100/R | Instruction Manual - Page 51
B 1.0m z ISO400 125 F3.5 +2.0EV N Espera GRABAR 00:00:12 101-0012 2007 1 1 9:30 AM z STOP z PLAY BACK/ NEXT VOLUME C 101 101 96 Distancia de enfoque predefinida Bloqueo AE/AF Número ISO Obturación lenta NR Velocidad de obturación Valor de abertura Valor de exposición Indicador del cuadro del visor - Sony DSC-T100/R | Instruction Manual - Page 52
imágenes que pueden grabarse o verse se tiene en cuenta el cambio de "Memory Stick Duo" según sea necesario. Tenga en cuenta que es posible que el . 22 • El método de medición está basado en la norma CIPA. (CIPA: Camera & Imaging Products Association) • El número de imágenes y la vida útil de - Sony DSC-T100/R | Instruction Manual - Page 53
16, 17). [ Número aproximado de imágenes fijas (Unidades: imágenes) Memoria Capacidad interna "Memory Stick Duo" formateado con esta cámara Tamaño Aprox. 31 MB 128 MB 256 MB 512 MB 1 ágenes grabadas utilizando modelos Sony anteriores, la indicación podrá variar del tamaño de imagen real. 23 - Sony DSC-T100/R | Instruction Manual - Page 54
ss:ss" en la pantalla, consulte la "Guía práctica de Cyber-shot". 2 Extraiga la batería, vuelva a insertarla después de un minuto aproximadamente y conecte la alimentación. 3 Inicialice los ajustes (página 15). 4 Consulte con el distribuidor de Sony o con la oficina de servicio local autorizada de - Sony DSC-T100/R | Instruction Manual - Page 55
el tamaño de imagen en uno distinto de [640(Fina)]. - Inserte un "Memory Stick PRO Duo". No se pueden introducir fechas en las imágenes. • Esta . Para imprimir o guardar imágenes con la fecha incluida, utilice "Picture Motion Browser". Aparecen rayas verticales al tomar un motivo muy brillante. • - Sony DSC-T100/R | Instruction Manual - Page 56
Visualización de imágenes La cámara no puede reproducir imágenes. • Pulse (reproducción) (página 12). • El nombre de la carpeta o del archivo ha sido modificado en el ordenador. • Si se ha procesado un archivo de imagen con un ordenador o si se ha grabado el archivo de imagen con un modelo distinto - Sony DSC-T100/R | Instruction Manual - Page 57
Precauciones [ No utilice/almacene la cámara en los siguientes lugares • En lugares extremadamente calurosos, fríos o húmedos. En lugares tales como en un automóvil estacionado bajo el sol, es posible que el cuerpo de la cámara se deforme, lo que podría provocar un fallo de funcionamiento. • Bajo - Sony DSC-T100/R | Instruction Manual - Page 58
Camera Sony Corporation. • "Memory Stick", , "Memory Stick PRO", , "Memory Stick Duo", , "Memory Stick PRO Duo", , "Memory Stick Micro", "MagicGate" y son marcas comerciales de Sony nombres de sistemas y productos utilizados en este manual son, en general, marcas comerciales o marcas - Sony DSC-T100/R | Instruction Manual - Page 59
- Sony DSC-T100/R | Instruction Manual - Page 60
Additional information on this product and answers to frequently asked questions can be found at our Customer Support Website. En la página Web de atención al cliente puede encontrar información adicional sobre este producto y respuesta a las preguntas hechas con más frecuencia. Printed on 70%
-
 1
1 -
 2
2 -
 3
3 -
 4
4 -
 5
5 -
 6
6 -
 7
7 -
8
-
9
-
10
-
11
-
12
-
13
-
14
-
15
-
16
-
17
-
18
-
19
-
20
-
21
-
22
-
23
-
24
-
25
-
26
-
27
-
28
-
29
-
30
-
31
-
32
-
33
-
34
-
35
-
36
-
37
-
38
-
39
-
40
-
41
-
42
-
43
-
44
-
45
-
46
-
47
-
48
-
49
-
50
-
51
-
52
-
53
-
54
-
55
-
56
-
57
-
58
-
59
-
60
 |
 |
© 2007 Sony Corporation
2-319-294-
63
(1)
Instruction Manual
Manual de instrucciones
DSC-T100
Digital Still Camera/Cámara fotografía digital
Operating Instructions
Before operating the unit, please read this manual thoroughly, and retain it for future reference.
Manual de instrucciones
Antes de utilizar la unidad, lea detenidamente este manual y consérvelo para futuras consultas.
For details on the advanced operations, please access
“Cyber-shot Handbook”
and
“Cyber-shot Step
Up Movie”
contained on the supplied CD-ROM via a
computer.
Para obtener más información sobre las opciones
avanzadas, consulte la
“Guía práctica de Cyber-
shot”
y la
“Guía avanzada de Cyber-shot”
del CD-
ROM suministrado mediante un ordenador.
GB
ES