Sony DSC-T7 Operating Instructions - Page 15
Attaching the Interface Adaptor, Attaching a tripod, Interface Adaptor, Stand
 |
View all Sony DSC-T7 manuals
Add to My Manuals
Save this manual to your list of manuals |
Page 15 highlights
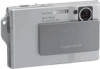
Enjoying the camera N "Memory Stick Duo" slot (bottom) (t step 3 in "Read This First") O Access lamp (bottom) (t step 4 in "Read This First") P Screw groove (bottom) Interface Adaptor Use the Interface Adaptor for a variety of connections. Attaching the Interface Adaptor Push the Interface Adaptor firmly into the camera until it clicks into place. Eject button qj qk ql To detach the Interface Adaptor, hold down the eject button as you remove the Interface Adaptor. Q A/V OUT (MONO) jack (75) R (USB) jack (58, 70) S DC IN jack For connecting an AC-LS5/AC-LS5K AC Adaptor (not supplied). 2 To the multi connector 1 To DC IN jack Interface Adaptor v mark 3 To wall outlet Stand The stand provides a stable resting place for the camera. If you use a tripod, attach it to the stand. Attaching a tripod 1 Insert the camera in the stand as shown. 1 2 A Screw groove B Locking screw 15
-
 1
1 -
2
-
3
-
4
-
5
-
6
-
7
-
8
-
9
-
 10
10 -
 11
11 -
 12
12 -
 13
13 -
 14
14 -
 15
15 -
 16
16 -
 17
17 -
 18
18 -
 19
19 -
 20
20 -
21
-
22
-
23
-
24
-
25
-
26
-
27
-
28
-
29
-
30
-
31
-
32
-
33
-
34
-
35
-
36
-
37
-
38
-
39
-
40
-
41
-
42
-
43
-
44
-
45
-
46
-
47
-
48
-
49
-
50
-
51
-
52
-
53
-
54
-
55
-
56
-
57
-
58
-
59
-
60
-
61
-
62
-
63
-
64
-
65
-
66
-
67
-
68
-
69
-
70
-
71
-
72
-
73
-
74
-
75
-
76
-
77
-
78
-
79
-
80
-
81
-
82
-
83
-
84
-
85
-
86
-
87
-
88
-
89
-
90
-
91
-
92
-
93
-
94
-
95
-
96
-
97
-
98
-
99
-
100
-
101
-
102
-
103
 |
 |
