Sony DVP-FX820W Operating Instructions - Page 27
Adjusting the Picture Size and Quality, Press OPTIONS., Press, to select LCD Mode, and press ENTER.
 |
View all Sony DVP-FX820W manuals
Add to My Manuals
Save this manual to your list of manuals |
Page 27 highlights
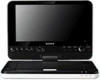
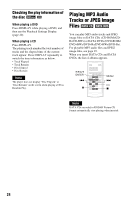
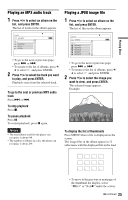
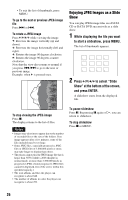
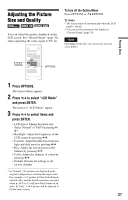
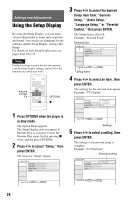
Adjusting the Picture Size and Quality You can adjust the picture displayed on the LCD screen. See "General Setup" (page 29), when outputting the video signal to TV, etc. C/X/x/c ENTER 1 2 3 4 5 6 7 8 9 0 OPTIONS To turn off the Option Menu Press OPTIONS or O RETURN. z Hints • The screen turns off automatically when the LCD panel is closed. • You can see the settings for the display in "General Setup" (page 29). Note Depending on the disc, the screen size you can select differs. Playing Discs 1 Press OPTIONS. The Option Menu appears. 2 Press X/x to select "LCD Mode" and press ENTER. The items for "LCD Mode" appear. 3 Press X/x to select items and press ENTER. • LCD Aspect: Change the picture size. Select "Normal" or "Full" by pressing X/ x*. • Backlight: Adjust the brightness of the LCD screen by pressing C/c. • Contrast: Adjust the difference between light and dark areas by pressing C/c. • Hue: Adjust the red and green color balance by pressing C/c. • Color: Adjust the richness of colors by pressing C/c. • Default: Returns all settings to the factory defaults. * In "Normal," the pictures are displayed in the original configuration, retaining the aspect ratio. For example, a 4:3 picture will have black bands on both sides, and the letterbox pictures recorded either in 16:9 or 4:3 will have black bands on all sides. In "Full," a 16:9 picture will be adjusted to fill the entire screen. 27
-
 1
1 -
2
-
3
-
4
-
5
-
6
-
7
-
8
-
9
-
10
-
11
-
12
-
13
-
14
-
15
-
16
-
17
-
18
-
19
-
20
-
21
-
 22
22 -
 23
23 -
 24
24 -
 25
25 -
 26
26 -
 27
27 -
 28
28 -
 29
29 -
 30
30 -
 31
31 -
 32
32 -
33
-
34
-
35
-
36
-
37
-
38
-
39
-
40
-
41
-
42
-
43
-
44
-
45
-
46
-
47
-
48
-
49
-
50
-
51
-
52
-
53
-
54
-
55
-
56
-
57
-
58
-
59
-
60
 |
 |