Sony FW-75BZ40L Operating Instructions - Page 1
Sony FW-75BZ40L Manual
 |
View all Sony FW-75BZ40L manuals
Add to My Manuals
Save this manual to your list of manuals |
Page 1 highlights
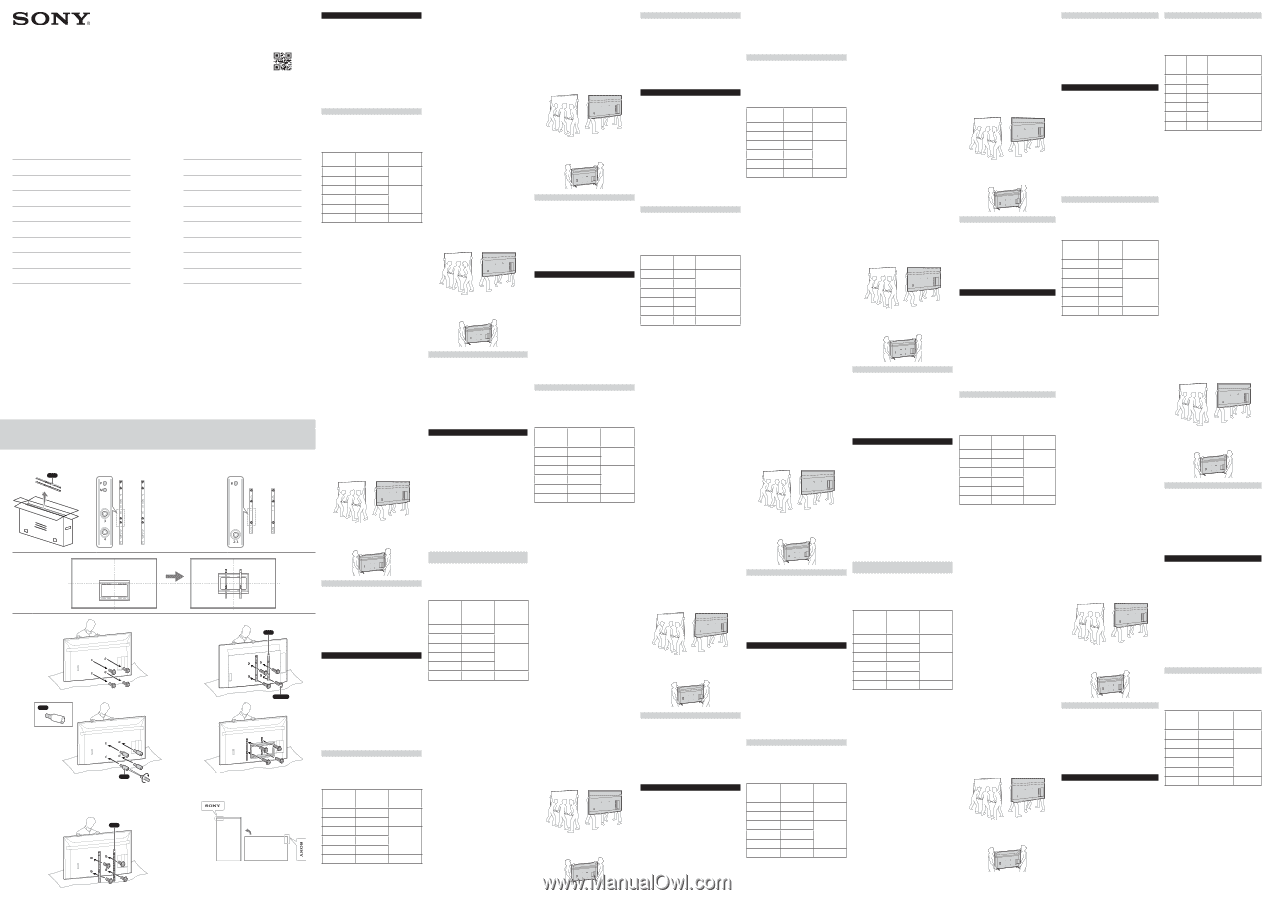
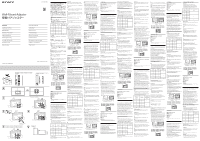
5-053-184-11(1) Wall-Mount Adjuster Operating Instructions Mode d'emploi Manual de instrucciones Gebruiksaanwijzing Bedienungsanleitung Instruções de Operação Istruzioni per l'uso Bruksanvisning Betjeningsvejledning Käyttöohjeet Bruksanvisning Instrukcja obsługi Kullanma Kılavuzu © 2023 Sony Corporation https://www.sony.net/ FW-85BZ40L / FW-85BZ35L / FW-85BZ30L / FW-75BZ40L / FW-75BZ35L / FW-75BZ30L / FW-65BZ40L / FW-65BZ35L / FW-55BZ40L / FW-55BZ35L / FW-55BZ30L / FW-65BZ30L WA FW-50BZ30L / FW-43BZ30L A 1 FW-50BZ30L / FW-43BZ30L WA 2 VS 4 M6L16 VS 1.5 N·m/1,5 N·m {15 kgf·cm} 3 FW-85BZ40L / FW-85BZ35L / FW-85BZ30L / FW-75BZ40L / FW-75BZ35L / FW-75BZ30L / FW-65BZ40L / FW-65BZ35L / FW-65BZ30L / FW-55BZ40L / FW-55BZ35L / FW-55BZ30L WA 日本語 LCD LCD A LCD LCD LCD LCD LCD LCD 1.5 N·m {15 kgf·cm} 43 A 2 50 B 55 C 65 E 3 75 F 85 G 4 LCD LCDモニ LCD LCD 1 LCD LCD 55/65/75/85のLCD LCD 3 2 LCD LCD LCD LCD 3 付属の4 4 LCD LCD Sony LCD LCD LCD LCD LCD LCD LCD LCD LCD LCD 2人以上(FW-85BZ40L/FW-85BZ35L/ FW-85BZ30Lは3 LCD LCD FW-85BZ40L / FW-85BZ35L / FW-85BZ30L FW-75BZ40L / FW-75BZ35L / FW-75BZ30L / FW-65BZ40L / FW-65BZ35L / FW-65BZ30L / FW-55BZ40L / FW-55BZ35L / FW-55BZ30L / FW-50BZ30L / FW-43BZ30L 仕様 mm) WA(L): 30 × 635 × 10 WA(S): 30 × 415 × 10 g) WA(L): 420 WA(S): 280 English Please read these safety instructions to ensure your personal safety and prevent property damage. Before Using the Wall-Mount Adjuster This Wall-Mount Adjuster corrects the offset of the location of the Wall-Mount Bracket to the center position of screen A. Please consider if you need to use this Wall-Mount Adjuster before use. If you don't need to put the Wall-Mount Bracket to the center of screen, you don't need to use this. Using a Wall-Mount Bracket The LCD Display or LCD Monitor can be mounted to a wall using a suitable Wall-Mount Bracket (not supplied). Some larger size LCD Display or LCD Monitor may require removing the Table-Top Stand, refer to the instructions provided with the LCD Display or LCD Monitor. Setting up the Wall-Mount Adjuster Note • If using an electric screwdriver, set the torque at approximately 1.5 N·m {15 kgf·cm}. • Be sure to store the unused parts in a safe place for future use. Retain this manual for future reference. Screen Size (Inch) Screw location Wall-Mount Bracket location 43 A 2 50 B 55 C 65 E 3 75 F 85 G 4 Screw location When installing the Wall-Mount Adjuster on the LCD Display or LCD Monitor. Installation: Please refer to Setup Guide bundled in the LCD Display or LCD Monitor together with this manual. 1 Remove the screws from the rear of the LCD Display or LCD Monitor. Note • For 55/65/75/85 screen size LCD Display or LCD Monitor user. Please keep these screws for fixing this Wall-Mount Adjuster at step 3. 2 Attach the Wall-Mount Attachment (supplied with the LCD Display or LCD Monitor) to the rear of the LCD Display or LCD Monitor (to make it parallel with the wall). 3 Attach the Wall-Mount Adjuster using the four screws supplied. Refer to the "Screw location" in the table. 4 Attach the Wall-Mount Bracket (not supplied) to the Wall-Mount Adjuster. Refer to the "Wall-Mount Bracket location" in the table. When place the LCD Display or LCD Monitor vertically, Sony logo mark must be set top position. Before setting up the LCD Display or LCD Monitor Be sure to consider the following while setting up the LCD Display or LCD Monitor: • Disconnect all cables when carrying the LCD Display or LCD Monitor. • Carry the LCD Display or LCD Monitor with the adequate number of people; larger size LCD Displays or LCD Monitors require two or more people (three or more people for FW-85BZ40L / FW-85BZ35L / FW-85BZ30L). • Correct hand placement while carrying the LCD Display or LCD Monitor is very important for safety and to avoid damage. FW-85BZ40L / FW-85BZ35L / FW-85BZ30L FW-75BZ40L / FW-75BZ35L / FW-75BZ30L / FW-65BZ40L / FW-65BZ35L / FW-65BZ30L / FW-55BZ40L / FW-55BZ35L / FW-55BZ30L / FW-50BZ30L / FW-43BZ30L Specifications Dimensions (Approx.) (w × h × d) (mm) / (inches) WA(L): 30 × 635 × 10 / 1 3/16 × 25 × / 13 32 WA(S): 30 × 415 × 10 / 1 3/16 × 16 3/8 × / 13 32 Mass (Approx.) (g) / (oz) WA(L): 420 / 14.6 WA(S): 280 / 9.6 Note • Design and specifications are subject to change without notice. Français Commencez par lire ces consignes de sécurité afin de préserver votre sécurité personnelle et d'éviter les dégâts matériels. Avant d'utiliser le dispositif d'ajustement de fixation murale Ce dispositif d'ajustement de fixation murale corrige le décalage de l'emplacement du support de fixation murale par rapport à la position centrale de l'écran A. Veuillez tout d'abord déterminer si vous avez besoin d'utiliser ce dispositif d'ajustement de fixation murale. Si vous n'avez pas besoin de placer le support de fixation murale au centre de l'écran, vous n'avez pas besoin d'utiliser ce dispositif. Utilisation d'un support de fixation murale Votre écran LCD ou votre moniteur LCD peut être monté sur un mur à l'aide d'un support de fixation murale (non fourni). Pour certains écrans LCD ou moniteurs LCD de plus grande taille, il peut être nécessaire de retirer le support de table, reportez-vous aux instructions fournies avec l'écran LCD ou le moniteur LCD. Installation du dispositif d'ajustement de fixation murale Remarque • Si vous utilisez un tournevis électrique, réglez le couple à environ 1,5 N·m {15 kgf·cm}. • Veillez à ranger en lieu sûr les pièces excédentaires en vue d'une utilisation future. Conservez ce manuel pour toute référence ultérieure. Taille d'écran (pouces) Emplacement des vis Emplacement du support de fixation murale 43 A 2 50 B 55 C 65 E 3 75 F 85 G 4 Emplacement des vis Lors de l'installation du dispositif d'ajustement de fixation murale sur l'écran LCD ou le moniteur LCD. Installation : Veuillez vous reporter au Guide d'installation fourni avec l'écran LCD ou le moniteur LCD en plus de ce manuel. 1 Retirez les vis à l'arrière de l'écran LCD ou du moniteur LCD. Remarque • Pour l'utilisateur d'un écran LCD ou moniteur LCD de taille 55/65/75/85. Veuillez conserver ces vis pour fixer ce dispositif d'ajustement de fixation murale à l'étape 3. 2 Fixez l'accessoire de fixation murale (fourni avec l'écran LCD ou le moniteur LCD) à l'arrière de l'écran LCD ou du moniteur LCD (pour le rendre parallèle au mur). 3 Fixez le dispositif d'ajustement de fixation murale à l'aide des quatre vis fournies. Reportez-vous à « Emplacement des vis » dans le tableau. 4 Fixez le Support de fixation murale (non fourni) au dispositif d'ajustement de fixation murale. Reportez-vous à « Emplacement du support de fixation murale » dans le tableau. Lorsque l'écran LCD ou le moniteur LCD est positionné à la verticale, le logo Sony doit se trouver en haut. Avant d'installer l'écran LCD ou le moniteur LCD Tenez compte des points suivants lorsque vous installez l'écran LCD ou le moniteur LCD : • Débranchez tous les câbles lorsque vous transportez l'écran LCD ou le moniteur LCD. • Transportez l'écran LCD ou le moniteur LCD avec un nombre suffisant de personnes ; les écrans LCD ou les moniteurs LCD de grande taille nécessitent deux personnes ou plus (trois personnes ou plus pour FW-85BZ40L / FW-85BZ35L / FW-85BZ30L). • Le placement correct des mains lors du transport de l'écran LCD ou du moniteur LCD est très important pour la sécurité et pour éviter les dommages. FW-85BZ40L / FW-85BZ35L / FW-85BZ30L FW-75BZ40L / FW-75BZ35L / FW-75BZ30L / FW-65BZ40L / FW-65BZ35L / FW-65BZ30L / FW-55BZ40L / FW-55BZ35L / FW-55BZ30L / FW-50BZ30L / FW-43BZ30L Spécifications Dimensions (Environ) (l × h × p) (mm) / (pouces) WA(L): 30 × 635 × 10 / 1 3/16 × 25 × / 13 32 WA(S): 30 × 415 × 10 / 1 3/16 × 16 3/8 × / 13 32 Poids (Environ) (g) / (oz) WA(L): 420 / 14,6 WA(S): 280 / 9,6 Remarque • La conception et les spécifications sont sujettes à modification sans préavis. Español Lea estas instrucciones de seguridad para garantizar su seguridad personal y evitar daños materiales. Antes de usar el ajustador del Soporte de pared Este ajustador de soporte de pared corrige la desviación de la ubicación del soporte de pared respecto a la posición central de la pantalla A. Tenga en cuenta si necesita usar el ajustador del Soporte de pared antes de la instalación. Si no necesita colocar la abrazadera del soporte de pared en el centro de la pantalla, no hace falta que use esto. Usar un Soporte de pared La Pantalla LCD o el Monitor LCD pueden montarse a un Soporte de pared adecuado (no suministrado). Es posbile que algunas Pantallas LCD o Monitores LCD de mayor tamaño requieran la retirada del soporte de sobremesa, consulte las instrucciones proporcionadas con la Pantalla LCD o el Monitor LCD. Instalar el ajustador del Soporte de pared Nota • Si utiliza un destornillador eléctrico, ponga la torsión a aproximadamente 1,5 N·m {15 kgf·cm}. • Asegúrese de guardar las piezas no utilizadas en un lugar seguro para usarlas a futuro. Conserve este manual para poder consultarlo en el futuro. Tamaño de la pantalla (pulgadas) Ubicación de los tornillos Ubicación del Soporte de pared 43 A 2 50 B 55 C 65 E 3 75 F 85 G 4 Ubicación de los tornillos Al instalar el ajustador del Soporte de pared en la Pantalla LCD o el Monitor LCD. Instalación: Consulte la Guía de configuración suministrada con la Pantalla LCD o el Monitor LCD junto con este manual. 1 Retire los tornillos de la parte trasera de la Pantalla LCD o el Monitor LCD. Nota • Para usuarios de la Pantalla LCD o el Monitor LCD de tamaño 55/65/75/85. Conserve los tornillos para fijar el ajustador del Soporte de pared en el paso 3. 2 Una la unión de pared (suministrada con la Pantalla LCD o el Monitor LCD) a la parte trasera de la Pantalla LCD o el Monitor LCD (para que esté en paralelo a la pared). 3 Sujete el ajustador del Soporte de pared haciendo uso de los cuatro tornillos suministrados. Consulte la sección "Ubicación de los tornillos" en la tabla. 4 Coloque el Soporte de pared (no suministrado) al ajustador del Soporte de pared. Consulte la sección "Ubicación del Soporte de pared" en la tabla. Al colocar la Pantalla LCD o el Monitor LCD de forma vertical, el logotipo de Sony debe estar en la posición superior. Antes de configurar la Pantalla LCD o el Monitor LCD Asegúrese de tener en cuenta lo siguiente mientras configura la Pantalla LCD o el Monitor LCD: • Desconecte todos los cables mientras traslada la Pantalla LCD o el Monitor LCD. • Traslade la Pantalla LCD o el Monitor LCD con la cantidad adecuada de personas; se requieren dos o más personas para las Pantallas LCD o Monitores LCD de mayor tamaño (tres o más personas para la FW-85BZ40L / FW-85BZ35L / FW-85BZ30L). • Colocar correctamente las manos al trasladar la Pantalla LCD o el Monitor LCD es fundamental para la seguridad y para evitar daños. FW-85BZ40L / FW-85BZ35L / FW-85BZ30L FW-75BZ40L / FW-75BZ35L / FW-75BZ30L / FW-65BZ40L / FW-65BZ35L / FW-65BZ30L / FW-55BZ40L / FW-55BZ35L / FW-55BZ30L / FW-50BZ30L / FW-43BZ30L Especificaciones Dimensiones (Aprox.) (ancho x alto x fondo) (mm) / (pulgadas) WA(L): 30 × 635 × 10 / 1 3/16 × 25 × / 13 32 WA(S): 30 × 415 × 10 / 1 3/16 × 16 3/8 × / 13 32 Peso (Aprox.) (g) / (oz) WA(L): 420 / 14,6 WA(S): 280 / 9,6 Nota • El diseño y las especificaciones están sujetos a cambios sin previo aviso. Nederlands Lees eerst deze veiligheidsinstructies om uw persoonlijke veiligheid te garanderen en materiële schade te voorkomen. Vóór gebruik van de wandmontageadapter Deze wandmontageadapter corrigeert de verschuiving van de plaats van de wandmontagesteun ten opzichte van de middenpositie van scherm A. Bedenk eerst of u deze wandmontageadapter nodig hebt. Als u de wandmontagesteun niet ten opzichte van het scherm hoeft te centreren, dan hoeft u dit niet te gebruiken. Gebruik van een wandmontagesteun Het lcd-scherm of de lcd-monitor kan tegen een wand worden bevestigd met een geschikte wandmontagesteun (niet bijgeleverd). Bij sommige grotere lcd-schermen of lcd-monitoren moet de tafelstandaard wellicht worden verwijderd. Zie de instructies die bij het lcd-scherm of de lcd-monitor zijn geleverd. Installatie van de wandmontageadapter Opmerkingen • Bij gebruik van een elektrische schroevendraaier moet het moment op ongeveer 1,5 N·m {15 kgf·cm} worden ingesteld. • Bewaar de ongebruikte onderdelen op een veilige plaats voor toekomstig gebruik. Bewaar deze handleiding voor toekomstig gebruik. Schermgrootte Plaats Plaats van de (inch) schroef wandmontagesteun 43 A 2 50 B 55 C 65 E 3 75 F 85 G 4 Plaats schroef Voor het installeren van de wandmontageadapter op het lcd-scherm of de lcd-monitor. Installatie: Zie de bij het lcd-scherm of de lcd-monitor geleverde installatiehandleiding in combinatie met deze handleiding. 1 Verwijder de schroeven aan de achterzijde van het lcd-scherm of de lcd-monitor. Opmerkingen • Voor gebruikers van lcd-scherm of lcd-monitor met een grootte van 55/65/75/85 inch. Bewaar deze schroeven om de wandmontageadapter bij stap 3 te bevestigen. 2 Bevestig de bevestigingsplaat voor de wandmontage (bijgeleverd met het lcd-scherm of de lcd-monitor) aan de achterzijde van het lcd-scherm of de lcd-monitor (om het evenwijdig aan de wand te maken). 3 Bevestig de wandmontageadapter met de vier bijgeleverde schroeven. Zie de "Plaats schroef" in de tabel. 4 Bevestig de wandmontagesteun (niet bijgeleverd) op de wandmontageadapter. Zie de "Plaats van de wandmontagesteun" in de tabel. Als het lcd-scherm of de lcd-monitor verticaal wordt geplaatst, moet het Sony-logo bovenaan zijn. Voordat het lcd-scherm of de lcd-monitor wordt geïnstalleerd Houd bij het installeren van het lcd-scherm of de lcd-monitor rekening met het volgende: • Koppel alle kabels los wanneer u het lcd-scherm of de lcd-monitor draagt. • Draag het lcd-scherm of de lcd-monitor met een voldoende aantal mensen. Een groter formaat lcd-scherm of lcd-monitor vergt twee of meer personen (drie of meer personen voor FW-85BZ40L / FW-85BZ35L / FW-85BZ30L). • Het op de juiste plaats vasthouden tijdens het dragen van het lcd-scherm of de lcd-monitor is belangrijk voor de veiligheid en ter voorkoming van schade. FW-85BZ40L / FW-85BZ35L / FW-85BZ30L FW-75BZ40L / FW-75BZ35L / FW-75BZ30L / FW-65BZ40L / FW-65BZ35L / FW-65BZ30L / FW-55BZ40L / FW-55BZ35L / FW-55BZ30L / FW-50BZ30L / FW-43BZ30L Specificaties Afmetingen (ong.) (b × h × d) (mm) WA(L): 30 × 635 × 10 WA(S): 30 × 415 × 10 Gewicht (ong.) (g) WA(L): 420 WA(S): 280 Opmerkingen • Ontwerp en specificaties kunnen zonder voorafgaande kennisgeving worden gewijzigd. Deutsch Bitte beachten Sie die folgenden Sicherheitshinweise, um Verletzungen oder Sachschäden zu vermeiden. Vor der Verwendung des Wandhalterungseinstellers Dieser Wandhalterungseinsteller korrigiert den Versatz der Wandhalterung zur Mittenposition A des Bildschirms. Bitte überlegen Sie vor der Verwendung, ob Sie diesen Wandhalterungseinsteller benutzen müssen. Wenn Sie die Wandhalterung nicht zur Bildschirmmitte hin ausrichten müssen, benötigen Sie dies nicht. Verwenden einer Wandhalterung Das LCD-Display oder der LCD-Monitor kann mit einer geeigneten Wandhalterung (nicht mitgeliefert) an einer Wand montiert werden. Bei einigen größeren LCD-Displays oder LCD-Monitoren kann es erforderlich sein, den Tischständer zu entfernen; siehe die mit dem LCD-Display oder LCD-Monitor gelieferten Hinweise. Einrichten des Wandhalterungseinstellers Hinweis • Wenn Sie einen elektrischen Schraubendreher benutzen, setzen Sie das Drehmoment bei etwa 1,5 N·m {15 kgf·cm} an. • Bewahren Sie die unbenutzten Teile für eine spätere Verwendung an einem sicheren Ort auf. Bewahren Sie dieses Handbuch zum späteren Nachschlagen auf. Bildschirmgröße Position der Position der (Zoll) Schrauben Wandhalterung 43 A 2 50 B 55 C 65 E 3 75 F 85 G 4 Position der Schrauben Bei der Installation des Wandhalterungseinstellers am LCD-Display oder LCD-Monitor. Installation: Bitte lesen Sie das im Lieferumfang des LCD-Displays oder LCD-Monitors enthaltene Einrichtungshandbuch zusammen mit diesem Handbuch. 1 Entfernen Sie die Schrauben an der Rückseite des LCD-Displays oder LCD-Monitors. Hinweis • Für Benutzer von LCD-Displays oder LCD- Monitoren mit einer Bildschirmgröße von 55/65/75/85. Bitte bewahren Sie diese Schrauben für die Befestigung dieses Wandhalterungseinstellers in Schritt 3 auf. 2 Befestigen Sie die Wandmontagebefestigung (mit dem LCD-Display oder LCD-Monitor mitgeliefert) an der Rückseite des LCD-Displays oder LCD-Monitors (parallel zur Wand). 3 Befestigen Sie den Wandhalterungseinsteller mit den vier mitgelieferten Schrauben. Siehe „Position der Schrauben" in der Tabelle. 4 Bringen Sie die Wandhalterung (nicht mitgeliefert) am Wandhalterungseinsteller an. Siehe „Position der Wandhalterung" in der Tabelle. Wenn Sie das LCD-Display oder den LCD-Monitor vertikal aufstellen, muss das Sony-Logo oben positioniert sein. Vor dem Einrichten des LCD-Displays oder LCD-Monitors Beachten Sie beim Einrichten des LCD-Displays oder LCD-Monitors Folgendes: • Trennen Sie alle Kabel, wenn Sie das LCD-Display oder den LCD-Monitor tragen. • Tragen Sie das LCD-Display oder den LCD-Monitor mit einer angemessenen Anzahl von Personen. Größere LCD-Displays oder LCD-Monitore erfordern zwei oder mehr Personen (drei oder mehr Personen für FW-85BZ40L/FW-85BZ35L/ FW-85BZ30L). • Die richtige Handhaltung beim Tragen des LCD-Displays oder LCD-Monitors ist sehr wichtig für die Sicherheit und um Schäden zu vermeiden. FW-85BZ40L / FW-85BZ35L / FW-85BZ30L FW-75BZ40L / FW-75BZ35L / FW-75BZ30L / FW-65BZ40L / FW-65BZ35L / FW-65BZ30L / FW-55BZ40L / FW-55BZ35L / FW-55BZ30L / FW-50BZ30L / FW-43BZ30L Technische Daten Abmessungen (ca.) (B × H × T) (mm) WA(L): 30 × 635 × 10 WA(S): 30 × 415 × 10 Gewicht (ca.) (g) WA(L): 420 WA(S): 280 Hinweis • Änderungen, die dem technischen Fortschritt dienen, bleiben vorbehalten. Português Leia estas instruções de segurança para assegurar a sua segurança pessoal e evitar danos materiais. Antes de utilizar o Regulador de Parede O Regulador de Parede corrige o deslocamento da localização do Suporte de Parede para a posição central do ecrã A. Por favor considere se necessita de utilizar este Regulador de Parede antes de o fazer. Se não precisa de colocar o Suporte de Parede no centro do ecrã, não precisa utilizar isto. Utilizar um Suporte de parede O Ecrã LCD ou o Monitor LCD pode ser montado numa parede utilizando um Suporte de parede (não fornecido). Alguns dos Ecrãs LCD ou dos Monitores LCD de maior tamanho podem exigir a remoção do Suporte de Mesa, consulte as instruções fornecidas com o Ecrã LCD ou o Monitor LCD. Configurar o Regulador de Parede Nota • Se utilizar uma chave de fendas elétrica, fixe o torque para aproximadamente 1,5 N·m {15 kgf·cm}. • Guarde as peças que não utilizar num lugar seguro para poder utilizá-las no futuro. Guarde este manual para poder consultá-lo no futuro. Dimensões do Ecrã (Polegadas) Localização do parafuso Localização do Suporte de Parede 43 A 2 50 B 55 C 65 E 3 75 F 85 G 4 Localização do parafuso Quando instalar o Regulador de Parede no Ecrã LCD ou Monitor LCD. Instalação: Consulte o Guia de Configuração fornecido com o Ecrã LCD ou o Monitor LCD juntamente com este manual. 1 Retire os parafusos da parte de trás do Ecrã LCD ou Monitor LCD. Nota • Para o utilizador de Ecrã LCD ou Monitor LCD com ecrã de dimensões 55/65/75/85. Por favor guarde estes parafusos para fixar este Regulador de Parede no passo 3. 2 Instale a Fixação de Parede (fornecida com o Ecrã LCD ou Monitor LCD) à parte de trás do Ecrã LCD ou Monitor LCD (para ficar paralelo à parede). 3 Instale o Regulador de Parede utilizando os quatro parafusos fornecidos. Consulte a "Localização do parafuso" na tabela. 4 Instalar o Suporte de Parede (não fornecido) ao Regulador de Parede. Consulte a "Localização do Suporte de Parede" na tabela. Quando colocar o Ecrã LCD ou Monitor LCD na vertical, o logo Sony deve estar no topo. Antes de configurar o Ecrã LCD ou o Monitor LCD Certifique-se de que considera o seguinte ao configurar o Ecrã LCD ou o Monitor LCD: • Desligue todos os cabos quando transportar o Ecrã LCD ou o Monitor LCD. • O Ecrã LCD ou o Monitor LCD deve ser transportado pelo número adequado de pessoas. São necessárias duas ou mais pessoas no caso dos Ecrãs LCD ou dos Monitores LCD de maior tamanho (três ou mais pessoas para FW-85BZ40L / FW-85BZ35L / FW-85BZ30L). • O posicionamento correto das mãos ao transportar o Ecrã LCD ou o Monitor LCD é muito importante para fins de segurança e evitar a ocorrência de danos. FW-85BZ40L / FW-85BZ35L / FW-85BZ30L FW-75BZ40L / FW-75BZ35L / FW-75BZ30L / FW-65BZ40L / FW-65BZ35L / FW-65BZ30L / FW-55BZ40L / FW-55BZ35L / FW-55BZ30L / FW-50BZ30L / FW-43BZ30L Características técnicas Dimensões (Aprox.) (larg. × alt. × prof.) (mm) WA(L): 30 × 635 × 10 WA(S): 30 × 415 × 10 Peso (Aprox.) (g) WA(L): 420 WA(S): 280 Nota • O design e as características técnicas estão sujeitas a alteração sem aviso prévio. Italiano Leggere le presenti istruzioni per la sicurezza per garantire la sicurezza delle persone ed evitare danni alla proprietà. Prima di utilizzare il regolatore per il montaggio a parete Questo regolatore per il montaggio a parete corregge l'offset della posizione della staffa di montaggio a parete nella posizione centrale dello schermo A. Considerare se è necessario utilizzare questo regolatore per il montaggio a parete prima dell'uso. Se non si deve posizionare la staffa di montaggio a parete al centro dello schermo, non è necessario utilizzarlo. Utilizzo di una staffa di montaggio a parete Il display LCD o il monitor LCD può essere installato a parete utilizzando una staffa di montaggio a parete (non in dotazione). Alcuni display LCD o monitor LCD di dimensioni maggiori potrebbero richiedere la rimozione del supporto da tavolo, fare riferimento alle istruzioni fornite con il display LCD o il monitor LCD. Impostazione del regolatore per il montaggio a parete Nota • Se si utilizza un cacciavite elettrico, impostare la coppia di serraggio a circa 1,5 N·m {15 kgf·cm}. • Assicurarsi di conservare le parti inutilizzate in un luogo sicuro per un utilizzo futuro. Conservare il presente manuale per riferimenti futuri. Dimensioni schermo (pollici) Posizione delle viti Posizione della staffa di montaggio a parete 43 A 2 50 B 55 C 65 E 3 75 F 85 G 4 Posizione delle viti Quando si installa il regolatore per il montaggio a parete sul display LCD o sul monitor LCD. Installazione: Fare riferimento alla Guida di installazione inclusa nel display LCD o nel monitor LCD insieme al presente manuale. 1 Rimuovere le viti dal retro del display LCD o del monitor LCD. Nota • Per utenti di display LCD o monitor LCD con dimensioni dello schermo da 55/65/75/85. Conservare queste viti per fissare questo regolatore per il montaggio a parete al passo 3. 2 Collegare l'accessorio di montaggio a parete (in dotazione con il display LCD o il monitor LCD) al retro del display LCD o del monitor LCD (per renderlo parallelo alla parete). 3 Collegare il regolatore per il montaggio a parete utilizzando le quattro viti in dotazione. Fare riferimento alla "Posizione delle viti" nella tabella. 4 Fissare la staffa di montaggio a parete (non in dotazione) al regolatore per il montaggio a parete. Fare riferimento alla "Posizione della staffa di montaggio a parete" nella tabella. Quando si colloca il display LCD o il monitor LCD verticalmente, il logo Sony deve essere posizionato in alto. Prima di impostare il display LCD o il monitor LCD Assicurarsi di considerare quanto segue durante l'impostazione del display LCD o del monitor LCD: • Scollegare tutti i cavi durante il trasporto del display LCD o del monitor LCD. • Trasportare il display LCD o il monitor LCD con un numero adeguato di persone; i display LCD o i monitor LCD di dimensioni maggiori richiedono due o più persone (tre o più persone per FW-85BZ40L / FW-85BZ35L / FW-85BZ30L). • Il corretto posizionamento delle mani durante il trasporto del display LCD o del monitor LCD è estremamente importante per la sicurezza e per evitare danni. FW-85BZ40L / FW-85BZ35L / FW-85BZ30L FW-75BZ40L / FW-75BZ35L / FW-75BZ30L / FW-65BZ40L / FW-65BZ35L / FW-65BZ30L / FW-55BZ40L / FW-55BZ35L / FW-55BZ30L / FW-50BZ30L / FW-43BZ30L Caratteristiche tecniche Dimensioni (circa) (l × a × p) (mm) WA(L): 30 × 635 × 10 WA(S): 30 × 415 × 10 Peso (circa) (g) WA(L): 420 WA(S): 280 Nota • Design e caratteristiche tecniche sono soggetti a modifiche senza preavviso. Svenska Läs igenom dessa säkerhetsinstruktioner för att försäkra dig om din säkerhet och förhindra skador på egendom. Innan du använder väggfästjusteraren Denna väggfästjusterare korrigerar förskjutningen för väggfästets plats till mittpositionen för skärm A. Fundera igenom om du behöver använda denna väggfästjusterare innan användning. Om du inte behöver placera väggfästet mot skärmens mitt behöver du inte använda den. Använda ett väggfäste LCD-skärmytan eller LCD-bildskärmen kan monteras på en vägg med ett passande väggfäste (medföljer ej). För vissa större LCD-skärmytor och LCD-bildskärmar kan det krävas att man tar bort bordsstativet; se instruktionerna som medföljde LCD-skärmytan eller LCD-bildskärmen. Installera väggfästjusteraren Obs! • Om du använder en elektrisk skruvdragare, ställ in vridmomentet på ungefär 1,5 N·m {15 kgf·cm}. • Glöm inte att spara oanvända delar på en säker plats för framtida användning. Spara denna bruksanvisning för framtida användning. Skärmstorlek Placering av (tum) skruvar Plats för väggfäste 43 A 2 50 B 55 C 65 E 3 75 F 85 G 4 Placering av skruvar När du installerar väggfästjusteraren på LCD-skärmytan eller LCD-bildskärmen. Installation: Se Startguiden som kom med LCD-skärmytan eller LCD-bildskärmen ihop med denna manual. 1 Lossa skruvarna på LCD-skärmytans eller LCD-bildskärmens baksida. Obs! • För användare av LCD-skärmyta eller LCD-bildskärm av storleken 55/65/75/85. Behåll dessa skruvar för att fästa denna väggfästjusterare i steg 3. 2 Fäst väggfästanordningen (medföljer LCD-skärmytan eller LCD-bildskärmen) mot LCD-skärmytans eller LCD-bildskärmens baksida (för att få den parallell med väggen). 3 Fäst väggfästjusteraren med de fyra medföljande skruvarna. Se "Placering av skruvar" i tabellen. 4 Fäst väggfästet (medföljer ej) mot väggfästjusteraren. Se "Plats för väggfäste" i tabellen. När LCD-skärmytan eller LCD-bildskärmen placeras vertikalt måste Sonys logotypmärke vara installerat i topposition. Innan du installerar LCD-skärmytan eller LCD-bildskärmen Se till att iaktta följande när du ställer in LCD-skärmytan eller LCD-bildskärmen: • Koppla ur alla kablar när du bär LCD-skärmytan eller LCD-bildskärmen. • Bär LCD-skärmytan eller LCD-bildskärmen med tillräckligt antal personer; för större storlekar på LCD-skärmytor eller LCD-bildskärmar krävs två eller fler personer (tre eller fler personer för FW-85BZ40L / FW-85BZ35L / FW-85BZ30L). • Korrekt handplacering när LCD-skärmytan eller LCD-bildskärmen bärs är väldigt viktigt för säkerhet och för att undvika skada. FW-85BZ40L / FW-85BZ35L / FW-85BZ30L FW-75BZ40L / FW-75BZ35L / FW-75BZ30L / FW-65BZ40L / FW-65BZ35L / FW-65BZ30L / FW-55BZ40L / FW-55BZ35L / FW-55BZ30L / FW-50BZ30L / FW-43BZ30L Specifikationer Mått (Ca.) (b × h × d) (mm) WA(L): 30 × 635 × 10 WA(S): 30 × 415 × 10 Vikt (Ca.) (g) WA(L): 420 WA(S): 280 Obs! • Design och specifikationer kan ändras utan förvarning. Dansk Sikkerhedsforanstaltningerne nedenfor skal læses for at beskytte dig og undgå tingskade. Før du bruger justeringsenheden til vægmontering Denne justeringsenhed til vægmontering korrigerer forskydningen af placeringen af beslaget til vægmontering til midterpositionen for skærm A. Overvej, om du skal bruge denne justeringsenhed til vægmontering før brug. Hvis du ikke behøver at sætte beslaget til vægmontering til midten af skærmen, behøver du ikke bruge dette. Anvendelse af beslag til vægmontering LCD-displayet eller LCD-skærmen kan monteres på en væg ved hjælp af et egnet beslag til vægmontering (medfølger ikke). Visse større LCD-display eller LCD-skærme kræver muligvis, at LCD-skærmfoden fjernes. Se instruktionerne, der fulgte med LCD-displayet eller LCD-skærmen. Opsætning af justeringsenheden til vægmontering Bemærk • Ved brug af elektrisk skruetrækker, sættes moment til omkring 1,5 N·m {15 kgf·cm}. • Sørg for at opbevare dele, der ikke bruges, et sikkert sted til brug i fremtiden. Gem vejledningen til senere brug. Skærmstørrelse (tommer) Placering af skrue Placering af beslag til vægmontering 43 A 2 50 B 55 C 65 E 3 75 F 85 G 4 Placering af skrue Når du installerer justeringsenheden til vægmontering på LCD-displayet eller LCD-skærmen. Installation: Se venligst installationsvejledningen, der følger med LCD-displayet eller LCD-skærmen sammen med denne vejledning. 1 Fjern skruer fra bagsiden af LCD-displayet eller LCD-skærmen. Bemærk • Til bruger af skærmstørrelse 55/65/75/85 LCD-display eller LCD-skærm. Gem disse skruer til fastgøring af denne justeringsenhed til vægmontering i trin 3. 2 Forbind tilslutningen til vægmontering (der følger med LCD-displayet eller LCD-skærmen) til bagsiden af LCD-displayet eller LCD-skærmen (for at gøre den parallel med muren). 3 Fastgør justeringsenheden til vægmontering ved hjælp af de fire medfølgende skruer. Se "Placering af skrue" i tabellen. 4 Fastgør beslaget til vægmontering (medfølger ikke) justeringsenheden til vægmontering. Se "Placering af beslag til vægmontering" i tabellen. Når LCD-displayet eller LCD-skærmen placeres lodret, skal Sony-logomærket være øverst. Før opsætning af LCD-displayet eller LCD-skærmen Sørg for at overveje følgende under opsætning af LCD-displayet eller LCD-skærmen: • Frakobl alle kabler, når LCD-displayet eller LCD-skærmen bæres. • Bær LCD-displayet eller LCD-skærmen med det nødvendige antal personer; større LCD-display eller LCD-skærme kræver to eller flere personer (tre eller flere personer til FW-85BZ40L / FW-85BZ35L / FW-85BZ30L). • Korrekt placering af hænderne mens LCD-displayet eller LCD-skærmen bæres er meget vigtigt af hensyn til sikkerheden og for at undgå skader. FW-85BZ40L / FW-85BZ35L / FW-85BZ30L FW-75BZ40L / FW-75BZ35L / FW-75BZ30L / FW-65BZ40L / FW-65BZ35L / FW-65BZ30L / FW-55BZ40L / FW-55BZ35L / FW-55BZ30L / FW-50BZ30L / FW-43BZ30L Specifikationer Mål (Ca.) (b × h × d) (mm) WA(L): 30 × 635 × 10 WA(S): 30 × 415 × 10 Vægt (Ca.) (g) WA(L): 420 WA(S): 280 Bemærk • Design og specifikationer kan ændres uden varsel. Suomi Lukekaa nämä turvaohjeet oman turvallisuutenne varmistamiseksi ja omaisuusvahinkojen välttämiseksi. Ennen seinäasennussäätimen käyttöä Tämä seinäasennussäädin siirtää seinäasennuskiinnittimen sijainnin näytön keskikohtaan A. Harkitse ennen käyttöä, tarvitseeko sinun käyttää tätä seinäasennussäädintä. Jos seinäasennuskiinnitintä ei ole tarpeen siirtää näytön keskelle, tätä säädintä ei tarvitse käyttää. Seinäasennuskiinnittimen käyttäminen LCD-näytön voi asentaa seinään seinäasennuskiinnittimellä (ei sisälly toimitukseen). Joissakin suurikokoisissa LCD-näytöissä tämä voi edellyttää pöytäjalustan irrottamista. Katso LCD-näytön mukana toimitettuja ohjeita. Seinäasennussäätimen asentaminen Huomautus • Jos käytät sähköistä ruuvitalttaa, aseta vääntömomentiksi noin 1,5 N·m {15 kgf·cm}. • Pane käyttämättömät osat talteen turvalliseen paikkaan tulevaa käyttötarvetta varten. Säilytä tämä käyttöohje tulevaa käyttöä varten. Näytön koko (tuuma) Ruuvin Seinäasennuskiinnittimen sijainti sijainti 43 A 2 50 B 55 C 65 E 3 75 F 85 G 4 Ruuvin sijainti Kun asennat seinäasennussäädintä LCD-näyttöön. Asennus: Tutustu LCD-näytön mukana toimitettuun Asetusoppaaseen yhdessä tämän käyttöoppaan kanssa. 1 Irrota ruuvit LCD-näytön takaosasta. Huomautus • 55/65/75/85 näytön kokoiselle LCD-näytön käyttäjälle. Säilytä nämä ruuvit, jotta voit kiinnittää tämän seinäasennussäätimen vaiheessa 3. 2 Kiinnitä seinäasennuksen kiinnitysosa (sisältyy LCD-näytön toimitukseen) LCD-näytön takaosaan (jotta se on seinän kanssa samansuuntainen). 3 Kiinnitä seinäasennussäädin neljällä mukana toimitetulla ruuvilla. Katso taulukon kohta "Ruuvin sijainti". 4 Kiinnitä seinäasennuskiinnitin (ei sisälly toimitukseen) seinäasennussäätimeen. Katso taulukon kohta "Seinäasennuskiinnittimen sijainti". Kun LCD-näyttö asetetaan pystysuoraan, Sony-logomerkki on asetettava yläasentoon. Ennen LCD-näytön asennusta Huomioi seuraavat asiat asentaessasi LCD-näyttöä: • Irrota kaikki kaapelit, kun siirrät LCD-näyttöä. • Ota LCD-näytön kantamiseen mukaan riittävä määrä avustajia. Suurikokoisten LCD-näyttöjen siirtämiseen tarvitaan vähintään kaksi kantajaa (vähintään kolme malleille FW-85BZ40L / FW-85BZ35L / FW-85BZ30L). • Oikeista kohdista kiinni pitäminen LCD-näyttöä kannettaessa on erittäin tärkeää turvallisuuden vuoksi ja vahinkojen välttämiseksi. FW-85BZ40L / FW-85BZ35L / FW-85BZ30L FW-75BZ40L / FW-75BZ35L / FW-75BZ30L / FW-65BZ40L / FW-65BZ35L / FW-65BZ30L / FW-55BZ40L / FW-55BZ35L / FW-55BZ30L / FW-50BZ30L / FW-43BZ30L Tekniset tiedot Mitat (Noin) (l × k × s) (mm) WA(L): 30 × 635 × 10 WA(S): 30 × 415 × 10 Paino (Noin) (g) WA(L): 420 WA(S): 280 Huomautus • Rakennetta ja teknisiä tietoja saatetaan muuttaa siitä erikseen ilmoittamatta. Norsk Les gjennom disse sikkerhetsinstruksene for å sikre din egen personlige sikkerhet og forhindre eiendomsskade. Før bruk av veggmonteringsjusteringen Denne veggmonteringsjusteringen korrigerer forskyvingen av plasseringen for veggmonteringsbraketten til senterposisjonen på skjerm A. Vurder om du behøver å bruke denne veggmonteringsjusteringen før du tar den i bruk. Hvis det ikke er nødvendig å plassere veggmonteringsbraketten på midten av skjermen, behøver du ikke bruke denne. Bruke en veggmonteringsbrakett LCD-displayet eller LCD-skjermen kan monteres på en vegg med en passende veggmonteringsbrakett (medfølger ikke). Noen større LCD-displayer eller LCD-skjermer vil kunne kreve at bordstativet demonteres, se instruksjoner som følger med LCD-displayet eller LCD-skjermen. Oppsett for veggmonteringsjusteringen Merknader • Still moment til ca. 1,5 N·m {15 kgf·cm} hvis det brukes en elektrisk skrutrekker. • Sørg for at de ubrukte delene blir oppbevart på en trygg plass for framtidig bruk. Behold denne håndboken for fremtidig referanse. Skjermstørrelse (tommer) Skrueplassering Plassering av veggmonteringsbrakett 43 A 2 50 B 55 C 65 E 3 75 F 85 G 4 Skrueplassering Ved montering av veggmonteringsjusteringen på LCD-displayet eller LCD-skjermen. Installasjon: Se Innstillingsveiledningen som er pakket sammen med LCD-displayet eller LCD-skjermen sammen med denne veiledningen. 1 Fjern skruene fra baksiden av LCD-displayet eller LCD-skjermen. Merknader • For brukere av LCD-display eller LCD-skjerm med skjermstørrelse 55/65/75/85. Ta vare på disse skruene for bruk ved montering av denne veggmonteringsjusteringen i trinn 3.
-
 1
1 -
 2
2
 |
 |