Sony HDR-CX300 Operating Guide - Page 18
Step 2: Turning the power on, and setting the date and time, Open the LCD screen of your camcorder.
 |
UPC - 027242788817
View all Sony HDR-CX300 manuals
Add to My Manuals
Save this manual to your list of manuals |
Page 18 highlights
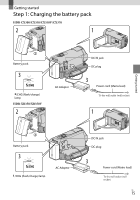
Step 2: Turning the power on, and setting the date and time 1 Open the LCD screen of your camcorder. Your camcorder is turned on and the lens cover is opened. To turn on your camcorder when the LCD screen is open, press POWER. MODE lamp POWER button 2 Select the desired geographical area with Touch the button on the LCD screen / , then touch [NEXT]. To set the date and time again, touch (MENU) [Show others] [CLOCK/ LANG] (under [GENERAL SET] category) [CLOCK SET]. When an item is not on the screen, touch / until the item appears. 3 Set [DST SET] or [SUMMERTIME], date and time, then touch . The clock starts. If you set [DST SET] or [SUMMERTIME] to [ON], the clock advances 1 hour. US 18
-
 1
1 -
2
-
3
-
4
-
5
-
6
-
7
-
8
-
9
-
10
-
11
-
12
-
 13
13 -
 14
14 -
 15
15 -
 16
16 -
 17
17 -
 18
18 -
 19
19 -
 20
20 -
 21
21 -
 22
22 -
 23
23 -
24
-
25
-
26
-
27
-
28
-
29
-
30
-
31
-
32
-
33
-
34
-
35
-
36
-
37
-
38
-
39
-
40
-
41
-
42
-
43
-
44
-
45
-
46
-
47
-
48
-
49
-
50
-
51
-
52
-
53
-
54
-
55
-
56
-
57
-
58
-
59
-
60
-
61
-
62
-
63
-
64
-
65
-
66
-
67
-
68
-
69
-
70
-
71
-
72
-
73
-
74
-
75
-
76
-
77
-
78
-
79
-
80
-
81
-
82
-
83
-
84
-
85
-
86
-
87
-
88
-
89
-
90
-
91
-
92
-
93
-
94
-
95
-
96
-
97
-
98
-
99
-
100
-
101
-
102
-
103
-
104
-
105
-
106
-
107
-
108
-
109
-
110
-
111
-
112
-
113
-
114
-
115
-
116
-
117
-
118
-
119
-
120
-
121
-
122
-
123
-
124
-
125
-
126
-
127
-
128
-
129
-
130
-
131
-
132
-
133
-
134
-
135
-
136
-
137
-
138
-
139
-
140
-
141
-
142
-
143
-
144
-
145
-
146
-
147
-
148
-
149
-
150
-
151
-
152
-
153
-
154
-
155
 |
 |
1¸
US
Step 2: Turning the power on, and setting the
date and time
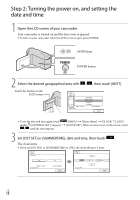
1
Open the LCD screen of your camcorder.
Your camcorder is turned on and the lens cover is opened.
To turn on your camcorder when the LCD screen is open, press POWER.
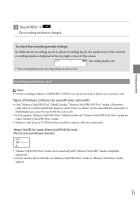
2
Select the desired geographical area with
/
, then touch [NEXT].
To set the date and time again, touch
(MENU)
[Show others]
[CLOCK/
LANG]
(under
[GENERAL SET] category)
[CLOCK SET]. When an item is not on the screen, touch
/
until the item appears.
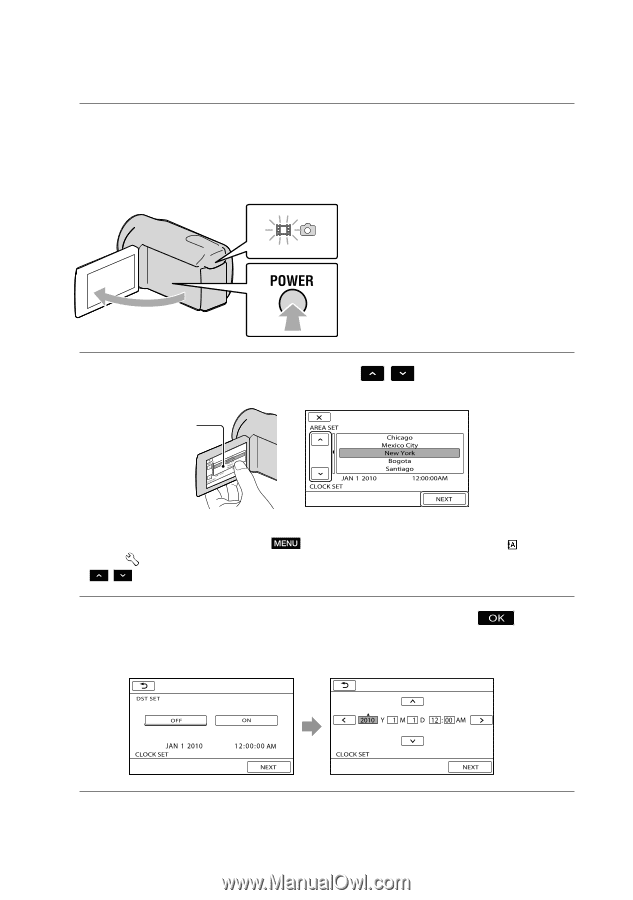
3
Set [DST SET] or [SUMMERTIME], date and time, then touch
.
The clock starts.
If you set [DST SET] or [SUMMERTIME] to [ON], the clock advances 1 hour.
Touch the button on the
LCD screen
MODE lamp
POWER button