Sony HDR-CX560V Handycam® Handbook - Page 121
Parts and controls - camcorder accessories
 |
UPC - 027242820128
View all Sony HDR-CX560V manuals
Add to My Manuals
Save this manual to your list of manuals |
Page 121 highlights
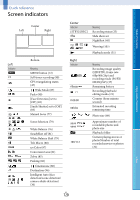
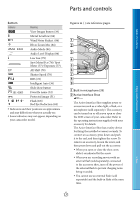
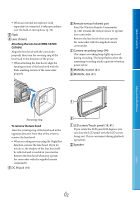
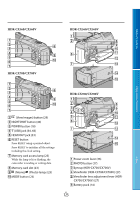
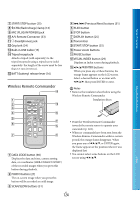
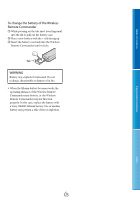
Parts and controls Table of Contents Enjoy Useful Functions Bottom Indicator Meaning View Images button (29) Micref Level low (84) Wind Noise Reduct. (84) Blt-in Zoom Mic (84) Audio Mode (84) Audio Level Display (86) Low Lux (79) Spot Meter/Fcs (76)/ Spot Meter (77)/ Exposure (77) EV AE Shift (78) Shutter Speed (78) IRIS (78) Intelligent Auto (36) Slide show button 101-0005 Data file name (32) Protected image (51) Flash (83)/ Red Eye Reduction (84) Indicators and their positions are approximate and may differ from what you actually see. Some indicators may not appear, depending on your camcorder model. Figures in ( ) are reference pages. Built-in microphone (39) Active Interface Shoe The Active Interface Shoe supplies power to accessories such as a video light, a flash, or a microphone (sold separately). The accessory can be turned on or off as you open or close the LCD screen of your camcorder. Refer to the operating instructions supplied with your accessory for details. The Active Interface Shoe has a safety device for fixing the installed accessory securely. To connect an accessory, press down and push it to the end, and then tighten the screw. To remove an accessory, loosen the screw, and then press down and pull out the accessory. When you open or close the shoe cover, slide it as indicated by the arrow. When you are recording movies with an external flash (sold separately) connected to the accessory shoe, turn off the power of the external flash to prevent charging noise being recorded. You cannot use an external flash (sold separately) and the built-in flash at the same time. US 121 Index
-
 1
1 -
2
-
3
-
4
-
5
-
6
-
7
-
8
-
9
-
10
-
11
-
12
-
13
-
14
-
15
-
16
-
17
-
18
-
19
-
20
-
21
-
22
-
23
-
24
-
25
-
26
-
27
-
28
-
29
-
30
-
31
-
32
-
33
-
34
-
35
-
36
-
37
-
38
-
39
-
40
-
41
-
42
-
43
-
44
-
45
-
46
-
47
-
48
-
49
-
50
-
51
-
52
-
53
-
54
-
55
-
56
-
57
-
58
-
59
-
60
-
61
-
62
-
63
-
64
-
65
-
66
-
67
-
68
-
69
-
70
-
71
-
72
-
73
-
74
-
75
-
76
-
77
-
78
-
79
-
80
-
81
-
82
-
83
-
84
-
85
-
86
-
87
-
88
-
89
-
90
-
91
-
92
-
93
-
94
-
95
-
96
-
97
-
98
-
99
-
100
-
101
-
102
-
103
-
104
-
105
-
106
-
107
-
108
-
109
-
110
-
111
-
112
-
113
-
114
-
115
-
 116
116 -
 117
117 -
 118
118 -
 119
119 -
 120
120 -
 121
121 -
 122
122 -
 123
123 -
 124
124 -
 125
125 -
 126
126 -
127
-
128
 |
 |