Sony HT-6600DP Operating Instructions
Sony HT-6600DP - Dvd Home Theater Manual
 |
View all Sony HT-6600DP manuals
Add to My Manuals
Save this manual to your list of manuals |
Sony HT-6600DP manual content summary:
- Sony HT-6600DP | Operating Instructions - Page 1
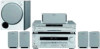
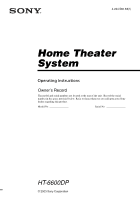
4-244-560-12(1) Home Theater System Operating Instructions Owner's Record The model and serial numbers are located at the rear of the unit. Record the serial number in the space provided below. Refer to them whenever you call upon your Sony dealer regarding this product. Model No. Serial No. - Sony HT-6600DP | Operating Instructions - Page 2
magnitude to constitute a risk of electric shock to persons. This symbol is intended to alert the user to the presence of important operating and maintenance (servicing) instructions in the literature accompanying the appliance. 2US WARNING This equipment has been tested and found to comply - Sony HT-6600DP | Operating Instructions - Page 3
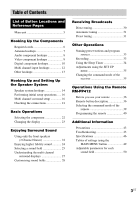
command mode of the receiver 35 Operations Using the Remote RM-PP412 Before you use your remote 36 Remote button description 36 Selecting the command mode of the remote 39 Programming the remote 40 Additional Information Precautions 43 Troubleshooting 43 Specifications 46 Tables of settings - Sony HT-6600DP | Operating Instructions - Page 4
Area code Any differences in operation, according to the area code, are clearly indicated in the text, for example, "Models of area code AA only". Tip The instructions in this manual describe the controls on the receiver. You can also use the controls on the supplied remote if they have the same - Sony HT-6600DP | Operating Instructions - Page 5
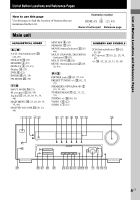
buttons that are mentioned in the text. Illustration number r DISPLAY 3 (23, 45) R R Name of Display qs (23) DVD 8 (22) ENTER qh (33, 35) FM MODE wk (30) I - O INPUT MODE qf (22) IR (receptor) 5 (36, 45) Jog dial qj (17, 28, 29, 33, 35, 49) MAIN MENU qg (17, 28, 29, 33, 35, 49) MASTER VOLUME - Sony HT-6600DP | Operating Instructions - Page 6
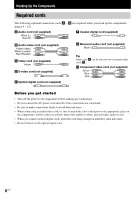
Hooking Up the Components Required cords The following optional connection cords A - H are required when you hook up the components (pages 8 - 12). A Audio cord (not supplied) White (L) Red (R) F Coaxial digital cord (supplied) B Audio/video cord (not supplied) Yellow (video) White (L/audio) - Sony HT-6600DP | Operating Instructions - Page 7
of the connector varies depending on the area code. Notes on antenna hookups • To prevent noise pickup, keep the AM loop antenna away from the receiver and other components. • Be sure to fully extend the FM wire antenna. • After connecting the FM wire antenna, keep it as horizontal as possible. 7US - Sony HT-6600DP | Operating Instructions - Page 8
Audio component hookups MD or Tape deck INPUT OUTPUT LINE LINE L R A A OUT IN ç ç DIGITAL OPTICAL VIDEO 2 IN MD/ TAPE IN MD/ TAPE OUT CD/ SACD IN DVD IN COAXIAL L ANTENNA AM y FM 75Ω COAXIAL L CENTER MONITOR VIDEO IN VIDEO IN VIDEO OUT VIDEO IN VIDEO OUT S-VIDEO S-VIDEO IN IN L S- - Sony HT-6600DP | Operating Instructions - Page 9
IN TV monitor Note on video component hookups You can connect your TV's audio output jacks to the VIDEO 2 AUDIO IN jacks on the receiver and apply sound effects to the audio from the TV. In this case, do not connect the TV's video output jack to the VIDEO 2 VIDEO IN jack - Sony HT-6600DP | Operating Instructions - Page 10
output jacks of your DVD player and satellite tuner (etc.) to the receiver's digital input jacks to bring the multi channel surround sound of a movie theater into your home. To fully enjoy multi channel surround sound, five speakers (two front speakers, two surround speakers, and a center speaker - Sony HT-6600DP | Operating Instructions - Page 11
signals, make digital connections. • The sound is not output when you play a Super Audio CD disc on the Super Audio CD player connected to the CD/SACD OPTICAL IN jack on this unit. Connect to the analog input jacks (CD/SACD IN jacks). Refer to the operating instructions supplied with the Super Audio - Sony HT-6600DP | Operating Instructions - Page 12
directly to the receiver to enjoy the sound of the DVD player sound, five speakers (two front speakers, two surround speakers, and a center speaker) and a sub woofer are required. Refer to the operating instructions • See page 14 for details on speaker system hookup. DIGITAL OPTICAL VIDEO 2 IN MD/ - Sony HT-6600DP | Operating Instructions - Page 13
CENTER SPEAKERS IMPEDANCE USE 8-16Ω SURROUND Connecting the AC power cord Before connecting the AC power cord of this receiver to a wall outlet, connect the speaker system to the receiver (page 14). Connect the AC power cord(s) of your audio/ video components to a wall outlet. b To a wall outlet - Sony HT-6600DP | Operating Instructions - Page 14
USE 8-16Ω SURROUND SPEAKERS FRONT B* A A A e Ee Ee E Center speaker Surround speaker Surround speaker (R) (L) * If you have an additional front speaker system, connect them to the SPEAKERS FRONT B terminals. You can select the front speakers you want to use with the SPEAKERS (OFF - Sony HT-6600DP | Operating Instructions - Page 15
of the speakers. Hooking Up and Setting Up the Speaker System Stripped cords are touching each other due to excessive removal of sound is heard from a speaker while outputting a test tone or a test tone is output from a speaker other than the one whose name is currently displayed on the receiver, - Sony HT-6600DP | Operating Instructions - Page 16
names of input selectors and preset stations. • The master volume is set to "VOL MIN". Performing initial setup operations Before using your receiver for the first time, adjust SET UP parameters so that the receiver correspond to your system. For the adjustable parameters, see the table on page 49 - Sony HT-6600DP | Operating Instructions - Page 17
change the speaker system, select "NORM. sound balance. If you use Sony 's Micro Satellite Speakers, select "MICRO SP.". Caution When you use Micro Satellite Speakers and the speaker size is set to "LARGE", you may not obtain the correct soundstage. The speaker may also be damaged at high volume - Sony HT-6600DP | Operating Instructions - Page 18
15 feet closer to your listening position (C on page 16). Tip The receiver allows you to input the speaker position in terms of distance. However, it because incorrect speaker placement is not conducive to enjoy surround sound. Please note that, setting the speaker distance closer than the actual - Sony HT-6600DP | Operating Instructions - Page 19
Hooking Up and Setting Up the Speaker System Tip The surround speaker placement parameter is designed specifically for implementation of the Digital Cinema Sound modes with virtual elements. With the Digital Cinema Sound modes, speaker placement is not as critical as other modes. All modes with - Sony HT-6600DP | Operating Instructions - Page 20
frequencies output from that speaker, set it to "SMALL". If the overall sound level is lower than you prefer, set all speakers to "LARGE". If MASTER VOL +/- on the remote or turn MASTER VOLUME on the receiver. Notes • The adjusted value are shown in the display during adjustment. • Although these - Sony HT-6600DP | Operating Instructions - Page 21
). 4 Start playing. If you do not obtain normal sound output after performing this procedure, see "Troubleshooting" on page 43 and take the appropriate measures to correct the problem. LEVEL 1 Rotate LEVEL to adjust the volume. Set the volume level to best suit your preference according to the - Sony HT-6600DP | Operating Instructions - Page 22
Operations jacks. Note When the 96 kHz digital signal is input, the tone, sound field and effect level do not function. MULTI CH IN Press MULTI CH recorded in a multi channel format. MUTING Press MUTING on the remote to mute the sound. Press again to cancel the muting function. The muting function - Sony HT-6600DP | Operating Instructions - Page 23
Press SPEAKERS (OFF/A/B/A+B) to output the sound from the speakers connected to the SPEAKERS FRONT terminals. Each time you press the button, the display will light up cyclically as follows: SP A t SP B t SP A and SP B t No display* To drive Speaker System A (Connected to the SPEAKERS FRONT - Sony HT-6600DP | Operating Instructions - Page 24
receiver's preprogrammed sound fields. They bring the exciting and powerful sound of movie theaters and concert halls into your home. You can also customize the sound fields to obtain the sound you want by changing the surround parameter. To fully enjoy surround sound, you must register the number - Sony HT-6600DP | Operating Instructions - Page 25
Sony Pictures Entertainment, Sony measured the sound environment of their studios and integrated the data of the measurement and Sony's own DSP (Digital Signal Processor) technology to develop "Digital Cinema Sound". In a home theater, "Digital Cinema Sound" simulates an ideal movie theater sound - Sony HT-6600DP | Operating Instructions - Page 26
(Cinema Studio EX B) Reproduces the sound characteristics of the Sony Pictures Entertainment "Kim Novak Theater" cinema production studio. This mode is . Tips • The receiver lets you apply the last selected sound field to a program source whenever it is selected (Sound Field Link). For example - Sony HT-6600DP | Operating Instructions - Page 27
Enjoying Surround Sound Understanding the multi channel surround displays 1 23 4 56 7 SP A SP B aDIGITAL a PRO LOGIC II DTS L C 7 Tuner indicators: Lights up when using the receiver to tune in radio stations, etc. See pages 30 - 32 for tuner operations. 8 SLEEP: Lights up when sleep timer is - Sony HT-6600DP | Operating Instructions - Page 28
multi channel surround displays (continued) qd Playback channel indicators: The letters (L, C, R, etc.) indicate the channels being played back. The boxes around the letters vary to show how the receiver downmixes the source sound (based on the speakers settings). When using sound fields like "C.ST - Sony HT-6600DP | Operating Instructions - Page 29
volumes late at night. We recommend using the "MAX" setting. • To reproduce the sound track with no compression, select "OFF". • To reproduce the sound other small speakers, adjust LEVEL on the subwoofer (page 21) to reinforce the bass. Resetting customized sound fields to the factory settings 1 If - Sony HT-6600DP | Operating Instructions - Page 30
. If not, repeat steps 2 and 3. If the entered numbers still flash, the frequency is not used in your area. 4 If you've tuned in an AM station, adjust the direction of the AM loop antenna for optimum reception. 5 Repeat steps 1 to 4 to receive another station. Tips • If you do not remember the - Sony HT-6600DP | Operating Instructions - Page 31
supplied remote. Up to 30 FM or AM stations can be preset. The receiver will also (page 31). 3 Press MEMORY. "MEMORY" appears in the display for a few seconds. Do steps 4 to 5 before "MEMORY MEMORY" goes out before you select the preset station number, start again from step 3. 5 Press MEMORY again - Sony HT-6600DP | Operating Instructions - Page 32
codes Use the supplied remote to perform the following operations. For details on the buttons used in this section, see pages 36-42. 1 Press TUNER on the remote. The last received station is tuned in. 2 Press SHIFT to select a memory page (A, B, or C), then press the preset number of the station you - Sony HT-6600DP | Operating Instructions - Page 33
until a blank space appears in the display. If you've made a mistake Press or repeatedly until the character to be changed flashes, then turn the jog dial to select record on a cassette tape or MiniDisc using the receiver. See the operating instructions of your cassette deck or MD deck if you need - Sony HT-6600DP | Operating Instructions - Page 34
receiver. You can also add audio from a variety of audio sources when editing a video tape. See the operating instructions can record the sound from any receiver to turn off automatically at a specified time. Press SLEEP on the remote while the power is on. Each time you press the button, the display - Sony HT-6600DP | Operating Instructions - Page 35
, the display changes as follows: C.MODE.AV1 y C.MODE.AV2 Tip The initial setting is "C.MODE.AV2". Notes • The initial setting for the command mode of the supplied remote is "AV2". • If the command mode of the receiver and the remote is different, you cannot use the remote to operate the receiver - Sony HT-6600DP | Operating Instructions - Page 36
MENU/ GUIDE MUTING AV MENU F G g MASTER VOL f O DISPLAY TV VOL RETURN/EXIT TV/ MAIN TV CH VIDEO MENU WIDE ON SCREEN The tables below show the settings of each button. Remote Button ?/1 SLEEP VIDEO1 VIDEO2 Operations Function Receiver Receiver Receiver Receiver Turns the receiver on - Sony HT-6600DP | Operating Instructions - Page 37
-mode. MUTING Receiver Mutes the sound from the receiver. Remote Button Operations Function V/v Receiver Select a menu item. B/b Receiver Makes adjustment or change the setting. MASTER Receiver VOL +/- Adjusts the master volume of the receiver. MAIN MENU Receiver Press this button - Sony HT-6600DP | Operating Instructions - Page 38
Receiver CH/ D.SKIP +/- TV/VCR/ Satellite tuner CD player/ VCD player/ DVD player/ MD deck ENTER TV/VCR/ Satellite tuner/ LD player/ MD deck/ DAT deck/ Tape deck DISC CD player/ VCD player ANT VCR Function Changes the sound Sony TVs with the picture-in-picture function. Remote Operations - Sony HT-6600DP | Operating Instructions - Page 39
printing, press ALT first before pressing the buttons. • Press MAIN MENU on the remote before you use the V/v/B/b buttons for receiver operation. • Press TOP MENU/GUIDE or AV MENU on the remote before you use the remote to control the satellite tuner, VCR and DVD player. • The VIDEO3, TV/SAT, PHONO - Sony HT-6600DP | Operating Instructions - Page 40
system. Furthermore, you can also program the remote for Sony components that the remote is unable to control. Note that the remote can only control components that accept infrared wireless control the indicator flashes 4 times in quick succession while entering the numeric code, an error has - Sony HT-6600DP | Operating Instructions - Page 41
of the component Use the numeric codes in the tables below to control non-Sony components and also Sony components that the remote is normally unable to control. Since the remote signal that a component accepts differs depending on the model and year of the component, more than one numeric code may - Sony HT-6600DP | Operating Instructions - Page 42
Programming the remote (continued) To control a VCR Maker SONY AIWA AKAI BLAUPUNKT EMERSON 547 535 523, 536, 537, 538 530, 537, 539 535, 540, 541 542, 543 To control a satellite tuner or cable box Maker SONY JERROLD/G.I. PANASONIC RCA S. ATLANTA Code(s) 801, 802, 803, 804 806, 807, 808, 809, 810 - Sony HT-6600DP | Operating Instructions - Page 43
If you have any question or problem concerning your receiver, please consult your nearest Sony dealer. Troubleshooting If you experience any of the following difficulties while using the receiver, use this troubleshooting guide to help you remedy the problem. Also, see "Checking the connections" on - Sony HT-6600DP | Operating Instructions - Page 44
the headphones are not connected. • The protective device on the receiver has been activated because of a short circuit ("PROTECT" flashes). Turn off the receiver, eliminate the short-circuit problem and turn on the power again. There is no sound from a specific component. • Check that the component - Sony HT-6600DP | Operating Instructions - Page 45
selector on the remote. • If the remote is set to operate the TV only, use the remote to select a source or component other than TV before operating the receiver or other component. If you are unable to remedy the problem using the troubleshooting guide Clearing the receiver's memory may remedy - Sony HT-6600DP | Operating Instructions - Page 46
watts per channel minimum RMS power, with no more than 0.7 % total harmonic distortion from 250 milliwatts to rated output (Models of area code U only). Amplifier section POWER OUTPUT Models of area code U, CA Rated Power Output at Stereo Mode (8 ohms 40 Hz - 20 kHz, THD 0.7 %) STR-K850P sound - Sony HT-6600DP | Operating Instructions - Page 47
Models After tuning in any AM station, turn off the receiver. Hold down PRESET TUNING + and press ?/1. All × 157.5 × 308.5 mm) including projecting parts and controls Mass (Approx.) 16 lb 13 oz (7.6 kg) Speaker SS-CNP95 for center speaker Speaker system Full range, magnetically shielded Speaker - Sony HT-6600DP | Operating Instructions - Page 48
SPECIFICATIONS POWER OUTPUT AND TOTAL HARMONIC DISTORTION: With 6 ohm loads, from 28 - 200 Hz; rated 100 watts, minimum RMS power, with no more than 0.8% total harmonic distortion from 250 milliwatts to rated output (Models of area code U only). Speaker system Active subwoofer, magnetically - Sony HT-6600DP | Operating Instructions - Page 49
to +10 dB (1 dB steps) S.W. XXX dB -10 dB to +10 dB (1 dB steps) D. RANGE COMP. XXX OFF, STD, MAX EFCT. XXX depends on the sound field (MIN, STD, MAX) SW (SUB WOOFER) S.W. XXX1) YES, NO L R (FRONT) XXXXX1) LARGE, SMALL C (CENTER) XXXXX1) LARGE, SMALL, NO SL SR (SURROUND) XXXXX1) LARGE - Sony HT-6600DP | Operating Instructions - Page 50
COMP1) z z z z z z z z z z z > EFCT. LEVEL z z z z z z 1) These parameters may not operate depending on the source or adjustments. For details, see each item in "Adjusting the level parameters" (page 28). 2) When these sound fields are selected, there is no sound output from the sub woofer if the - Sony HT-6600DP | Operating Instructions - Page 51
51US Additional Information - Sony HT-6600DP | Operating Instructions - Page 52
52USSony Corporation Printed in Malaysia
-
 1
1 -
 2
2 -
 3
3 -
 4
4 -
 5
5 -
 6
6 -
 7
7 -
8
-
9
-
10
-
11
-
12
-
13
-
14
-
15
-
16
-
17
-
18
-
19
-
20
-
21
-
22
-
23
-
24
-
25
-
26
-
27
-
28
-
29
-
30
-
31
-
32
-
33
-
34
-
35
-
36
-
37
-
38
-
39
-
40
-
41
-
42
-
43
-
44
-
45
-
46
-
47
-
48
-
49
-
50
-
51
-
52
 |
 |
Home Theater
System
4-244-560-
12
(1)
HT-6600DP
Owner’s Record
The model and serial numbers are located at the rear of the unit.
Record the serial
number in the space provided below. Refer to them whenever you call upon your Sony
dealer regarding this product.
Model No.
Serial No.
© 2003 Sony Corporation
Operating Instructions