Sony HTDDWG700 Operating Instructions
Sony HTDDWG700 - HT Home Theater System Manual
 |
UPC - 027242728042
View all Sony HTDDWG700 manuals
Add to My Manuals
Save this manual to your list of manuals |
Sony HTDDWG700 manual content summary:
- Sony HTDDWG700 | Operating Instructions - Page 1
3-284-098-11(1) Home Theatre System Operating Instructions HT-DDWG700 ©2008 Sony Corporation - Sony HTDDWG700 | Operating Instructions - Page 2
magnitude to constitute a risk of electric shock to persons. This symbol is intended to alert the user to the presence of important operating and maintenance (servicing) instructions in the literature accompanying the appliance. WARNING This equipment has been tested and found to comply with - Sony HTDDWG700 | Operating Instructions - Page 3
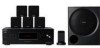
area code U only". The HT-DDWG700 consists of: • Receiver STR-KG700 • Speaker system - Front speakers SS-MSP700 - Center speaker SS-CNP710 - Surround speakers SS-SRP700 - Sub woofer SS-WP700 • The instructions in this manual describe the controls on the supplied remote. You can also use - Sony HTDDWG700 | Operating Instructions - Page 4
the remote .....21 6: Adjusting the speaker levels and balance (TEST TONE 22 Playback Selecting a component 24 Listening/Watching a component 25 Amplifier Operations Navigating through menus 27 Adjusting the level (LEVEL menu 30 Adjusting the tone (TONE menu 31 Settings for the surround sound - Sony HTDDWG700 | Operating Instructions - Page 5
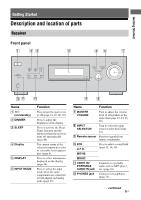
and the duration which the receiver turns off automatically (page 46). The current status of the selected component or a list of speakers at the same time (page 23, 24, 25, 26). Turn to select the input source to play back (page 24). Receives signals from remote commander. Press to select a sound - Sony HTDDWG700 | Operating Instructions - Page 6
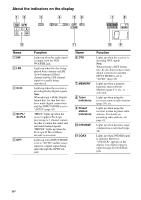
digital connections and that INPUT MODE is set to "AUTO" (page 43). "; PL" lights up when the receiver applies Pro Logic processing to 2 channel signals in order to output the center and surround channel signals. "; PLII" lights up when the Pro Logic II Movie/Music decoder is activated. Lights up - Sony HTDDWG700 | Operating Instructions - Page 7
vary to show how the receiver downmixes the source sound. Front Left Front Right Center (monaural) Surround Left Surround Right Surround (monaural or the surround components obtained by Pro Logic processing) Example: Recording format (Front/ Surround): 3/2.1 Sound Field: A.F.D. AUTO SW LCR SL - Sony HTDDWG700 | Operating Instructions - Page 8
COAXIAL IN sound quality jack (page 18). B ANTENNA section FM ANTENNA jack AM ANTENNA terminals Connects to the FM wire antenna supplied with this receiver (page 20). Connects to the AM loop antenna supplied with this receiver (page 20). C SPEAKERS section Connects to the speakers and sub - Sony HTDDWG700 | Operating Instructions - Page 9
9 qj q; TV VOL MASTER VOL qh qa qg O RETURN/EXIT MENU/HOME TV CH - TV CH + PRESET - REPLAY ADVANCE PRESET + .< Sony audio/video components that the remote is assigned to operate (page 47). If you press ?/1 (B) at the same time, it will turn off the receiver and other components (SYSTEM - Sony HTDDWG700 | Operating Instructions - Page 10
sound. Press MUTING and TV (N) at the same time to activate the TV's muting function. K TV VOL +a)/- Press TV VOL +/- and TV (N) at the same time to adjust the volume level of the TV. MASTER VOL +a)/- Press to adjust the volume level of all speakers at the same time. L MENU/HOME components guide - Sony HTDDWG700 | Operating Instructions - Page 11
TV (N) at the same time to display the options applicable to the Sony TV. Press to input the decimal point for channel number of the Digital receiver. b)This button is also available for DIGITAL MEDIA PORT adapter operation. For details on the function of the button, see the operating instructions - Sony HTDDWG700 | Operating Instructions - Page 12
1: Installing the speakers To fully enjoy theater-like multi channel surround sound requires five speakers (two front speakers, a center speaker, and two surround speakers) and a sub woofer (5.1 channel). Example of a 5.1 channel speaker system configuration Installing the speakers on a flat - Sony HTDDWG700 | Operating Instructions - Page 13
can install your front, center and surround speakers on the wall. 1 Prepare screws (not supplied) that are suitable for the hook on the back of each speaker as shown in the illustrations below the wall material or screws to be used. • Sony is not responsible for accident or damage caused by improper - Sony HTDDWG700 | Operating Instructions - Page 14
2: Connecting the speakers Before connecting the cords, be sure to disconnect the AC power cord (mains lead). F C B SUB SURROUND WOOFER R L CENTER FRONT RL SPEAKERS E D A AFront speaker (left) BFront speaker (right) CCenter speaker DSurround speaker (left) ESurround speaker (right) FSub - Sony HTDDWG700 | Operating Instructions - Page 15
, see page 3. Tip Use the supplied speakers to optimize the system's performance. 3: Connecting the audio/ video components How to connect your components This section describes how to hook up your components to this receiver. Before you begin, refer to "Component to be connected" below for the - Sony HTDDWG700 | Operating Instructions - Page 16
The following illustration shows how to connect audio components such as MP3 player, Super Audio CD player AM DMPORT DC5V 0.7A MAX IN IN IN L R SA-CD/CD TV SAT SUB SURROUND WOOFER R L CENTER FRONT RL SPEAKERS (On the front panel) VIDEO IN/ PORTABLE AUDIO IN B Portable audio A Audio cord - Sony HTDDWG700 | Operating Instructions - Page 17
VIDEO IN/PORTABLE AUDIO IN jack is very soft, you may increase the volume level. However, before you select other component, be sure to reduce the volume level to avoid damaging your speaker. Tip You are recommended to use "PORTABLE" sound field if the source is MP3 or other compressed source. 17US - Sony HTDDWG700 | Operating Instructions - Page 18
The following illustration shows how to connect video components such as DVD player, Blu-ray disc player AM DMPORT DC5V 0.7A MAX IN IN IN L R SA-CD/CD TV SAT SUB SURROUND WOOFER R L CENTER FRONT RL SPEAKERS C B DVD player/ DVD recorder/ Blu-ray disc player TV A Optical digital cord - Sony HTDDWG700 | Operating Instructions - Page 19
DVD/BD input button on the remote so that you can use the button instructions supplied with the DVD recorder. Tips • All the digital audio jacks are compatible with 32 kHz, 44.1 kHz, 48 kHz, and 96 kHz sampling frequencies. • To output the sound of the TV from the speakers connected to the receiver - Sony HTDDWG700 | Operating Instructions - Page 20
AM DMPORT DC5V 0.7A MAX IN IN IN L R SA-CD/CD TV SAT SUB SURROUND WOOFER R L CENTER FRONT RL SPEAKERS Notes • To prevent noise pickup, keep the AM loop antenna away from the receiver and other components. • Be sure to fully extend the FM wire antenna. • After connecting the FM wire - Sony HTDDWG700 | Operating Instructions - Page 21
Started 5: Preparing the receiver and the remote Connecting the AC power cord (mains lead) Connect the AC power cord (mains lead) to a wall outlet. AC power cord (mains lead) Performing initial setup operations Before using the receiver for the first time, initialize the receiver by performing the - Sony HTDDWG700 | Operating Instructions - Page 22
normal conditions, the batteries should last for about 3 months. When the remote no longer operates the receiver, replace all the batteries with new ones. 6: Adjusting the speaker levels and balance (TEST TONE) You can adjust the speaker levels and balance while listening to the test tone from your - Sony HTDDWG700 | Operating Instructions - Page 23
in sequence as follows: Front left t Center t Front right t Surround right t Surround left t Sub woofer 6 Adjust the speaker levels and balance using the LEVEL menu so that the level of the test tone sounds the same from each speaker. For details, see "Adjusting the level (LEVEL menu)" (page 30 - Sony HTDDWG700 | Operating Instructions - Page 24
HOME TV CH - TV CH + PRESET - REPLAY ADVANCE PRESET + .< > 1 MUTING 3 < 1 Press the input button to select a component. You can also use INPUT SELECTOR on the receiver . • Turn off the receiver. To avoid damaging your speakers Before you turn off the receiver, be sure to turn down the volume - Sony HTDDWG700 | Operating Instructions - Page 25
INPUT MODE INPUT SELECTOR MASTER VOLUME 5 3 Notes • The operation is described for a Sony Super Audio CD player. • Refer to the operating instructions supplied with the Super Audio CD player or CD player. Tips • You can select the sound field to suit the music. Refer to page 36 for details - Sony HTDDWG700 | Operating Instructions - Page 26
0/10 ENTER TOOLS/ OPTIONS MUTING TV VOL MASTER VOL O RETURN/EXIT MENU/HOME TV CH - TV CH + PRESET - REPLAY ADVANCE PRESET + .< > instructions supplied with the TV and DVD player or Blu-ray disc player. • Check the following if you cannot listen to multi channel sound. - Be sure this receiver - Sony HTDDWG700 | Operating Instructions - Page 27
amplifier menus, you can make various adjustments to customize the receiver. 2-6 D.SKIP 456 D.TUNING 789 >10 MEMORY AMP MENU 0/10 ENTER 1 CLEAR DISPLAY TOOLS/ OPTIONS MUTING TV VOL MASTER VOL O RETURN/EXIT MENU/HOME TV CH - TV CH + PRESET - REPLAY ADVANCE PRESET + .< > < 1 Press - Sony HTDDWG700 | Operating Instructions - Page 28
Front speaker balance* [FRT BAL] Center speaker level [CNT LVL] Surround left speaker level [SL LVL] Surround right speaker level step) TRE -4 dB For details, see "Enjoying Surround A.F.D. AUTO Sound" (page 35). Effect level* [EFFECT] FM station receiving mode* [FM MODE] Naming preset stations* [ - Sony HTDDWG700 | Operating Instructions - Page 29
[Display] Settings AUDIO [5-AUDIO] (page 32) SYSTEM [6-SYSTEM] (page 33) Digital audio input decoding DEC. Surround left speaker distance* DIST. 3 ft. to DIST. 23 ft. [SL DIST.] (1 ft. step) Surround right speaker distance* [SR DIST.] DIST. 3 ft. to DIST. 23 ft. (1 ft. step) Surround speaker - Sony HTDDWG700 | Operating Instructions - Page 30
balance between front left and right speakers. x CNT LVL (Center speaker level) x SL LVL (Surround left speaker level) x SR LVL (Surround right speaker level) x SW LVL (Sub woofer level) x D. RANGE (Dynamic range compressor) Lets you compress the dynamic range of the sound track. This may be useful - Sony HTDDWG700 | Operating Instructions - Page 31
"Overview of the menus" (page 28). TONE menu parameters x BASS LVL (Front speaker bass level) x TRE LVL (Front speaker treble level) Settings for the surround sound (SUR menu) You can use the SUR menu to select the sound field you want for your listening pleasure. Select "3-SUR" in the amplifier - Sony HTDDWG700 | Operating Instructions - Page 32
page 28). TUNER menu parameters x FM MODE (FM station receiving mode) • FM AUTO This receiver will decode the signal as stereo signal when the radio station when playback starts). However, when other signals are input, there may be no sound depending on the format. In this case, set to "DEC. AUTO". • - Sony HTDDWG700 | Operating Instructions - Page 33
monitor or a projector. • This parameter is valid only when you use a sound field selected with the 2CH or A.F.D. button. • This parameter is not valid for the system (SYSTEM menu) You can use the SYSTEM menu to set the distance of the speakers connected to this system. Select "6-SYSTEM" in the - Sony HTDDWG700 | Operating Instructions - Page 34
Select if the location of your surround speakers corresponds to sections A and C. Tip Surround speaker position is designed specifically for implementation of the CINEMA STUDIO EX modes. For other sound fields, speaker position is not so critical. Those sound fields were designed under the premise - Sony HTDDWG700 | Operating Instructions - Page 35
D.SKIP 456 Press A.F.D. repeatedly to select the sound field you want. For details, see "Types of the sound as it was recorded/encoded without adding any surround effects. However, this receiver will generate encoded in Dolby Surround. In addition, this mode can reproduce sound in 5.1 channel - Sony HTDDWG700 | Operating Instructions - Page 36
field You can take advantage of surround sound simply by selecting one of the receiver's preprogrammed sound fields. They bring the exciting and powerful sound of movie theaters and concert halls into your home. VIDEO DVD/BD SAT TV SA-CD/CD TUNER 2CH A.F.D. 2CH A.F.D. MOVIE MUSIC DVD/BD MENU - Sony HTDDWG700 | Operating Instructions - Page 37
Enjoying Surround Sound Types of sound field available Sound field for Movie Music Headphone* Sound field [Display] Effect CINEMA STUDIO EX A DCS [C.ST.EX A] Reproduces the sound characteristics of the Sony Pictures Entertainment "Cary Grant Theater" cinema production studio. This is a - Sony HTDDWG700 | Operating Instructions - Page 38
press A.F.D. repeatedly to select "A.F.D. AUTO". Using only the front speakers and sub woofer (2CH STEREO) In this mode, the receiver outputs the sound from the front left/right speakers and the sub woofer. When multi channel surround formats are input, the signals are downmixed to 2 channel with - Sony HTDDWG700 | Operating Instructions - Page 39
to turn off the receiver. 2 While holding down 2CH, press ?/1. "S.F. CLR." appears on the display and all sound fields are reset to 0/10 ENTER TOOLS/ OPTIONS MUTING TV VOL MASTER VOL O RETURN/EXIT MENU/HOME TV CH - TV CH + PRESET - REPLAY ADVANCE PRESET + .< > < 2 TUNING - m - Sony HTDDWG700 | Operating Instructions - Page 40
stops scanning whenever a station is received. In case of poor FM stereo reception If the FM stereo reception is poor and "ST" flashes on the display, select monaural audio so that the sound will be less distorted. Press FM MODE repeatedly until the "MONO" indicator lights up on the display. To - Sony HTDDWG700 | Operating Instructions - Page 41
steps 1 to 5 to preset another station. Tuner Operations O RETURN/EXIT MENU/HOME TV CH - TV CH + PRESET - REPLAY ADVANCE PRESET + .< > < to select the FM or AM band. You can also use INPUT SELECTOR on the receiver. 2 Tune in the station that you want to preset using Automatic Tuning (page - Sony HTDDWG700 | Operating Instructions - Page 42
AMP MENU 0/10 ENTER 3 CLEAR TOOLS/ DISPLAY OPTIONS MUTING TV VOL MASTER VOL O RETURN/EXIT MENU/HOME 1 Press TUNER repeatedly to select the FM or AM band. You can also use INPUT SELECTOR on the receiver. 2 Tune in the preset station you want to create an index name for (page 42). 3 Press - Sony HTDDWG700 | Operating Instructions - Page 43
audio input mode setting when you connect components to both digital and analog audio input jacks on the receiver. 1 Turn INPUT SELECTOR on the receiver to select the input. You can also use the input buttons on the remote. 2 Press INPUT MODE repeatedly on the receiver to select the audio input mode - Sony HTDDWG700 | Operating Instructions - Page 44
DMPORT) allows you to enjoy sound from a network system such as a portable audio source or computer. When you connect a DIGITAL MEDIA PORT adapter (supplied), you can enjoy sound from the connected component on the receiver. For details, see the operating instructions supplied with the DIGITAL MEDIA - Sony HTDDWG700 | Operating Instructions - Page 45
of the connected component. The sound is played back on the receiver. For details, refer the operating instructions supplied with the DIGITAL MEDIA PORT adapter. Note Depending on the type of DIGITAL MEDIA PORT adapter, you can operate the connected component by using the remote. For details on - Sony HTDDWG700 | Operating Instructions - Page 46
t Selected input t Sound field currently applied FM and AM band Preset station name* t Frequency t Sound field currently applied * Index is activated, the display dims. Note If you press any buttons on the remote or receiver after the display dims, the display brightens up. After a while, the - Sony HTDDWG700 | Operating Instructions - Page 47
components in your system. For example, if you connect a DVD player to the SAT jacks on the receiver, you can set the SAT button on this remote and VHS respectively. b)Sony DVD recorders are operated with a DVD1 or DVD3 setting. For details, refer to the operating instructions supplied with the DVD - Sony HTDDWG700 | Operating Instructions - Page 48
Matching", and "Cinema Studio Reverberation". "Virtual Multi Dimensions", the virtual speaker technology, creates a virtual multisurround environment with actual speakers up to 7.1 channels, and brings the surround sound experience of a theater with the latest facilities into your home. "Screen - Sony HTDDWG700 | Operating Instructions - Page 49
means better sound quality. Precautions On safety Should any solid object or liquid fall into the cabinet, unplug the receiver and have a qualified service shop. On heat buildup Although the receiver heats up during operation, this is not a malfunction. If you continuously use this receiver at a - Sony HTDDWG700 | Operating Instructions - Page 50
connecting other components, be sure to turn off and unplug the receiver. If you encounter color irregularity on a nearby TV screen The front speakers, center speaker and the sub benzine. If you have any questions or problems concerning your receiver, please consult your nearest Sony dealer. 50US - Sony HTDDWG700 | Operating Instructions - Page 51
the following difficulties while using the receiver, use this troubleshooting guide to help you remedy the problem. Audio There is no sound, no matter which component is selected, or only a very low-level sound is heard. • Check that the speakers and components are connected correctly and securely - Sony HTDDWG700 | Operating Instructions - Page 52
is not a malfunction and will depend on the connected component. There is no sound, or only a very lowlevel sound is heard from the center/ surround speakers. • Select a CINEMA STUDIO EX mode (page 37). • Adjust the speaker level (page 22). There is no sound from the sub woofer. • Check that the sub - Sony HTDDWG700 | Operating Instructions - Page 53
ones, if they are weak. • Make sure you select the correct input on the remote. If you are unable to remedy the problem using the troubleshooting guide Clearing the receiver's memory may remedy the problem (page 21). However, note that all memorized settings will be reset to their initial settings - Sony HTDDWG700 | Operating Instructions - Page 54
for front, center, surround speakers and sub woofer. Depending on the sound field settings and the source, there may be no sound output. Inputs Analog kHz or 10 kHz. After tuning in any AM station, turn off the receiver. While holding down MOVIE, press ?/1. All preset stations will be erased when - Sony HTDDWG700 | Operating Instructions - Page 55
speaker (1) • Surround speakers (2) • Sub woofer (1) Supplied accessories Operating instruction (this manual) Quick Setup Guide (1) TDM-iP10 DIGITAL MEDIA PORT Adapter (1) FM wire antenna (1) AM loop antenna (1) Coaxial digital cord (1) Foot pads • Speakers (20) • Sub woofer (4) Remote commander - Sony HTDDWG700 | Operating Instructions - Page 56
playback 25 D Digital Cinema Sound (DCS) 48 DIGITAL SYSTEM 33 TONE 31 TUNER 32 Muting 24 N Naming 42, 45 P Portable audio connecting 16 R Remote commander 9 S Satellite tuner/Set-top box connecting 18 Selecting component 24 sound field 36 Sleep Timer 46 Sound fields resetting 39 selecting 36 Speakers
-
 1
1 -
 2
2 -
 3
3 -
 4
4 -
 5
5 -
 6
6 -
 7
7 -
8
-
9
-
10
-
11
-
12
-
13
-
14
-
15
-
16
-
17
-
18
-
19
-
20
-
21
-
22
-
23
-
24
-
25
-
26
-
27
-
28
-
29
-
30
-
31
-
32
-
33
-
34
-
35
-
36
-
37
-
38
-
39
-
40
-
41
-
42
-
43
-
44
-
45
-
46
-
47
-
48
-
49
-
50
-
51
-
52
-
53
-
54
-
55
-
56
 |
 |

©2008 Sony Corporation
3-284-098-
11
(1)
Home Theatre
System
Operating Instructions
HT-DDWG700