Sony KDL-40SL130 Instructions (SU-WL500 Wall-Mount Bracket) - Page 7
Step 3: Installing the Base Bracket on the wall, Secure the Base Bracket to
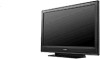 |
View all Sony KDL-40SL130 manuals
Add to My Manuals
Save this manual to your list of manuals |
Page 7 highlights
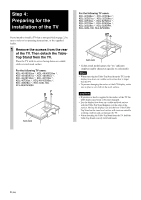
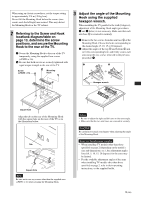
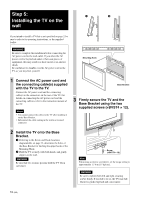
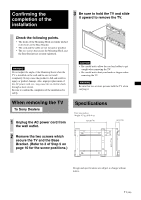
Step 3: Installing the Base Bracket on the wall 1 Secure the Base Bracket to the wall using four or more 8 mm (11/32 inches) diameter or equivalent screws (not supplied). 1 Determine the screw holes (d, h) for attaching the Mounting Hook to the Base Bracket. Then attach them securely using the supplied screws (+BVST4 × 12). Screw (+BVST4 × 12) d g h 2 Secure the Base Bracket and the Mounting Hook on the wall using the four or more 8 mm (11/32 inches) diameter or equivalent screws (not supplied). Select four screw holes with the z mark shown in the diagram below and tighten the screws securely so that they will not become loose. Align the unit so that it is level. Base Bracket 3 Remove the screws which were attached in procedure 1 and detach the Mounting Hook from the Base Bracket. Base Bracket Mounting Hook CAUTION Be careful not to drop the Mounting Hook when removing the screws from the Mounting Hook. WARNING • The screws required for this procedure are not supplied. Select screws suitable for the material and structure of the wall. • If the Base Bracket cannot be attached securely enough, use additional screws. • Be sure to confirm that the Base Bracket is securely attached to the wall. 7 (GB)
-
 1
1 -
 2
2 -
 3
3 -
 4
4 -
 5
5 -
 6
6 -
 7
7 -
 8
8 -
 9
9 -
 10
10 -
 11
11 -
 12
12 -
13
-
14
-
15
-
16
-
17
-
18
-
19
-
20
-
21
-
22
-
23
-
24
-
25
-
26
-
27
-
28
-
29
-
30
-
31
-
32
-
33
-
34
-
35
-
36
-
37
-
38
-
39
-
40
-
41
-
42
-
43
-
44
-
45
-
46
-
47
-
48
-
49
-
50
-
51
-
52
-
53
-
54
-
55
-
56
-
57
-
58
-
59
-
60
-
61
-
62
-
63
-
64
-
65
-
66
-
67
-
68
-
69
-
70
-
71
-
72
-
73
-
74
-
75
-
76
-
77
-
78
-
79
-
80
-
81
-
82
-
83
-
84
-
85
-
86
-
87
-
88
-
89
-
90
-
91
-
92
-
93
-
94
-
95
-
96
-
97
-
98
-
99
-
100
-
101
-
102
-
103
-
104
-
105
-
106
-
107
-
108
-
109
-
110
-
111
-
112
 |
 |
