Sony KDL-46XBR3 Software Update Information - Page 2
Updating the Software - standby
 |
View all Sony KDL-46XBR3 manuals
Add to My Manuals
Save this manual to your list of manuals |
Page 2 highlights
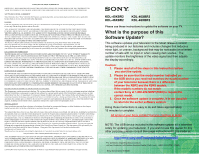
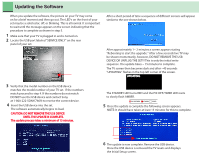
Updating the Software When you update the software, the picture on your TV may come on for a brief moment and then go out. The LED's on the front of your set may be a solid color, off, or blinking. This is all normal. It is important to wait until the message appears on the screen indicating that the procedure is complete as shown in step 5. 1 Make sure that your TV is plugged in and is turned on. 2 Locate the USB port labeled "SERVICE ONLY" on the rear panel of your set. After a short period of time a sequence of different screens will appear similar to the one shown below. After approximately 1~ 2 minutes a screen appears stating "Rebooting to start the upgrade." After a few seconds live TV may be shown momentarily, however, DO NOT REMOVE THE USB DEVICE OR UNPLUG THE SET!!! This is only the initial write sequence. The update takes ~ 15 minutes to complete. The TV screen then becomes dark and after ~45 seconds "UPDATING" flashes in the top left corner of the screen. UPDATING 3 Verify that the model number on the USB device matches the model number of your TV set. If the numbers match proceed to step 4. If the numbers do not match DO NOT use the USB device and contact Sony at 1-800-222-SONY(7669) to receive the correct device. 4 Insert the USB device into the set. The software automatically begins to load. CAUTION: DO NOT REMOVE THE USB DEVICE UNTIL THE UPDATE IS COMPLETE. The update process takes a minimum of 15 minutes. The STANDBY LED turns RED and the PIC OFF/TIMER LED starts to slowly flash AMBER. PIC OFF/TIMER STANDBY POWER 5 Once the update is complete the following screen appears. NOTE: It should have taken at least 15 minutes for this to complete. 6 The update is now complete. Remove the USB device. Once the USB device is removed the TV resets and displays the Initial Setup screen.
-
 1
1 -
 2
2
 |
 |
