Sony KDL37M4000 Operating Instructions - Page 30
Using the Picture Menu - white screen
 |
UPC - 027242737976
View all Sony KDL37M4000 manuals
Add to My Manuals
Save this manual to your list of manuals |
Page 30 highlights
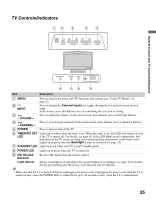
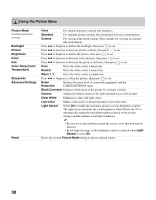
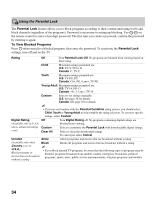
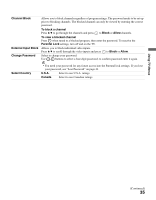
Using the Picture Menu Picture Mode Customized picture viewing Backlight Picture Brightness Color Hue Color Temp (Color Temperature) Sharpness Advanced Settings Vivid For enhanced picture contrast and sharpness. Standard For standard picture settings. Recommended for home entertainment. Cinema For viewing film-based content. Most suitable for viewing in a theaterlike environment. Press B/b to brighten or darken the backlight, then press to set. Press B/b to increase or decrease picture contrast, then press to set. Press B/b to brighten or darken the picture, then press to set. Press B/b to increase or decrease color intensity, then press to set. Press B/b to increase or decrease the green or red tones, then press to set. Cool Gives the white colors a bluish tint. Neutral Gives the white colors a neutral tint. Warm 1, 2 Gives the white colors a reddish tint. Press B/b to sharpen or soften the picture, then press to set. Noise Reduction Reduces the noise level of connected equipment, and the CABLE/ANTENNA input. Black Corrector Enhances black areas of the picture for stronger contrast. Gamma Adjusts the balance between the light and dark areas of the picture. Clear White Emphasizes white and light colors. Live Color Makes colors more vivid and reproduces clear skin tones. Light Sensor Select On to enable the automatic picture (screen) brightness control. The light sensor measures the room brightness which allows the TV to automatically adjust the backlight brightness based on the picture settings and the ambient room light conditions. Reset • Be sure not to put anything around the sensor, as its function may be affected. • In low light the range of the backlight control is reduced when Light Sensor is set to On. Resets the current Picture Mode setting to factory default values. 30
-
 1
1 -
2
-
3
-
4
-
5
-
6
-
7
-
8
-
9
-
10
-
11
-
12
-
13
-
14
-
15
-
16
-
17
-
18
-
19
-
20
-
21
-
22
-
23
-
24
-
 25
25 -
 26
26 -
 27
27 -
 28
28 -
 29
29 -
 30
30 -
 31
31 -
 32
32 -
 33
33 -
 34
34 -
 35
35 -
36
-
37
-
38
-
39
-
40
-
41
-
42
-
43
-
44
-
45
-
46
-
47
-
48
 |
 |
