Sony KDS-55A20L1 Quick Set-up Guide - Page 1
Sony KDS-55A20L1 - 55" Grand Wegaâ„¢ Sxrdâ„¢ Rear Projection Hdtv Manual
 |
View all Sony KDS-55A20L1 manuals
Add to My Manuals
Save this manual to your list of manuals |
Page 1 highlights
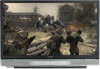
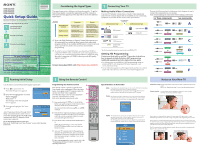
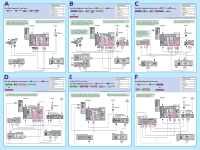
2-686-616-11(1) KDS-50A2000 KDS-55A2000 KDS-60A2000 Quick Setup Guide For further information, see the Operating Instructions supplied with the TV. Please retain this guide for your future reference. Please follow the steps to set up your TV: 1 Connecting Your TV (See reverse side) zzz 2 Running Initial Setup zzz 3 Using the Remote Control For Your Convenience Please contact Sony directly if you have questions on the use of your television after reading your Quick Setup Guide and manual. Contact Sony Customer Support at: http://www.sony.com/tvsupport Or to speak with a support representative: United States Canada 1-800-222-SONY (7669) 1-877-899-SONY (7669) 8:00 AM - 10:00 PM (EST) Mon - Fri 8:00 AM - 6:00 PM (Eastern) 10:30 AM - 7:15 PM (EST) Sat - Sun 8:00 AM - 5:00 PM (Western) Please Do Not Return the Product to the Store Sony Corporation © 2006 Printed in U.S.A. Considering the Signal Types 1 Connecting Your TV The signal types make a difference in the picture quality. To get the best picture quality, consider the signal types and the connection best suited for that signal type. The chart below shows the different signal types. Best Signal Performance High Definition Content Digital Content Analog Content Comments Best Picture Quality 16:9 Aspect Ratio Good Picture Quality Aspect Ratio based on Program Original TV format 4:3 Aspect Ratio Sources Over-The-Air Antenna Digital Cable Subscription Digital Satellite Subscription Over-The-Air Antenna Digital Cable Subscription Digital Satellite Subscription Over-The-Air Antenna Cable Subscription Even with High Definition or Digital Content Subscriptions, not all content may be available in those formats. Each individual program will list if it is available in HD format. Contact your local service provider for details on your service and available programming. In order to receive High Definition, you should use HDMI or component YPbPr video connection to your video equipment or coaxial to your over-the-air broadcast antenna. Connection using the yellow composite or S VIDEO will not provide HD quality signal to your TV. To learn more about HDTV, visit: http://www.sony.com/HDTV Making Audio/Video Connections Your new TV includes various types of audio/video inputs and jacks. Use the outputs/inputs that are available on your connecting equipment to provide the best audio/video performance. Video connector type Best Audio/Video Performance Audio connector type HD HDMI connection* HD Component connection Digital audio optical HD Analog audio S VIDEO connection Composite video connection * See the Operating Instructions for connection between HDMI to DVI. Getting HD Programming Contact your local cable or satellite TV provider for details on how to upgrade to High-Definition (HD) programming. Additional equipment and subscription fees may apply. •For information on availability of HD programming using an antenna (HDTV with integrated HD tuner required), visit www.antennaweb.org •For an interactive guide on cable requirements and how to connect audio and video devices, visit www.ceaconnectionsguide.com Review the following chart to determine which diagram to use to connect the components in your system: Turn off and unplug all components before making connections. VCR DVD PC Player Cable Box Satellite Receiver Cable Box Satellite Receiver HD Cable Box HD Sat Receiver HD Cable Box HD Sat Receiver HD DVR Cable Box Satellite Receiver VCR DVD PC Player AV Receiver VCR SAT DVD Player DVD Player AV Receiver Digital Recorder VCR Blu-ray Disc Player VCR Sony Dream System 2 Running Initial Setup Use the remote control when following the steps below. 1 Press to turn on the TV. The Initial Setup screen appears. 2 Press V/v to highlight the on-screen display language. Then press . The message "Start auto program now?" appears. 3 Press V/v to highlight "Yes" then press . Auto Program performed through Initial Setup will automatically create a list of receivable channels from both VHF/UHF antenna and cable TV channels if both sources are connected. To run Auto Program again at a later time Refer to the "Initial Setup" and "Auto Program" sections of the Operating Instructions. 3 Using the Remote Control Programming the Remote Control 4 The remote control is preset to operate most Sony brand video equipment. Follow the steps 1 below to program your TV's remote control to operate non-Sony video equipment. 2 Find the three-digit code for your equipment from the "Manufacturer's Codes". Refer to the Operating Instructions for codes. 3 1 Press and hold the BD/DVD , DVR/VCR or SAT/CABLE FUNCTION 1 button you want to program on the remote control and press the button simultaneously. The selected FUNCTION button ( BD/DVD , DVR/VCR or ) SAT/CABLE will flash. 2 Enter the three-digit manufacturer's code number using the 0-9 buttons while the FUNCTION button is lit. If the code is not entered within 10 seconds, you must start again from step 1. 3 Press the button while the FUNCTION button is lit. When the programming is correct, the selected FUNCTION button blinks twice, and when not, blinks five times. 4 Aim your TV's remote control at the equipment, and press the green button. If you can turn the equipment on and off by using the remote control, then the programming is complete. If not, try the next code listed. For tips on programming the remote control, refer to the "Programming the Remote Control" section of the Operating Instructions. Notes on Your New TV Special Buttons to Remember WIDE: Depending on the broadcast signal or the way the DVD disc is formatted, you may see bars on the screen or stretched images. Press the WIDE button repeatedly to cycle through different screen modes and select the mode that best meets your TV viewing. Projection Lamp: Periodic replacement of the projection lamp will maintain the picture quality. Refer to the "Replacing the Lamp" section of the Operating Instructions. Picture Quality: The illustrations below highlight the differences between highdefinition and standard-definition signals. TOOLS: This button provides an alternate way to access some of the features. It also provides direct access to some of the "Settings" menu options. The menus you can select may vary depending on the input signal. Close Picture Mode Sound Mode Wide Mode Add to Favorites Caption Vision (CC) MENU: This button allows you to easily navigate to the most convenient TV functions shown below: External Inputs, Favorites, last viewed TV channel from Antenna or Cable, and Settings. The Settings option enables you to make adjustments and customize settings for Picture, Sound, Screen, Channel, Parental Lock and more. MENU External Inputs Favorites C Cable Antenna Settings Select from connected equipment Exit: Shown above is a high-definition signal with wide mode (16:9 aspect ratio). A highdefinition signal fills the screen with a crisp, clear picture with no ghosting and less noise. Shown below is a standard-definition signal with 4:3 aspect ratio. The picture is fine with the Normal mode, but not as good as the high-definition signal. When a standard-definition signal is viewed in the Zoom or Wide Zoom mode, you can enjoy an enlarged picture on your TV screen, but picture quality may vary. This TV performs best with high-definition signals. Be sure to read the "Considering the Signal Types" section on this page. Screen Mode: Normal Screen Mode: Wide Zoom
-
 1
1 -
 2
2
 |
 |