Sony KE-42XS910 Instructions - Page 32
Step 4, Install the Display Unit, tape 4 : Installation de l, Paso 4, Instalar el monitor
 |
View all Sony KE-42XS910 manuals
Add to My Manuals
Save this manual to your list of manuals |
Page 32 highlights
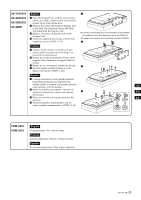
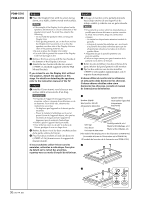
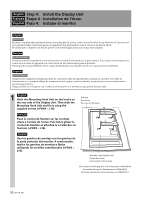
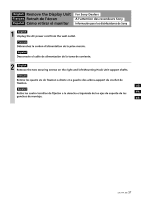
English Step 4: Install the Display Unit Français Étape 4 : Installation de l'écran Español Paso 4: Instalar el monitor English WARNING Be sure to complete the installation before connecting the AC power cord to the wall outlet. If you allow the AC power cord to be pinched under or between pieces of equipment, this may result in a short circuit or an electric shock. Be careful not to stumble over the AC power cord or the Display Unit, as you may hurt yourself. Français AVERTISSEMENT Terminez d'abord l'installation avant de brancher le cordon d'alimentation à la prise murale. Si le cordon d'alimentation est coincé sous ou entre les appareils, un court-circuit ou une électrocution peut se produire. Prenez garde à ne pas trébucher sur le cordon d'alimentation ou à heurter l'écran car vous pourriez vous blesser. Español ADVERTENCIA Asegúrese de completar la instalación antes de conectar el cable de alimentación a la toma de corriente. Si el cable de alimentación se ve atrapado debajo de componentes del equipo o entre los mismos, se puede provocar un cortocircuito o una descarga eléctrica. Tenga cuidado de no tropezar con el cable de alimentación o el monitor, ya que podría hacerse daño. 1 English Hitch the Mounting Hook Unit on the hooks on the rear side of the Display Unit. Then slide the Mounting Hook Unit and fix it using the supplied screws (+PSW5 × L16). Soft rag/ Tissu doux/ Un trozo de tela suave Français Fixez le crochet de fixation sur les crochets situés à l'arrière de l'écran. Puis faites glisser le crochet de fixation et attachez-le à l'aide des vis fournies (+PSW5 × L16). Español Una los ganchos de montaje con los ganchos de la parte posterior del monitor. A continuación, deslice los ganchos de montaje y fíjelos utilizando los tornillos suministrados (+PSW5 × L16). Rear side of the Display Unit/ Arrière de l'écran/ Parte posterior del monitor (The model of the Display Unit in the illustration is PDM-4210.) (Le modèle d'écran de l'illustration est le PDM-4210.) (El modelo del monitor de la ilustración es el PDM-4210.) 32 (US, FR, ES)
-
 1
1 -
2
-
3
-
4
-
5
-
6
-
7
-
8
-
9
-
10
-
11
-
12
-
13
-
14
-
15
-
16
-
17
-
18
-
19
-
20
-
21
-
22
-
23
-
24
-
25
-
26
-
 27
27 -
 28
28 -
 29
29 -
 30
30 -
 31
31 -
 32
32 -
 33
33 -
 34
34 -
 35
35 -
 36
36 -
 37
37 -
38
-
39
-
40
-
41
-
42
-
43
-
44
 |
 |