Sony KLV-32S550A Operating Instructions
Sony KLV-32S550A - SERIES BRAVIA 32" MULTI SYSTEM LCD HDTV. PAL/NTSC Manual
 |
UPC - 826422447458
View all Sony KLV-32S550A manuals
Add to My Manuals
Save this manual to your list of manuals |
Sony KLV-32S550A manual content summary:
- Sony KLV-32S550A | Operating Instructions - Page 1
KLV-37S550A KLV-32S550A KLV-32S530A KLV-26S550A © 2009 Sony Corporation LCD Colour TV Operating Instructions 4-130-985-13(1) - Sony KLV-32S550A | Operating Instructions - Page 2
manual are of the KLV-32S550A unless otherwise stated. Trademark information • HDMI, the HDMI logo and High-Definition Multimedia Interface are trademarks or registered trademarks of HDMI Licensing LLC. • "BRAVIA" and are trademarks of Sony features, settings and functionalities of this TV - Sony KLV-32S550A | Operating Instructions - Page 3
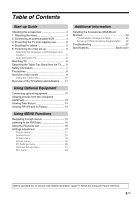
Installing the Accessories (Wall-Mount Bracket 24 TV installation dimensions table 25 Screw and Hook locations diagram/table ....... 26 Troubleshooting 27 Specifications Back cover Before operating the TV, please read "Safety information" (page 7). Retain this manual for future reference. 3 GB - Sony KLV-32S550A | Operating Instructions - Page 4
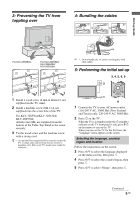
CATV, Satellite or If cannot receive FM signal Antenna selector FM signal 8 TV signal Antenna cable (not supplied) 8 Connecting an antenna/cable and VCR B KLV-32S550A/KLV-32S530A/KLV-26S550A 8 8 Antenna cable (not supplied) • This TV is very heavy, so two or more people should place the - Sony KLV-32S550A | Operating Instructions - Page 5
TV. For KLV-32S550A/KLV-32S530A/ KLV-26S550A: Attach a nut (M4, not supplied) from the bottom of the Table-Top Stand to the screw securely. 3 Tie the wood screw and the machine screw with a strong cord. z • An optional Sony support belt kit is used to secure the TV. Contact your nearest Sony Service - Sony KLV-32S550A | Operating Instructions - Page 6
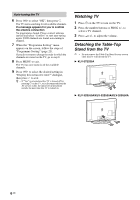
TV 1 Press 1 on the TV to turn on the TV. 2 Press the number buttons or PROG +/- to select a TV channel. 3 Press 2 +/- to adjust the volume. Detaching the Table-Top Stand from the TV • Do not remove the Table-Top Stand for any reason other than to wall-mount the TV. B KLV-37S550A B KLV-32S550A/KLV - Sony KLV-32S550A | Operating Instructions - Page 7
TV. • Only qualified service personnel should carry out wall installations. • For safety reasons, it is strongly recommended that you use Sony accessories, including: - KLV-37S550A/KLV-32S550A/ KLV model. Use of screws other than those supplied may result in internal damage to the TV not connect too - Sony KLV-32S550A | Operating Instructions - Page 8
problems occur. Ask your dealer or Sony service centre to have it checked by qualified service personnel. When: - AC power cord is damaged. - Poor fitting of AC power outlet. - TV objects on top of this TV set. The image may be uneven or the LCD screen may be damaged. • If this TV set is used in a - Sony KLV-32S550A | Operating Instructions - Page 9
easily. The Fastext feature can be used service) qh RETURN Returns to the previous screen of any displayed menu. qj - Twin Picture / PIP (page 14) qk a - TV mode Exit Text mode, or switches to a TV display when displaying external input. ql / - Input select / Text hold • Displays the connected - Sony KLV-32S550A | Operating Instructions - Page 10
For TV, Video, Component or HDMI (except PC input) Wide Zoom* Enlarges the centre portion of page 18. See page 19. See page 20. See page 20. See page 23. See page 23. Viewing connected equipment Options Picture Mode (except PC input mode) Description See page 17. Display Mode (in PC input mode - Sony KLV-32S550A | Operating Instructions - Page 11
menu: Moves through the options right ( ) or left ( ). 4 / - Input select / OK • Displays the connected equipment list and selects the input source (page 13). • In TV menu: Selects the menu or option, and confirms the setting. 5 Displays or cancels the menu. 6 - Remote sensor Receives IR signals - Sony KLV-32S550A | Operating Instructions - Page 12
You can connect a wide range of optional equipment to your TV. • The below terminals vary depending on TV models. Home theatre system S VHS/Hi8/ DVC camcorder Headphones Not available for KLV-32S530A DVD player with HDMI output Blu-ray disc player Digital video camcorder For service use only - Sony KLV-32S550A | Operating Instructions - Page 13
use a PC cable with ferrite core. Connect to the HDMI IN (KLV-32S530A), HDMI IN 1 or 2 (KLV-37S550A/ KLV-32S550A/KLV-26S550A) jack if the equipment has an HDMI jack. The digital video and audio signals are input from the equipment. • The HDMI jacks only support the following video inputs: 480i, 480p - Sony KLV-32S550A | Operating Instructions - Page 14
Right Window Video 1 Video 2 No picture and no sound Component *HDMI (except PC input mode) **HDMI 1 (except PC input mode) **HDMI 2 (except PC input mode) TV programme * For KLV-32S530A ** For KLV-37S550A/KLV-32S550A/KLV-26S550A 2 Press G/g to select active picture. 3 Press number buttons or - Sony KLV-32S550A | Operating Instructions - Page 15
various convenient features of this TV. You can easily select channels or inputs sources, preset FM radio stations and change the settings for your TV. 2 1 Radio You are able to listen to the FM radio stations using your TV by connecting an antenna (page 4). FM Radio tuning range is from 87.5-108 - Sony KLV-32S550A | Operating Instructions - Page 16
search for the desired FM radio station. • You can also manually search for the desired FM radio station by pressing G/g. The available effect, but the noise will be reduced. Using the Favourite List The Favourite feature lets you select programmes from a list of up to 16 favourite channels that - Sony KLV-32S550A | Operating Instructions - Page 17
to change the settings of your TV from "Settings" menu. 1 picture. "Cool": Gives the white colours a blue tint. "Neutral": Gives the white colours a ": Turns off the "Noise Reduction" feature. Reduces the picture noise in MPEG-compressed dark images scenes. It will increase the contrast distinction - Sony KLV-32S550A | Operating Instructions - Page 18
Adjust" is selected, then press . Selecting "Reset" will set your TV to the factory settings. 2 Press G/g to select the desired sound select other equipment connected to the TV, set "Dual Sound" to "Stereo", "Main" or "Sub". However, when the external equipment connected to the HDMI jack is selected - Sony KLV-32S550A | Operating Instructions - Page 19
Wide" is only available when watching programmes from video input, HDMI and component input in format 480i or 576i. z • Even TV's sound through the TV speakers. "Audio System": The TV speakers are turned off in order to listen to the TV's sound only through your external audio equipment connected - Sony KLV-32S550A | Operating Instructions - Page 20
Cancel" in the auto tuning confirmation dialogue. • Be sure not to turn the TV off during this period (it takes about 30 seconds) or press any buttons. PC TV receives an input signal from the connected PC. z • "Auto Adjustment" may not work well with certain input signals. In such cases, manually - Sony KLV-32S550A | Operating Instructions - Page 21
60 60 60 Standard VGA VESA VGA-T VESA Guidelines VESA VESA Guidelines VESA VESA VESA VESA VESA • This TV's PC input does not support Sync on Green or Composite Sync. • This TV's PC input does not support interlaced signals. • If input signal is not shown in above chart, then this signal may not be - Sony KLV-32S550A | Operating Instructions - Page 22
Picture" feature. Before selecting "Label"/"AFT"/"Skip"/"Colour System"/"Signal Booster", press PROG +/- to select the programme number with the channel. You cannot select a programme number that is set to "Skip" (page 22). Programme/TV System/VHF or UHF Presets programme channels manually. 1 Select - Sony KLV-32S550A | Operating Instructions - Page 23
FM radio stations. You can manually preset each FM radio station that to preset other FM radio stations. • To enable this feature, access to FM Radio mode by using MENU (page 15 Power Saving Idle TV Standby Selects the power saving mode to reduce the power consumption of the TV. Choose either " - Sony KLV-32S550A | Operating Instructions - Page 24
. To Sony Dealers and Contractors: Provide full attention to safety during the installation, periodic maintenance and examination of this product. Your TV can be installed using the Wall-Mount Bracket SU-WL500, SU-WL50B or SU-WL100 (sold separately). • Refer to the Instructions supplied with - Sony KLV-32S550A | Operating Instructions - Page 25
TV installation dimensions table SU-WL500: Screen centre point SU-WL50B: abc cba Screen centre point Model Name KLV-37S550A KLV-32S550A/ KLV- wall that the TV will be installed on should be capable of supporting a weight of at least four times that of the TV. Refer to "Specifications" for its - Sony KLV-32S550A | Operating Instructions - Page 26
- When installing the Mounting Hook on the TV. SU-WL500 SU-WL50B Hook location - When installing the TV onto the Base Bracket. SU-WL500 SU-WL50B models in the table below. * Hook location "b" cannot be used for the models in the table below. Model Name KLV-37S550A KLV-32S550A/KLV-32S530A KLV - Sony KLV-32S550A | Operating Instructions - Page 27
Sony service centre of how the indicator flashes (number of flashes). When it is not flashing 1 Check the items listed below. 2 If the problem still persists, have your TV serviced by qualified service personnel. Picture No picture (screen is dark) and no sound • Check the antenna/cable connection - Sony KLV-32S550A | Operating Instructions - Page 28
Specifications Model name KLV-37S550A KLV-32S550A KLV-32S530A KLV-26S550A System Panel System LCD (Liquid Crystal Display) Panel TV System B/G, I, D/K, M Colour System PAL, PAL60, SECAM, NTSC4.43, NTSC3.58 Channel Coverage B/G: VHF: E2 to E12/ UHF: E21 to E69/ CATV: S01 to S03, S1
-
 1
1 -
 2
2 -
 3
3 -
 4
4 -
 5
5 -
 6
6 -
 7
7 -
8
-
9
-
10
-
11
-
12
-
13
-
14
-
15
-
16
-
17
-
18
-
19
-
20
-
21
-
22
-
23
-
24
-
25
-
26
-
27
-
28
 |
 |
© 2009 Sony Corporation
4-130-985-
13
(1)
KLV-37S550A
KLV-32S550A
KLV-32S530A
KLV-26S550A
Operating Instructions
LCD Colour TV