Sony KV-32XBR250 Operating Instructions - Page 18
Connecting S-Link to a VCR, Connecting S-Link to a satellite, receiver
 |
View all Sony KV-32XBR250 manuals
Add to My Manuals
Save this manual to your list of manuals |
Page 18 highlights
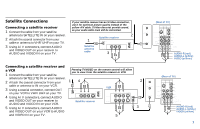
Connecting and Installing the TV (continued) Connecting S-Link to a VCR S-Link automatically powers on the TV and switches to the correct video input when a tape is inserted in the VCR. 1 Using A/V connectors, connect AUDIO and VIDEO OUT on your VCR to AUDIO and VIDEO IN on your TV. 2 Using an S-Link connector (mono mini plug), connect S-LINK on your VCR to S-LINK/CONTROL S-OUT in the same VIDEO IN column on your TV. AUDIO-R (red) AUDIO-L (white) VIDEO (yellow) OUT IN AUDIO R AUDIO L VIDEO LINE OUT VCR S-LINK 2 1 (Rear of TV) VIDEO IN 1 3 4 S VIDEO VIDEO L (MONO) AUDIO R Y PB PR L AUDIO R S-LINK CONTROL S OUT IN Connecting S-Link to a satellite receiver When you power on the satellite receiver , S-Link automatically powers on the TV and switches to the correct video input. 1 Using A/V connectors, connect AUDIO and VIDEO OUT on your satellite receiver to AUDIO and VIDEO IN on your TV. 2 Using an S-Link connector (mono mini plug), connect S-LINK on your satellite receiver to S-LINK/CONTROL S-OUT in the same VIDEO IN column on your TV. Note The S-Link feature will override the "SKIP" VIDEO LABEL input, (see page 25). 12 The S-Link connector must be in the same VIDEO-IN column as the connected A/V cables. Satellite receiver SATELLITE IN S-LINK AUDIO R AUDIO L VIDEO LINE OUT VHF/UHF IN OUT 1 AUDIO-R (red) AUDIO-L (white) VIDEO (yellow) 2 (Rear of TV) VIDEO IN 1 3 4 Y S VIDEO PB VIDEO L (MONO) AUDIO R PR L AUDIO R S-LINK CONTROL S OUT IN
-
 1
1 -
2
-
3
-
4
-
5
-
6
-
7
-
8
-
9
-
10
-
11
-
12
-
 13
13 -
 14
14 -
 15
15 -
 16
16 -
 17
17 -
 18
18 -
 19
19 -
 20
20 -
 21
21 -
 22
22 -
 23
23 -
24
-
25
-
26
-
27
-
28
-
29
-
30
-
31
-
32
-
33
-
34
-
35
-
36
-
37
-
38
-
39
-
40
-
41
-
42
-
43
-
44
-
45
-
46
 |
 |
