Sony LF-B1 Quick Start Guide (LF-PK1) - Page 2
Setup to Watch TV at Home, Setup to Watch TV On-the-Go
 |
View all Sony LF-B1 manuals
Add to My Manuals
Save this manual to your list of manuals |
Page 2 highlights
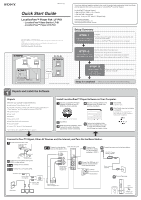
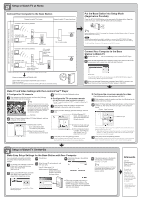
2 STEP Setup to Watch TV at Home Connect Your Computer to the Base Station Connect to watch TV at home • Connect to the router by wireless Connect to watch TV away from home Put the Base Station into Setup Mode (Registration Possible) Press the SETUP MODE button on the rear panel of the base station. Keep the button held down until the SETUP MODE LED starts blinking. Modem without router function To connect your computer to the base station with a router • Connect to the router by wired LAN to Internet Router (UPnP Compatible) Base station • Connect to the router by wireless DSL or cable modem with internal router (UPnP compatible) Modem with internal router • Connect to the router by wired LAN to LAN port Hub or wireless access point (without router function) * To determine the type of your modem, check with your Internet service provider. DSL or cable modem to Internet Check the base station NETWORK LED. Check whether the base station NETWORK LED is turned on. When not turned on: Make sure the router power is turned on and the LAN cable is connected correctly. z Tip Make all settings up to "STEP 2: Connecting Your Computer to the Base Station to Watch TV" while the SETUP MODE LED is blinking. The Setup Mode (registration possible) is available for 5 minutes. If the SETUP MODE LED stops blinking, keep pressing the SETUP MODE button again until the SETUP MODE LED starts blinking. * In the Setup Mode, the wireless LAN operates on the 2.4 GHz channel. Connect Your Computer to the Base Station to Watch TV 1 Double click the icon on the desktop to start LocationFree™ Player. 2 While the SETUP MODE LED is blinking, select a base station from the list, choosing one with a green icon, and then click [Connect]. Green icon If the SETUP MODE LED is not blinking, press the SETUP MODE button again to switch to Setup Mode (registration possible). 3 When the message "Registration completed. Select [OK] to connect to the Base Station and start watching TV/video" appears, click [OK]. Make TV and Video Settings with the LocationFree™ Player ■ Configure the TV channels 1 Click anywhere inside the window, and then click [Settings] at the bottom right of the window. z Tip [Settings] at the bottom right of the window appears only when you are connected to the base station. When you are not connected, click [Connect] at the bottom left, select the base station you want to set up from the list that appears, click [Properties], and then click [Channel Settings]. [Settings] 2 Select [Channel Settings] below [TV/Video Settings], and then configure all the settings. 3 Click [OK] to close the [Settings] window. ■ Configure the TV on-screen remote (For the set top box (STB) connection in STEP 1) * For the TV antenna connection in STEP 1, no need to configure the TV remote control. 1 Click anywhere inside the window, and then click [Settings] at the bottom right of the window. 2 Select [TV/Video Settings], [Remote Settings], and then [TV]. 1 Select [External TV tuner], and then select an appropriate channel from the pull-down list. ■ Configure the on-screen remote for video (For the connection to other devices in STEP 1) 1 Click anywhere inside the window, and then click [Settings] at the bottom right of the window. 2 Select [TV/Video Settings], [Remote Settings], and then [Video 1] or [Video 2], then select the make and type of the connected device. [Power] Select the make. Select the type. 1 Select [ON] or [OFF]. If you subscribe to cable TV, select the [ON] option. 2 Clear the check boxes for channels that you do not watch. 2 Select the make and type of the connected device. 3 If the configuration above is correct, each time you click [Power], your TV should turn on or off.** 3 Click [OK] to close the [Settings] window. Click anywhere inside the window, then click [TV]. Click [Remote], then the on-screen remote control appears. If the configuration above is correct, each time you click [Power], your device should turn on or off.** ** After clicking [Power], it takes five seconds or more for the device to respond. If it does not respond, make sure that the make and type are correct, and then try again. 3 Click [OK] to close the [Settings] window. Click anywhere inside the window, then click the type of the connected device. Click [Remote], then the on-screen remote control appears. 3 STEP Setup to Watch TV On-the-Go Make Easy Setup Settings for the Base Station with Your Computer If you are already connected via NetAV, disconnect before making the following settings. 1 To connect your computer to the base station with a router, put the base station into Setup Mode (See STEP 2). 2 Start LocationFree™ Player, and then click [Base Station Settings] in the [Base Station Selection] window. 3 Click [Enter]. 4 Enter the user ID and password, and then click [OK]. User ID (User name) : lfx Initial password: WebPassword printed on the label affixed to the side of the base station. 5 Click [Easy Setup] in the settings menu page. 6 If [Success] appears in the [NetAV Check] page, click [Exit Setup]. The setup is complete. z Tip If [Setup Incomplete] appears in the [NetAV Check] page, read the explanation on the NetAV check page, and then make the necessary settings. Your web browser starts, and the [Base Station Settings] page opens. ✱ Follow the on-screen instructions to proceed to the NetAV check. In the [NetAV Setup] page, read the supplied Dynamic DNS Terms-of-Use Agreement and then click [Agree]. Afterwards Use the LocationFree™ Player to watch TV and videos. For details on settings and operation of the LocationFree™ Player, refer to the supplied Operating Instructions (included on the supplied CD-ROM). * You can view the Operating Instructions from the [Start] menu in Windows.
-
 1
1 -
 2
2
 |
 |
