Sony LSPX-W1S Operating Instructions (Cabinet) - Page 2
Specifications
 |
View all Sony LSPX-W1S manuals
Add to My Manuals
Save this manual to your list of manuals |
Page 2 highlights
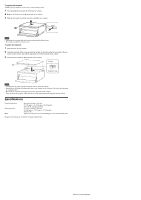
To remove the top panel A Phillips-head screwdriver is necessary to remove the top panel. 1 After opening the door, push the latch into the cabinet. 2 Remove the four screws on the front side of the cabinet. 3 Slide the top panel toward the front side, and lift it up to remove. Latch Notes • Removing the top panel with the latch projected may break the cabinet. • Be careful to keep the removed screws. To attach the top panel 1 Push the latch into the cabinet. 2 Align the backside of the top panel with the red line of the label on the left and right of the top surface of the cabinet, and slide the top panel toward the backside of the cabinet. 3 Attach the four screws on the front side of the cabinet. Red line Transparent label Notes • Attaching the top panel with the latch projected may break the cabinet. • Fasten the screws firmly. Floating screws may cause damage to the backside of the door when opening or closing the door. • Be careful not to pinch your fingers between the top panel and the cabinet. • After attaching the top panel, check that there is no floating between the top panel and the cabinet. Specifications External dimensions Inner dimensions Mass 600 mm × 265 mm × 535 mm (23 5/8 inches × 10 1/2 inches × 21 1/8 inches) (W × H × D, including the feet) 573 mm × 190 mm × 496 mm (22 5/8 inches × 7 1/2 inches × 19 5/8 inches) (W × H × D) Approx. 21.5 kg (47 lb 6.4 oz) (including the center board and four pins) Design and specifications are subject to change without notice.
-
 1
1 -
 2
2
 |
 |
