Sony MHC-RX66 Operating Instructions
Sony MHC-RX66 - Mini Hi Fi System Manual
 |
View all Sony MHC-RX66 manuals
Add to My Manuals
Save this manual to your list of manuals |
Sony MHC-RX66 manual content summary:
- Sony MHC-RX66 | Operating Instructions - Page 1
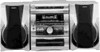
3-862-009-11(1) Mini Hi-Fi Component System Operating Instructions Owner's Record The model and serial numbers are located on the rear panel. Record the serial number in the space provided below. Refer to them whenever you call upon your Sony dealer regarding this product. Model No. Serial No. - Sony MHC-RX66 | Operating Instructions - Page 2
the user to the presence of important operating and maintenance (servicing) instructions in changes or modifications not expressly approved in this manual could void your authority to operate this equipment . This stereo system is equipped with the Dolby Btype noise reduction system*. * - Sony MHC-RX66 | Operating Instructions - Page 3
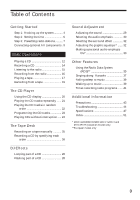
on a tape manually 25 Recording a System (RDS 35 Singing along: Karaoke 37 Falling asleep to music 39 Waking up to music 39 Timer-recording radio programs ....... 41 Additional Information Precautions 43 Troubleshooting 44 Specifications 47 Index 51 * MHC-GRX9000/RX900/GRX7/GRX7J, and MHC - Sony MHC-RX66 | Operating Instructions - Page 4
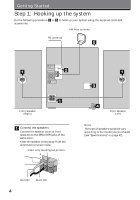
Do the following procedure 1 to 5 to hook up your system using the supplied cords and accessories. AM loop antenna FM antenna 5 1 2 1 Front speaker (Right) 1 Connect the speakers. Connect the speaker cords of front speakers to - Sony MHC-RX66 | Operating Instructions - Page 5
. CFMOA75XIAL AM 4 Connect the power cord to a wall outlet. Demo mode appears in the display. 5 Deactivate the demo mode by pressing DISPLAY/DEMO when the system power is turned off. The demo mode is also deactivated when you set the time. continued 5 - Sony MHC-RX66 | Operating Instructions - Page 6
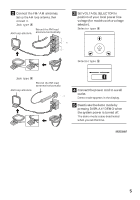
] }} ] Tip With normal use, the batteries should last for about six months. When the remote no longer operates the system, replace both batteries with new ones. Note If you do not use the remote for a long period of time, remove the batteries to avoid possible damage from battery leakage. When - Sony MHC-RX66 | Operating Instructions - Page 7
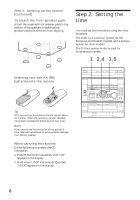
1 Press CLOCK/TIMER SET. The hour indication flashes. 2 Turn the jog dial to set the hour. 3 Press ENTER/NEXT. The minute indication flashes. Step 3: Presetting radio stations You can preset the following number of stations: - 2 band model: 20 for FM, 10 for AM. - 3 band model: 20 for FM, 10 for MW - Sony MHC-RX66 | Operating Instructions - Page 8
stops when the system tunes in a station. "TUNED" and "STEREO" (for a stereo program) appear. ALL DISCS MONO TUNED STEREO VOLUME kHz MHz a weak signal Press + or - repeatedly in step 2 to tune in the station manually. To change the preset number Start over from step 1. To change the AM tuning - Sony MHC-RX66 | Operating Instructions - Page 9
AV components To enhance your system, you can connect optional components. Refer to the instructions of each component. Connecting audio of the MD deck Tip When you connect a Sony MD deck, you can use the MD (, P, and p buttons on this unit's remote to perform play, pause, and stop operations. Note - Sony MHC-RX66 | Operating Instructions - Page 10
enable the "VIDEO" function, just press FUNCTION repeatedly until "VIDEO" appears. To the audio output of the VCR Connecting the surround speakers (MHC-RX77 (Canadian model) only) Connect the speaker cords from the surround speakers to the appropriate SURROUND SPEAKER jacks. Connect the solid cords - Sony MHC-RX66 | Operating Instructions - Page 11
Connecting outdoor antennas Connect the outdoor antenna to improve the reception. FM antenna Connect the optional FM outdoor antenna. You can also use the TV antenna instead. Jack type A 75-ohm coaxial cable (not supplied) Screw clamp FM75 y AM Ground wire (not supplied) Jack type B IEC - Sony MHC-RX66 | Operating Instructions - Page 12
rotate the disc tray. 2 Press one of the DISC 1~3 buttons. The disc tray closes and play starts. If you press CD (P (or CD ( on the remote) when the disc tray is closed, play starts from the CD loaded on the tray whose button is lit green. Disc tray number Playing time - Sony MHC-RX66 | Operating Instructions - Page 13
" appears. Remove the CD Press §. Exchange other Press DISC SKIP/ CDs while EX-CHANGE. playing Adjust the volume Turn VOLUME (or press VOL +/- on the remote). Tips • Pressing CD (P when the power is off automatically turns the power on and starts CD playback if there is a CD in the tray (One - Sony MHC-RX66 | Operating Instructions - Page 14
Recording a CD - CD Synchro Recording The CD SYNC button lets you record from a CD to a tape easily. You can use TYPE I (normal) or TYPE II (CrO2) tapes. The recording level is adjusted automatically. (Power) p 5 2 DISC SKIP/ EX-CHANGE 2 Press § and place a CD. Then press again to close the disc - Sony MHC-RX66 | Operating Instructions - Page 15
model: FM ˜ AM 3 band model: FM n MW n SW n or FM n MW n LW n 4 band model: FM n MW n LW n UKV* n * "STEREO PLUS" is displayed when you select UKV. 2 Turn the jog dial (or press = or + on the remote) to tune in the desired preset station. Turn counter- + clockwise (or press = = on the - Sony MHC-RX66 | Operating Instructions - Page 16
continued) To listen to non-preset radio stations Use manual or automatic tuning in step 2. For manual tuning, press + or - repeatedly. For automatic When an FM program is noisy, press STEREO/MONO so that "MONO" appears in the display. There will be no stereo effect, but the reception will improve. - Sony MHC-RX66 | Operating Instructions - Page 17
. To select either deck A or B, press DECK A ( or DECK B ( on the remote. (Power) 3 p = + P PAUSE To stop recording Press p. Tips • If you preset stations, use + and - in step 2 to tune in the desired station manually. • When you want to reduce the hiss noise in lowlevel high-frequency signals, - Sony MHC-RX66 | Operating Instructions - Page 18
to resume play. Fast-forward Press 0 or ). Rewind Press 0 or ). Remove the cassette Press §. Adjust the volume Turn VOLUME (or press VOL +/- on the remote). Tips • Pressing TAPE A (or TAPE B) ( or 9 when the power is off automatically turns the power on and starts tape playback if there is - Sony MHC-RX66 | Operating Instructions - Page 19
Basic Operations Recording from a tape - High-speed Dubbing You can use TYPE I (normal) or TYPE II (CrO2) tapes. The recording level is automatically adjusted. (Power) p 4 3 Press DIRECTION repeatedly to select A to record on one side. Select ß (or RELAY) to record on both sides. 4 Press P - Sony MHC-RX66 | Operating Instructions - Page 20
(ALL DISCS mode) µ Clock display (for eight seconds) µ Effect (P FILE*) name or "EFFECT ON (OFF)" µ Name of spectrum analyzer display pattern * MHC-GRX9000/RX900/GRX7/GRX7J and MHC-RX77 (Canadian model) only. To check the total playing time and the number of tracks on a CD Press DISPLAY/DEMO in the - Sony MHC-RX66 | Operating Instructions - Page 21
Playing the CD tracks repeatedly -- Repeat Play This function lets you repeat a single CD or all CDs in normal play, Shuffle Play and Program Play. (Power) PLAY MODE REPEAT To cancel Repeat Play Press REPEAT so that "REPEAT" or "REPEAT 1" disappears from the display. / Press REPEAT during playback - Sony MHC-RX66 | Operating Instructions - Page 22
during normal play by pressing PLAY MODE repeatedly to select "SHUFFLE". • To skip a track, turn the jog dial clockwise (or press + on the remote). Jog dial 1 Press FUNCTION repeatedly until "CD" appears in the display, then place a CD. 2 Press PLAY MODE repeatedly until "1 DISC SHUFFLE " or "ALL - Sony MHC-RX66 | Operating Instructions - Page 23
Programming the CD tracks -- Program Play You can make a program of up to 32 tracks from all the CDs in the order you want them to be played. 1 3 7 (Power) p 2 45 CD ( p = + CHECK CLEAR 1 Press FUNCTION repeatedly until "CD" appears in the display, then place a CD. 2 Press PLAY MODE repeatedly - Sony MHC-RX66 | Operating Instructions - Page 24
a specific track Add a track to the program Clear the entire program Press CHECK on the remote repeatedly. After the last track, "CHECK END" appears. CLEAR on the remote in stop mode. CHECK on the remote repeatedly until the number of the track to be erased lights up, then press CLEAR. 1 Select - Sony MHC-RX66 | Operating Instructions - Page 25
The Tape Deck Recording on a tape manually You can record from CD, tape, or radio as you like. For example, you can record just the songs you want or record from the - Sony MHC-RX66 | Operating Instructions - Page 26
time. 7 To program additional tracks to be recorded on side A, repeat steps 4 to 6. Skip step 4 to select tracks from the same disc. 8 Press P on the remote to insert a pause at the end of side A. "P" appears in the display and the total playing time resets to "0.00" in the display. ◊ √ 26 - Sony MHC-RX66 | Operating Instructions - Page 27
ß (or RELAY) to record on both sides. 12 Press P PAUSE. Recording starts. To stop recording Press p. To check the order Press CHECK on the remote repeatedly. After the last track, "CHECK END" appears. To cancel Program Edit Press PLAY MODE repeatedly until "PROGRAM" or "SHUFFLE" disappears from the - Sony MHC-RX66 | Operating Instructions - Page 28
holding LOOP (or press MUSIC MENU > or . while holding LOOP on the remote) to select different loop lengths (LOOP 1~20). / Press and hold FLASH during holding FLASH (or press MUSIC MENU > or . while holding FLASH on the remote) to select different flash lengths (FLASH 1~20). To use LOOP and FLASH - Sony MHC-RX66 | Operating Instructions - Page 29
more powerful sound, and listen with headphones. (Power) DBFB GROOVE PHONES Notes • With some songs, the music will sound distorted when you use the DBFB system with the graphic equalizer if the bass is too strong. Adjust the bass slowly while listening to music so that you can monitor the effect - Sony MHC-RX66 | Operating Instructions - Page 30
audio emphasis file") lets you store your own effects (MHC-GRX9000/RX900/ GRX7/GRX7J/MHC-RX77 (Canadian model) only). MHC-GRX9000 / RX900 / GRX7 / GRX7J MHC-RX77 (Canadian model) 1 2 3 (Power) EFFECT MHC-R700 / GRX5 / RX66 / RX77S MHC-RX77 (except for Canadian model) (Power) 231 v/V ◊ EFFECT - Sony MHC-RX66 | Operating Instructions - Page 31
(Canadian model) Press EFFECT on the front panel (or the remote) repeatedly so that "EFFECT OFF" appears in the display. MHC-R700 / GRX5 / RX66 / RX77S MHC-RX77 (except for Canadian model) Press EFFECT on the remote repeatedly so that "EFFECT OFF" appears in the display. Music menu options "SUR - Sony MHC-RX66 | Operating Instructions - Page 32
on or off. Every time you press the button, the display changes as follows: n SURROUND ON (SUR ) µ SURROUND OFF (off) Tip (for MHC-GRX9000 / RX900 / GRX7 / GRX7J and MHC-RX77 (Canadian model) only) If you want to memorize the effect, store it into a personal file (see "Making a personal audio - Sony MHC-RX66 | Operating Instructions - Page 33
store it in a personal file. (See "Making a personal audio emphasis file".) Making a personal audio emphasis file -Personal file (MHC-GRX9000 / RX900 / GRX7 / GRX7J and MHC-RX77 (Canadian model) only) You can create a personal file of audio patterns (surround effect and graphic equalizer) and store - Sony MHC-RX66 | Operating Instructions - Page 34
. 4 Press ENTER/NEXT. The adjusted sound effects are stored under the selected file number. The settings previously stored at this memory location are erased and replaced by the new settings. To call up the personal file 1 Press FILE SELECT. 2 Use the jog dial to select the personal file you desire - Sony MHC-RX66 | Operating Instructions - Page 35
the signal strength is weak. * Not all FM stations provide RDS service, nor do they provide the same type of services. If you are not familiar with the RDS system, check with your local radio stations for details on RDS services in your area. Receiving RDS broadcasts / Simply select a station from - Sony MHC-RX66 | Operating Instructions - Page 36
Using the Radio Data System (RDS) (continued) 1 Press PTY. 2 Turn jog dial to select the program type you want. See the "List of program types" section below. 3 Press ENTER/NEXT. - Sony MHC-RX66 | Operating Instructions - Page 37
Singing along: Karaoke You can sing along with any stereo CD or tape by turning down the singer's voice. You songs, vocals may not be cancelled when you select "KARAOKE PON". Adjusting the microphone echo (For MHC-GRX7 / GRX7J (Middle Eastern model) only) (Power) ECHO LEVEL 1,5 2 VOLUME 1 Turn - Sony MHC-RX66 | Operating Instructions - Page 38
Mixing and recording sounds 2 (Power) p 53 14 1 Do the above steps 1 to 5. Then, insert a tape in deck B. 2 Press FUNCTION repeatedly to select the source you desire and set it to pause mode. 3 Press r REC. 4 Press P PAUSE. Recording starts. 5 Press CD (P to start playing the CD player (or TAPE - Sony MHC-RX66 | Operating Instructions - Page 39
Falling asleep to music - Sleep Timer You can let the system turn off at the preset time, so you can sleep to the music. You can preset the time to be turned off by 10 minutes. - Sony MHC-RX66 | Operating Instructions - Page 40
Waking up to music (continued) 1 Prepare the music source you want to play. • CD: Insert a CD. To start from a specific track, make a program (see "Programming the CD tracks"). • Tape: Insert an tape with the side you want to play facing forward. • Radio: Tune in the preset station you want (see " - Sony MHC-RX66 | Operating Instructions - Page 41
To check the setting Press TIMER SELECT and turn the jog dial to select the respective mode (DAILY 1 or DAILY 2), then press ENTER/NEXT. To change the setting, start over from step 1. To cancel the timer operation Press TIMER SELECT and turn the jog dial to select "TIMER OFF", then press ENTER/ NEXT - Sony MHC-RX66 | Operating Instructions - Page 42
Timer-recording radio programs (continued) 1 Tune in the preset radio station (see "Listening to the radio"). 2 Press CLOCK/TIMER SET. "SET (DAILY 1)" appears. 3 Turn jog dial to select "REC", then press ENTER/NEXT. "ON" appears and the hour digits flash in the display. 1 2 REC SLEEP ALL DISCS - Sony MHC-RX66 | Operating Instructions - Page 43
have any questions or problems concerning your stereo system, please consult your nearest Sony dealer. Notes on CDs • Before playing, clean the CD with a cleaning cloth. Wipe the CD from the center out. • Do not use solvents such as benzene, thinner, commercially available cleaners or anti-static - Sony MHC-RX66 | Operating Instructions - Page 44
20 to 30 hours of use with a separately sold demagnetizing cassette. For details, refer to the instructions of the demagnetizing cassette. Troubleshooting If you run into any problem using this stereo system, use the following check list. First, check that the power cord is connected firmly and the - Sony MHC-RX66 | Operating Instructions - Page 45
TV or VCR is placed too close to the stereo system. Move the stereo system away from the TV or VCR. The sound remote does not function. •There is an obstacle between the remote and the system. •The remote is not pointing in the direction of the system's sensor. •The batteries have run down. Replace - Sony MHC-RX66 | Operating Instructions - Page 46
Troubleshooting (continued) Tape Deck The tape does not record. •No tape in the Connect the external antenna. A stereo FM program cannot be received in stereo. •Press STEREO/MONO so that "STEREO" appears. If other troubles not described above occur, reset the system as follows: 1 Unplug the - Sony MHC-RX66 | Operating Instructions - Page 47
Specifications AUDIO POWER SPECIFICATIONS: (MHC-RX66 U.S.A. models only) POWER OUTPUT AND TOTAL at 1 kHz, 10% THD) Total harmonic distortion less than 0.07% (8 ohms at 1 kHz, 55 W) MHC-RX66: Continuous RMS power output (reference) 60 + 60 watts (6 ohms at 1 kHz, 10% THD) Total harmonic distortion - Sony MHC-RX66 | Operating Instructions - Page 48
voltage 250 mV (phono jacks) impedance 1 kilohms PHONES: accepts headphones of 8 (stereo phone jack) ohms or more SPEAKER: MHC-RX66/GRX5/RX77(European models) /RX77S/R700: accepts impedance of 6 to 16 ohms MHC-RX900/GRX9000/GRX7/GRX7J/ RX77 (Canadian models): accepts impedance of 8 to - Sony MHC-RX66 | Operating Instructions - Page 49
6 ohms Dimensions (w/h/d) Approx. 230 x 335 x 310 mm Mass Approx. 5 kg net per speaker SS-J50 for MHC-RX77 (European models)/ MHC-RX66/MHC-GRX5 SS-J50B for MHC-R700 Speaker system 3-way, bass-reflex type Speaker units Woofer: 15 cm, cone type Tweeter: 5 cm, cone type Super Tweeter - Sony MHC-RX66 | Operating Instructions - Page 50
: Approx. 12.0 kg (26 lbs. 7 oz.) Supplied accessories: Optional accessories: (MHC-RX77 Canadian models only) Speaker system Speaker units: Full range Nominal impedance Dimensions (w/h/d) Mass AM loop antenna (1) Remote RM-SR5 (1) Batteries (2) FM lead antenna (1) Speaker cords (2) Front speaker - Sony MHC-RX66 | Operating Instructions - Page 51
Edit 27 F, G Flash 28 H, I, J Hooking up optional components 9 the antennas 5, 11 the power 5 the system 4 K Karaoke 37 L, M Loop 28 N Normal Play 12 O One Touch Play 13, 16, 18 P, Q 41 waking up to music 39 Troubleshooting 44 Tuner 7, 15 Tuning interval 8, 48 W, X, Y, Z Wake-up timer 39 51 - Sony MHC-RX66 | Operating Instructions - Page 52
Sony Corporation Printed in Hungary 52
-
 1
1 -
 2
2 -
 3
3 -
 4
4 -
 5
5 -
 6
6 -
 7
7 -
8
-
9
-
10
-
11
-
12
-
13
-
14
-
15
-
16
-
17
-
18
-
19
-
20
-
21
-
22
-
23
-
24
-
25
-
26
-
27
-
28
-
29
-
30
-
31
-
32
-
33
-
34
-
35
-
36
-
37
-
38
-
39
-
40
-
41
-
42
-
43
-
44
-
45
-
46
-
47
-
48
-
49
-
50
-
51
-
52
 |
 |
Mini Hi-Fi
Component
System
©1998 by Sony Corporation
Operating Instructions
3-862-009-
11
(1)
f
MHC-GRX9000 / RX900
MHC-GRX7 / GRX7J
MHC-RX77 / RX77S / R700
MHC-GRX5 / RX66
Owner’s Record
The model and serial numbers are located on the rear panel.
Record the serial
number in the space provided below. Refer to them whenever you call upon your
Sony dealer regarding this product.
Model No.
Serial No.