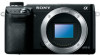
Sony NEX-6 Instruction Manual
Sony NEX-6 Manual
 |
View all Sony NEX-6 manuals
Add to My Manuals
Save this manual to your list of manuals |
Sony NEX-6 manual content summary:
- Sony NEX-6 | Instruction Manual - Page 1
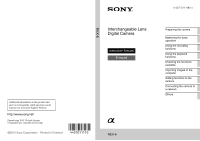
be found at our Customer Support Website. Printed using VOC (Volatile Organic Compound)-free vegetable oil based ink. ©2012 Sony Corporation Printed in Thailand NEX-6 4-437-011-11(1) Interchangeable Lens Digital Camera Instruction Manual E-mount Preparing the camera Mastering the basic operation - Sony NEX-6 | Instruction Manual - Page 2
. Refer to these numbers whenever you call your Sony dealer regarding this product. Model No. NEX-6 Serial No Model No. AC-UB10/AC-UB10B . IMPORTANT SAFETY INSTRUCTIONS -SAVE THESE INSTRUCTIONS DANGER -TO REDUCE THE RISK OF FIRE OR ELECTRIC SHOCK, CAREFULLY FOLLOW THESE INSTRUCTIONS If the shape - Sony NEX-6 | Instruction Manual - Page 3
Sony battery charger or a device that can charge the battery pack. • Keep the battery pack out of the reach of small children. • Keep the battery pack dry. • Replace only with the same or equivalent type recommended by Sony. • Dispose of used battery packs promptly as described in the instructions - Sony NEX-6 | Instruction Manual - Page 4
org/ Caution: Do not handle damaged or leaking Lithium-Ion batteries. [ Battery pack and lens (If lens supplied) This device complies with Part 15 of the FCC -003. This equipment complies with FCC/IC radiation exposure limits set forth for an uncontrolled environment and meets the FCC radio frequency - Sony NEX-6 | Instruction Manual - Page 5
Trade Name: SONY Model No.: NEX-6 Responsible Party: Sony Electronics Inc. Address modifications not expressly approved in this manual could void your authority to operate in accordance with the instructions, may cause harmful into an outlet on a circuit different from that to which the receiver - Sony NEX-6 | Instruction Manual - Page 6
or guarantee matters please refer to the addresses given in separate service or guarantee documents. Hereby, Sony Corporation, declares that this NEX-6 Interchangeable Lens Digital Camera is in compliance with the essential requirements and other relevant provisions of the Directive 1999/5/EC - Sony NEX-6 | Instruction Manual - Page 7
. In case of products that for safety, performance or data integrity reasons require a permanent connection with an incorporated battery, this battery should be replaced by qualified service staff only. To ensure that the battery will be treated properly, hand over the product at end-of-life to the - Sony NEX-6 | Instruction Manual - Page 8
for electronic communications networks and services) of the Code of electronic communications. Caution if using the camera in Norway Use of this All Wireless function designated for the NEX-6 Interchangeable Lens Digital Camera are applicable in the U.S.A., Canada, Mexico, France, Sweden, Russia - Sony NEX-6 | Instruction Manual - Page 9
parts 12 Charging the battery pack 16 Attaching/removing the lens 21 Inserting a memory card (sold separately 23 Adjusting the viewfinder (diopter adjustment 25 Attaching/removing the eyepiece cup 25 Setting the date and time 26 Mastering the basic operation Shooting still images 28 - Sony NEX-6 | Instruction Manual - Page 10
of recordable images 75 List of icons on the LCD screen 78 Learning more about the camera (α Handbook 82 Troubleshooting 83 Precautions 88 Specifications 93 Index 99 This manual covers several models supplied with different lenses. The model name varies depending on the supplied lens. The - Sony NEX-6 | Instruction Manual - Page 11
battery pack NP-FW50 (1) • Eyepiece cup (1) • Shoe Cap (1) (Attached on the camera) • CD-ROM (1) - Application Software for α camera - α Handbook • Instruction Manual (This manual) (1) x NEX-6 • Body cap (1) (attached to the camera) • Micro USB cable (1) x NEX-6L • E16 - 50 mm zoom lens - Sony NEX-6 | Instruction Manual - Page 12
21) K Lens release button (22) L Mount M Image sensor4) N Lens contacts4) A Flash (48) B Shutter button (29) C Hook for shoulder strap Attach the shoulder strap to prevent damage caused by dropping the camera. 1) For details on compatible accessories of the Multi Interface Shoe, visit the Sony web - Sony NEX-6 | Instruction Manual - Page 13
(50) P Soft key A (34) Q Control wheel (33) R Soft key C (34) S Soft key B (34) T Diopter-adjustment dial (25) A Image sensor position mark B Viewfinder (25) C Eyepiece cup (25) • Not attached to the camera at the factory. D Eye sensor E Wi-Fi sensor (built-in) F Charge lamp G Micro USB terminal - Sony NEX-6 | Instruction Manual - Page 14
(sold separately). Insert the connection plate into the battery compartment, and then pass the cord through the connection plate cover as shown below. x Lens See page 96 on the specifications of the lenses. E PZ 16 - 50 mm F3.5-5.6 OSS (supplied with NEX-6L/NEX-6Y) • Make sure that the cord is not - Sony NEX-6 | Instruction Manual - Page 15
Preparing the camera E55 - 210 mm F4.5-6.3 OSS (supplied with NEX-6Y) A Focusing ring B Zooming ring C Focal-length scale D Focal-length index E Lens contacts1) F Mounting index 1) Do not touch this part directly. GB 15 - Sony NEX-6 | Instruction Manual - Page 16
pack can also be used when it has not been fully charged. The charged battery pack is discharged little by little, even when you do not use it. To avoid missing an opportunity to shoot, charge the battery pack again before you shoot. 1 Set the power switch to OFF. 2 Open the cover by sliding the - Sony NEX-6 | Instruction Manual - Page 17
and charging starts. • Set the power switch to OFF while charging the battery. If the power switch is set to ON, the camera cannot charge the battery. • When the charge lamp flashes, remove and re-insert the battery pack. Charge lamp Lit: Charging Off: Charging finished Flashing: Charging error or - Sony NEX-6 | Instruction Manual - Page 18
. In such cases, remove the battery pack and re-insert it, and then charge the battery pack. • Do not try to charge the battery pack again right after it has been charged, or when it has not been used after being charged. Doing so will affect the performance of the battery pack. • When charging is - Sony NEX-6 | Instruction Manual - Page 19
using a micro USB cable. Notes • Note the following points when charging via a computer: - If the camera is connected to a laptop computer that is not connected to a power source, the laptop battery level decreases. Do not leave the camera connected to a computer for an extended period of time. - Do - Sony NEX-6 | Instruction Manual - Page 20
Preparing the camera x Checking the remaining battery level Check the level with the following indicators and percent figures displayed on the LCD screen. Battery level High "Battery exhausted." You cannot Low shoot any more image. Notes • The displayed battery power level may not be correct - Sony NEX-6 | Instruction Manual - Page 21
by aligning the white index marks on the lens and the camera. • Hold the camera's face downward to prevent the dust from entering into the camera. Preparing the camera 3 While pushing the lens lightly toward the camera, turn the lens clockwise until it clicks into the locked position. • Be sure - Sony NEX-6 | Instruction Manual - Page 22
to use body caps or rear lens caps, please purchase ALC-B1EM (Body cap) or ALC-R1EM (Rear lens cap) (sold separately). • When you use a lens with a power zoom, set the power switch of the camera to OFF and confirm that the lens is completely retracted before switching lenses. If the lens has not - Sony NEX-6 | Instruction Manual - Page 23
Preparing the camera Inserting a memory card (sold separately) 1 Open the cover. 2 Insert a memory card. • Insert the memory card until it clicks as illustrated. 3 Close the cover. Check on the direction of the notched corner. GB 23 - Sony NEX-6 | Instruction Manual - Page 24
. Make sure that the device is compatible with exFAT before connecting it to the camera. If you connect your camera to an incompatible device, you may be prompted to format the card. Never format the card in response to this prompt, as doing so will erase all data on the card. (exFAT is the - Sony NEX-6 | Instruction Manual - Page 25
top of the eyepiece cup with the viewfinder, and snap it onto the bottom of the viewfinder. • To remove the eyepiece cup, push on the sides and pull the eyepiece cup off the viewfinder. Notes • Remove the eyepiece cup when you attach an accessory (sold separately) to the Multi Interface Shoe. GB 25 - Sony NEX-6 | Instruction Manual - Page 26
When you turn on the camera for the first time, the screen to set date and time appears. 1 Set the power switch to ON to turn on the camera. The screen to set date and time appears. • To turn off the camera, set the power switch to OFF. 2 Press the center of the control wheel. 3 Select your area by - Sony NEX-6 | Instruction Manual - Page 27
print images with date. Refer to "PlayMemories Home Help Guide" for more details (page 67). x Resetting the date and time/Checking the current clock setting Select MENU t [Setup] t [Date/Time Setup] (page 60). x Maintaining the date and time setting This camera has an internal rechargeable battery - Sony NEX-6 | Instruction Manual - Page 28
allows you to shoot with appropriate settings. 1 Set the mode dial to (Intelligent Auto). Mastering the basic operation 2 Point the camera to the subject. When the camera recognizes the scene, the Scene Recognition icon and guide appear on the LCD screen: (Night Scene), (Tripod Night Scene - Sony NEX-6 | Instruction Manual - Page 29
, beeps sound and z lights up. Mastering the basic operation Focus indicator 5 Press the shutter button fully down. When the camera detects and shoots a face with [Auto Port. Framing] set to [Auto], the captured image is automatically trimmed into a suitable composition. Both the original and - Sony NEX-6 | Instruction Manual - Page 30
wait until the camera is ready to shoot again. Playing back images 1 Press the (Playback) button. The last recorded image is displayed on the LCD screen. • Press the center of the control wheel to enlarge the displayed image. (Playback) button x Selecting the image Turn the control wheel. GB 30 - Sony NEX-6 | Instruction Manual - Page 31
Mastering the basic operation x Playing back movies 1 Select MENU t [Playback] t [Still/Movie Select] t [Folder View(MP4)] or [AVCHD View]. • To return to still image playback, select [Folder View(Still)]. 2 Turn the control wheel to select the desired movie, and press the center. During movie - Sony NEX-6 | Instruction Manual - Page 32
the basic operation Deleting images You can delete the image that is currently displayed. 1 Press (Delete). 2 Press the center of the control wheel. • Select to quit the operation. z Deleting several images Select MENU t [Playback] t [Delete] to select and delete several images at the same time - Sony NEX-6 | Instruction Manual - Page 33
wheel. When playing back, DISP (Display Contents) and (Image Index) functions are assigned to the control wheel. When you turn or press the top/bottom/right/left parts of the control wheel following the on-screen display, you can select setting items. Your selection is determined when you press the - Sony NEX-6 | Instruction Manual - Page 34
use the function shown at the center, press the center of the control wheel (soft key C). In this manual, the soft keys are indicated by the icon or the function shown on the screen. In this case, soft key A A works as the MENU (Menu) button, and C soft key B as the (View on Smartphone) B button. GB - Sony NEX-6 | Instruction Manual - Page 35
for better shooting. Use these guides to make better use of the camera. x Help Guides The camera displays the Help Guides to explain the selected function, when you change the setting, etc. You can hide the Help Guides by selecting MENU t [Setup] t [Help Guide Display] t [Off]. x Shooting tips You - Sony NEX-6 | Instruction Manual - Page 36
the optical zoom of the lens and then the camera shifts automatically to the [Zoom] feature of the camera. When using a lens that is not equipped with a power zoom, follow the instruction below after magnifying using the optical zoom. 1 Select MENU t [Camera] t [Zoom] t desired value. z The [Zoom - Sony NEX-6 | Instruction Manual - Page 37
for more intuitive operations than a normal screen. You can shoot a subject with easy operations and obtain creative photos easily. 1 Set the mode dial to (Intelligent Auto) or (Superior Auto). 2 Press the bottom of the control wheel. The [Photo Creativity] screen appears. 3 Select the item you want - Sony NEX-6 | Instruction Manual - Page 38
an E-mount lens is mounted. • [Photo Creativity] is only available when [Intelligent Auto] or [Superior Auto] is selected. x Defocusing the background easily (Background Defocus Control) 1 Select (Bkground Defocus) (page 37). 2 Defocus the background by turning the control wheel. : You can focus on - Sony NEX-6 | Instruction Manual - Page 39
, tender, soft. (Partial Color): Creates an image which retains the specified color, but converts others to black and white. (High Contrast Mono.): Creates an image with high contrast in black and white. • You can use more picture effects. Select MENU t [Brightness/Color] t [Picture Effect]. GB 39 - Sony NEX-6 | Instruction Manual - Page 40
+3.0 EV. 1 Press (Exposure Comp.) on the control wheel. 2 Turn the control wheel or the control dial to select the desired value, and press the center. • When the image is too bright, set [Exposure Comp.] toward -. • When the image is too dark, set [Exposure Comp.] toward +. Using the self-timer - Sony NEX-6 | Instruction Manual - Page 41
when you want to include yourself in the picture. When you press the shutter button, the self-timer lamp flashes and beeps until the shutter operates. (Self-timer: 2 Sec): Sets the 2-second delay self-timer. You can prevent blur caused by camera-shake that occurs when the shutter button is - Sony NEX-6 | Instruction Manual - Page 42
information. Level: Displays an indicator guide showing the angle of inclination of the camera to the front, back, left or right side. Histogram: Displays the luminance distribution graphically. For viewfinder: Shows only shooting information on the screen (no image). Select this mode when you - Sony NEX-6 | Instruction Manual - Page 43
customize settings, except for the exposure (shutter speed and aperture). (Superior Auto): Shoots images with a wider range of shooting functions than those of Intelligent Auto shooting. Recognizes and evaluates the shooting conditions automatically, performs Auto HDR, and chooses the best image. GB - Sony NEX-6 | Instruction Manual - Page 44
of scenery in sharp focus with vivid colors. (Macro): Shoots close-ups of the subjects such as flowers, insects, food, or small items. (Sports Action): Shoots a moving subject at a fast shutter speed so that the subject looks as if it is standing still. The camera shoots images continuously while - Sony NEX-6 | Instruction Manual - Page 45
pan the camera, the camera shoots several images and composes them into one panoramic image. 1 Set the shooting mode to (Sweep Panorama) (page 43). 2 Select the shooting direction by turning the control dial. 3 Point the camera at the subject for which you want to set the brightness and focus, and - Sony NEX-6 | Instruction Manual - Page 46
from the beginning to the end by pressing the center of the control wheel while panoramic images are being displayed. Press the center of the control wheel again to pause. • Panoramic images shot with other cameras may not be displayed or scrolled correctly. This indicator shows the displayed area - Sony NEX-6 | Instruction Manual - Page 47
control dial to select the desired value. • You can record a movie with a value adjusted with [Aperture Priority]. x Program Auto/Superior Auto In [Superior Auto] mode, the camera shoots with higher quality than [Intelligent Auto] mode and perform scene and shoot continuous images. (Program Auto) - Sony NEX-6 | Instruction Manual - Page 48
exposure is completed every time you trigger the shutter. A trailing image of the movement of the subject is captured to make more natural image. (Wireless): This mode is effective when you attach a remote controlcompatible external flash (sold separately) to the camera, and shoot with a wireless - Sony NEX-6 | Instruction Manual - Page 49
Using the recording functions The flash range The range of the flash depends on the ISO sensitivity and m - 6 m (9.2 feet - 20 feet) Setting using the Fn (Function) button 1 Press the settings. (AF/MF Select)/ (Autofocus Mode)/ (Autofocus Area)/ (White Balance)/ (Metering Mode)/ (Picture - Sony NEX-6 | Instruction Manual - Page 50
. The exposure value is fixed and the (AE lock) lights up. AEL button 3 Holding the AEL button down, focus on your subject and shoot. z How to keep the AE locked after you have released the AEL button Select MENU t [Setup] t [Custom Key Settings] t [Func. of AEL button] t [AEL toggle]. GB 50 - Sony NEX-6 | Instruction Manual - Page 51
format paper. The smaller the image size, the more images can be recorded. In the case of movies, the larger the bit-rate, the higher the image quality. 1 Select MENU t [Image Size] t [Image Size]. For movie recording, select MENU t [Image Size] t [Record Setting]. 2 Select the desired mode. Using - Sony NEX-6 | Instruction Manual - Page 52
(Playback) button to enter playback mode. 2 Press (Image Index) on the control wheel. Six images are displayed at a time. (Playback) button 3 Turn the control wheel to select an image. • To return to the single-image screen, select the desired image, and press the center. z Displaying a desired - Sony NEX-6 | Instruction Manual - Page 53
a TV To view images on the camera using a TV, an HDMI cable (sold separately) and an HD TV equipped with an HDMI connector are required. 1 Connect the camera to the TV with an HDMI cable (sold separately). To the HDMI connector HDMI cable To the HDMI terminal Notes • Use an HDMI mini connector - Sony NEX-6 | Instruction Manual - Page 54
. * The application downloading function may not be available in some countries/ regions. x Camera Allows you to set shooting functions, such as continuous shooting, self-timer, and flash. Drive Mode Flash Mode AF/MF Select Autofocus Area Autofocus Mode Object Tracking Zoom Face Detection GB 54 - Sony NEX-6 | Instruction Manual - Page 55
person to be given priority in the focus. (New Registration/Order Exchanging/Delete/Delete All) Each time the camera detects a smile, the camera releases the shutter automatically. (Off/On) Analyzes the scene when capturing a face and saves another image with a more impressive composition. (Off/Auto - Sony NEX-6 | Instruction Manual - Page 56
Size Panorama Direction Movie File Format Record Setting Selects the image size. (Standard/Wide) Selects the direction to pan the camera when shooting panoramic images. (Right/Left/Up/Down) Selects AVCHD or MP4. Selects the image size, frame rate, and image quality of movies. (AVCHD: 60i/50i 24M - Sony NEX-6 | Instruction Manual - Page 57
Picture Effect Creative Style Shoots with the desired effects to express a unique atmosphere. (Off/Toy Camera/Pop Color/Posterization/Retro Photo/Soft High-key/Partial Color/High Contrast Mono./Soft Focus/HDR Painting/Rich-tone Mono./ Miniature) Selects the image processing method. (Standard/Vivid/ - Sony NEX-6 | Instruction Manual - Page 58
downloading website "PlayMemories Camera Apps" via the Internet. x Setup Allows you to make more detailed shooting settings, or change the camera settings. Shooting Settings AEL w/ shutter AF Illuminator Phase Detection AF Area Red Eye Reduction FINDER/LCD Setting Live View Display Auto Review - Sony NEX-6 | Instruction Manual - Page 59
Space SteadyShot Release w/o Lens Eye-Start AF Front Curtain Shutter Long Exposure NR High ISO NR Enhances the outline of in-focus ranges with a specific color. (High/Mid/Low/Off) Sets the color used for the peaking function. (White/Red/Yellow) Zooms an image with higher quality than Digital - Sony NEX-6 | Instruction Manual - Page 60
corners of the screen. (Auto/Off) Lens Comp.: Distortion Compensates for distortion on the screen. (Auto/Off) Face Priority Tracking Sets whether to preferentially-track a certain face or not when the camera detects that face during object tracking. (On/Off) Auto Slow Shutter Sets whether or - Sony NEX-6 | Instruction Manual - Page 61
to display wide images. (Full Screen/Normal) Selects the method used to play back portrait images. (Auto Rotate/Manual Rotate) Set resolution when connected to HDMI TV. (Auto/1080p/1080i) Sets whether or not to operate the camera with a "BRAVIA" Sync-compliant TV's Remote Control. (On/Off) Selects - Sony NEX-6 | Instruction Manual - Page 62
Displays the remaining recording time of movies and the recordable number of still images on the memory card. Eye-Fi Setup* Upload Settings Sets whether to use the upload function of the camera with an Eye-Fi card. (On/Off) Network Settings WPS Push You can register the access point to the - Sony NEX-6 | Instruction Manual - Page 63
) SCN (Scene Selection) Exposure Comp. - - - Self-timer Cont. Shooting - Face Detection Picture Effect - - - - - - - - - - - - - - - - - - - - - - - - - - (Sweep Panorama) - - - - M (Manual - Exposure) S (Shutter Priority) A (Aperture Priority) P (Program Auto - Sony NEX-6 | Instruction Manual - Page 64
* The camera emits flash light in slow synchro mode if the flash is necessary. ** The [Wireless] setting cannot be used with the camera's internal flash. Notes • The flash modes may be limited also by conditions other than the shooting mode. • Even if you select a workable flash mode, the flash does - Sony NEX-6 | Instruction Manual - Page 65
can view them, and use various convenient features to enhance the images you have shot. Notes • Log on as Administrator. • Use "Image Data Converter" to play back RAW images. • If "PMB" (Picture Motion Browser) supplied with a camera that was purchased before 2011 has already been installed on the - Sony NEX-6 | Instruction Manual - Page 66
[Install.exe]. • If the AutoPlay screen appears, select "Run Install.exe" and follow the instructions that appear on the screen to proceed with the installation. 2 Connect the camera to the computer. 3 Click [Install]. • Make sure that both "Image Data Converter" and "PlayMemories Home" are checked - Sony NEX-6 | Instruction Manual - Page 67
file in the destination folder. • Follow the instructions on the screen to complete the installation. What you can do with the supplied software x "PlayMemories Home" With "PlayMemories Home," you can do the following: • You can import images shot with the camera to your computer and display them on - Sony NEX-6 | Instruction Manual - Page 68
the original image quality, store your movies on a Blu-ray Disc. x "Image Data Converter" With "Image Data Converter," you can do the following: • You can play back and edit images recorded in RAW format with various corrections, such as tone curve and sharpness. • You can adjust images with white - Sony NEX-6 | Instruction Manual - Page 69
images to network services directly from the camera. Some applications may be fee-based. x Starting up downloading services 1 Access the application downloading website. http://www.sony.net/pmca • Use Internet Explorer 8 or 9 for Windows, and Safari 5 for Mac. 2 Follow the instructions on the screen - Sony NEX-6 | Instruction Manual - Page 70
using Wi-Fi function of the camera You can download applications using the Wi-Fi function without connecting to a computer. Select MENU t [Application] t (PlayMemories Camera Apps), then follow the instructions on the screen to download applications. Acquire a service account in advance (page 69 - Sony NEX-6 | Instruction Manual - Page 71
All Images on This Date: Transfers all still images in the same date range as the most recently shot or played back image to the Smartphone. All Images in The Device: Transfers all still images in the camera to the Smartphone. 2 If the camera is ready for the transfer, the information screen appears - Sony NEX-6 | Instruction Manual - Page 72
compatible with "PlayMemories Mobile." Connecting to a network You can transfer images on the camera via Wi-Fi network and view them on other devices. The setting procedure differs Push]. Other than above. Use [Access Point Settings]. x WPS Push 1 Select MENU t [Setup] t [WPS Push]. 2 Press the WPS - Sony NEX-6 | Instruction Manual - Page 73
is not displayed on the screen: Select [Manual Setting] and set the access point following the instructions on the screen. • For details, refer to "α Handbook." Notes • When aboard an airplane, turn off the camera. Saving images to a computer You can save images on the camera to a computer that is - Sony NEX-6 | Instruction Manual - Page 74
You can transfer images on the camera to a network-compatible TV without connecting them using a cable. The transferred images can be played back on the TV. 1 Select MENU t [Playback] t [View on TV]. 2 Select the device to be connected to the camera. 3 Press the center of the control wheel to play - Sony NEX-6 | Instruction Manual - Page 75
card into the camera and set the power switch to ON, the number of images that can be recorded (should you continue to shoot using the current settings) is displayed on the LCD screen. Notes • When "0" (the number of recordable images) flashes in yellow, the memory card is full. Replace the memory - Sony NEX-6 | Instruction Manual - Page 76
. The recording time also vary depending on the shooting condition or your subject or the setting of image quality/size. • The duration of time available for movie recording varies with the temperature or condition of the camera before you start recording. If you frequently recompose or shoot still - Sony NEX-6 | Instruction Manual - Page 77
images Approx. 270 images • The number of images is calculated using full charged battery pack under the following conditions: - At an ambient temperature of 25 °C (77 °F). - An E PZ 16-50 mm F3.5-5.6 OSS lens is attached. - [Quality] is set to [Fine]. - [Autofocus Mode] is set to [Single-shot AF - Sony NEX-6 | Instruction Manual - Page 78
on the LCD screen Icons are displayed on the screen to indicate the camera status. You can change the screen display using DISP (Display Contents) on the control wheel. Shooting 1M 4M 3.4M Number of recordable still images Recordable time of movies Aspect ratio of still images Image size of still - Sony NEX-6 | Instruction Manual - Page 79
Display RAW RAW+J FINE STD 60i/50i 60i/50i 60p/50p 24p/25p 24p/25p Indication Image quality of still images Recording mode of movies Display 101-0012 100% Remaining battery Flash charge in progress AF illuminator Live view Does not record sound during movie recording Wind noise reduction is - Sony NEX-6 | Instruction Manual - Page 80
Smile detection sensitivity indicator Indication Level Phase Detection AF ranging points Focus status Shutter speed Aperture value Metered manual Exposure compensation ISO sensitivity AE lock Shutter speed indicator Aperture indicator Recording time of the movie (m:s) Recorded date/time of the image - Sony NEX-6 | Instruction Manual - Page 81
Display 12/12 Indication Image number/ Number of images in the view mode Appears when HDR did not work on the image. Appears when [Picture Effect] did not work on the image. Histogram Others GB 81 - Sony NEX-6 | Instruction Manual - Page 82
Learning more about the camera (α Handbook) "α Handbook," which explains how to use the camera in detail, is included on the CD-ROM (supplied). Refer to "α Handbook" for in-depth instructions on the many functions of the camera. x For Windows users 1 Turn on your computer, and insert the CD-ROM ( - Sony NEX-6 | Instruction Manual - Page 83
occurs when you use the camera in an extremely hot or cold location. • The battery pack is discharged. Install a charged battery pack (page 16). • The battery pack is dead. Replace the battery pack with a new one. Cannot turn the camera on. • Install the battery pack correctly (page 16). • The - Sony NEX-6 | Instruction Manual - Page 84
• This phenomenon occurs when you use the camera in an extremely hot or cold location. The optimal temperature for charging the battery pack is between 10 °C and 30 °C (50 °F and 86 °F). The battery pack is not charged. • When the battery pack is not charged (the charge lamp does not light) even if - Sony NEX-6 | Instruction Manual - Page 85
the RAW mode. Since the RAW data file is large, the RAW mode shooting may take time. • The [Auto HDR] is processing an image. The image is out of focus. • The subject is too close. Check the minimum focal distance of the lens. • You are shooting in manual focus mode. Set [AF/MF Select] to [Autofocus - Sony NEX-6 | Instruction Manual - Page 86
the correct date and time (page 26). • The area selected with [Area Setting] is different from the actual area. Set the actual area by selecting MENU t [Setup] t [Area Setting]. The aperture value and/or shutter speed flashes. • The subject is too bright or too dark, and the camera's available range - Sony NEX-6 | Instruction Manual - Page 87
Selection] (page 44) are also effective in reducing blur. The exposure value is flashing on the LCD screen or the viewfinder. • The subject is too bright or too dark for the metering range of the camera. Viewing images Images cannot be played back. • The folder/file name has been changed on your - Sony NEX-6 | Instruction Manual - Page 88
camera: 50i • Your camera is compatible with 1080 60p/50p movies. Unlike existing standard recording modes, which record in an interlacing method, this camera records using a progressive method. This increases the resolution, and provides a smoother, more realistic image. On the LCD screen and lens - Sony NEX-6 | Instruction Manual - Page 89
that you use Sony lenses/accessories designed to suit the characteristics of this camera. Using the products of other manufacturers may cause the camera not to operate to its capability, or result in accidents and malfunctions of the camera. On the Multi Interface Shoe • Set the power switch - Sony NEX-6 | Instruction Manual - Page 90
that if you attempt to shoot with moisture remaining inside the lens, you will be unable to record clear images. On the internal rechargeable battery This camera has an internal rechargeable battery for maintaining the date and time and other settings regardless of whether the power is on or off, or - Sony NEX-6 | Instruction Manual - Page 91
Home" in the CD-ROM (supplied). On RAW images To view RAW images recorded with the camera, "Image Data Converter" on the CD-ROM (supplied) is required. with this camera cannot be played by the following devices. - Other devices compatible with AVCHD format that does not support High Profile - Sony NEX-6 | Instruction Manual - Page 92
the copyright laws. The pictures used in this manual The photographs used as examples of pictures in this manual are reproduced images, and are not actual images shot using this camera. GB 92 On the data specifications described in this manual The data on performance and specifications are defined - Sony NEX-6 | Instruction Manual - Page 93
of image sensor: Approx. 16 700 000 pixels Effective pixel number of camera: Approx. 16 100 000 pixels [Anti-dust] System: Charge protection coating on Low-Pass Filter and ultrasonic vibration mechanism [Auto focus system] System: Fast Hybrid AF (Phase detection system/Contrast detection system - Sony NEX-6 | Instruction Manual - Page 94
Used battery pack: Rechargeable battery pack NP-FW50 [Power consumption] When using an E PZ 16-50 mm F3.55.6 OSS lens* When using the viewfinder: Approx. 3.3 W When using an LCD screen: Approx. 2.5 W * supplied with NEX-6L/6Y [Others] Exif Print: Compatible PRINT Image Matching III: Compatible DPOF - Sony NEX-6 | Instruction Manual - Page 95
) For countries or regions other than the USA and Canada: Approx. 43 g (1.5 oz) Rechargeable battery pack NP-FW50 Used battery: Lithium-ion battery Maximum voltage: DC 8.4 V Nominal voltage: DC 7.2 V Maximum charge voltage: DC 8.4 V Maximum charge current: 1.02 A Capacity: Typical 7.7 Wh (1 080 mAh - Sony NEX-6 | Instruction Manual - Page 96
zoom lens1) E55 - 210 mm zoom lens Camera NEX-6L/6Y NEX-6Y Equivalent 35 mm-format focal length2) (mm) 24 - 75 82.5 - 315 Lens groups- elements Angle of view2) Minimum on digital cameras equipped with an APS-C sized image sensor. 3) Minimum focus is the shortest distance from the image sensor - Sony NEX-6 | Instruction Manual - Page 97
a 35 mm-format camera, and shoot with the same picture angle, by increasing the focal length of your lens by half. For example, by using a 50 mm lens, you can get the approximate equivalent of a 75 mm lens of a 35 mm-format camera. On image data compatibility • This camera conforms with DCF (Design - Sony NEX-6 | Instruction Manual - Page 98
of their respective developers or manufacturers. However, the ™ or ® marks are not used in all cases in this manual. • Add further enjoyment with your PlayStation 3 by downloading the application for PlayStation 3 from PlayStation Store (where available). • The application for PlayStation 3 requires - Sony NEX-6 | Instruction Manual - Page 99
Contents 58 Downloading application 69 Drive Mode 54 DRO/Auto HDR 56 E Edit Device Name 62 Enlarge Image 57 Exposure compensation 40 Eye-Fi 62 Eye-Start AF 59 F Face Detection 54 Face Priority Tracking 60 Face Registration 55 File Format 51, 56 File Number 61 Fill-flash 48 Finder - Sony NEX-6 | Instruction Manual - Page 100
59 Peaking Level 59 Phase Detection AF Area 58 Photo Creativity 37 Picture Effect 39, 57 Playback 30 Playback Display 61 PlayMemories Home 67 Portrait 44 Power Save 61 Power Saving Start Time 61 Program Auto 47 Protect 57 Q Quality 55 R Record Setting 56 Recover Image DB 62 Red Eye - Sony NEX-6 | Instruction Manual - Page 101
Connection 61 V Version 61 View mode 57 View on Smartphone 71 View on TV (HDMI cable compatible TV 53 View on TV (Network compatible TV 74 Viewfinder Bright 61 Volume Settings 57 W White Balance 56 Wide Image 61 Wi-Fi 72 Wind Noise Reduct 60 Windows 65 WPS Push 72 Z Zoom 54 Others - Sony NEX-6 | Instruction Manual - Page 102
GB 102 - Sony NEX-6 | Instruction Manual - Page 103
GB 103 Others
-
 1
1 -
 2
2 -
 3
3 -
 4
4 -
 5
5 -
 6
6 -
 7
7 -
8
-
9
-
10
-
11
-
12
-
13
-
14
-
15
-
16
-
17
-
18
-
19
-
20
-
21
-
22
-
23
-
24
-
25
-
26
-
27
-
28
-
29
-
30
-
31
-
32
-
33
-
34
-
35
-
36
-
37
-
38
-
39
-
40
-
41
-
42
-
43
-
44
-
45
-
46
-
47
-
48
-
49
-
50
-
51
-
52
-
53
-
54
-
55
-
56
-
57
-
58
-
59
-
60
-
61
-
62
-
63
-
64
-
65
-
66
-
67
-
68
-
69
-
70
-
71
-
72
-
73
-
74
-
75
-
76
-
77
-
78
-
79
-
80
-
81
-
82
-
83
-
84
-
85
-
86
-
87
-
88
-
89
-
90
-
91
-
92
-
93
-
94
-
95
-
96
-
97
-
98
-
99
-
100
-
101
-
102
-
103
 |
 |
4-437-011-
11
(1)
NEX-6
Interchangeable Lens
Digital Camera
Instruction Manual
E-mount
Preparing the camera
Mastering the basic
operation
Using the recording
functions
Using the playback
functions
Checking the functions
available
Importing images to the
computer
Adding functions to the
camera
Connecting the camera to
a network
Others
©2012 Sony Corporation
Printed in Thailand
NEX-6
Printed using VOC (Volatile Organic
Compound)-free vegetable oil based ink.
Additional information on this product and
answers to frequently asked questions can be
found at our Customer Support Website.