Sony NW-E3 Operating Instructions - Page 14
Transferring music data from the computer to Network Walkman Check-Out, continued
 |
View all Sony NW-E3 manuals
Add to My Manuals
Save this manual to your list of manuals |
Page 14 highlights
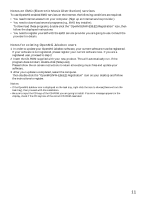
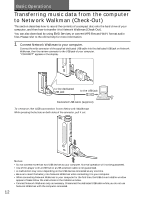
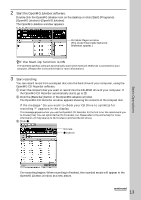
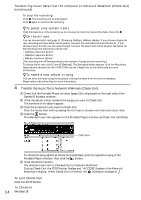
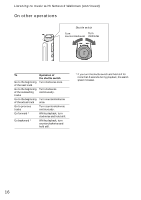
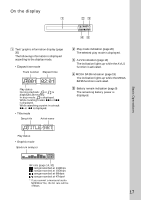
Transferring music data from the computer to Network Walkman (Check-Out) (continued) To stop the recording Click x. The recording will be interrupted. Click z again to continue the recording. zTo select only certain items Click the check box of the contents you do not want to record to remove the check, then click z. zOn the bit rate You can choose the bit rate (page 17, 32) among 132kbps, 105kbps, 66kbps. If you choose a higher bit rate, recording will have better sound quality, however the recordable time will be shorter. If you choose a lower bit rate, you can record longer, however the sound will not be as good. See below for the recording time according to the bit rate. • 132kbps: maximum 60 min. • 105kbps: maximum 80 min. • 66kbps: maximum 120 min. (The recording time differs according to the number of songs you are recording.) To choose the bit rate, click [Control]-[Settings]. The Settings window appears. Click the Recording Setup tab and choose from the ATRAC3 Bit rate list. Please refer to the online help for more information. zTo name a new album or song You can enter the name using the keyboard or bring the name from the Internet database. Please refer to the online help for more information. 4 Transfer the music file to Network Walkman (Check-Out). 1 Check that the Portable Player window (page 13) is displayed on the right side of the OpenMG Jukebox window. 2 Click the album which contains the songs you want to Check-Out. The contents of the album appear. 3 Click the music item you want to Check-Out. Click the music item while pressing the Ctrl key to choose more than one music item. 4 Click the button. The desired music item appears in the Portable Player window as Check-Out candidate. Click here To cancel the song added as Check-Out candidate, click the respective song in the Portable Player window, then click the button. 5 Click the START button. The desired music item is Checked-Out to Network Walkman. During Check-Out, the STOP button flashes and "ACCESS" flashes in the Network Walkman's display. When Check-Out is finished, the indication changes to . To quit Check-Out Click the STOP button. To Check-In 14 See page 18.
-
 1
1 -
2
-
3
-
4
-
5
-
6
-
7
-
8
-
 9
9 -
 10
10 -
 11
11 -
 12
12 -
 13
13 -
 14
14 -
 15
15 -
 16
16 -
 17
17 -
 18
18 -
 19
19 -
20
-
21
-
22
-
23
-
24
-
25
-
26
-
27
-
28
-
29
-
30
-
31
-
32
-
33
-
34
-
35
-
36
 |
 |