Sony PAM-200 Installation Manual - Page 7
Safety Warning, Concrete Mounting, Technical Specifications
 |
UPC - 027242240773
View all Sony PAM-200 manuals
Add to My Manuals
Save this manual to your list of manuals |
Page 7 highlights
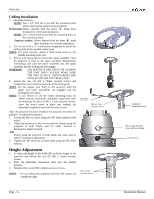
Safety Warning M4 x 12mm Security Screw PAM-200 WARNING: Both M4 x 12mm security screws (located on each side of the mount) must be tightened securely before installation is complete. If the M4 x 12mm screws are not properly secured, there will be an increased risk of attachment failure, which could result in damage to the projector. Concrete Mounting NOTE: The PAM-200 can be mounted to a ceiling with a minimum 6" thickness. Concrete wedge anchors must be used for concrete installation. It is recommended that ¼" wedge anchors be used. A 5/16" masonry bit must be used to drill the pilot hole. These items can be purchased at your local hardware store. 1. Begin by placing the ceiling plate into position against the ceiling, keeping it level. 2. Mark off four holes to be used for securing the mount and place the ceiling plate aside. 3. Next, drill holes using the appropriate masonry bit for your anchor. 4. Insert a concrete anchor into each hole. 5. If necessary, a hammer can be used to lightly tap each anchor into place so that they are flush with the ceiling. 6. Once all of the anchors are in place, move the ceiling plate back into position. 7. Attach the nut onto the threaded shaft that is protruding from the ceiling. 8. Do not tighten until all nuts are in place. Technical Specifications All measurements are inches (mm). Installation Manual Page - 7 -
-
 1
1 -
 2
2 -
 3
3 -
 4
4 -
 5
5 -
 6
6 -
 7
7 -
 8
8
 |
 |
