Sony PCV-RS310 VAIO User Guide (primary manual) - Page 54
Backing Up Audio CDs, SonicStage Backup Tool
 |
View all Sony PCV-RS310 manuals
Add to My Manuals
Save this manual to your list of manuals |
Page 54 highlights
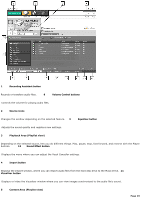
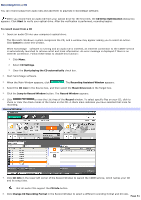
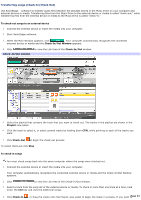
check in all of the tracks in the external device or media, click the Check-In All button. To cancel check-out, click Stop. To make a backup copy of an audio CD On computer models equipped with a CD recording device, you can use the Backing Up Audio CDs utility to make a backup copy of an audio CD. On computer models that have both a read-only optical drive and an optical writing drive, you can make a copy with one click. On computer models with only one optical drive, you must swap the original CD for a blank CD-R disc when requested to do so in the middle of the copying process. 1. Click Start in the Windows® taskbar, and point to All Programs. 2. Point to SonicStage and click the SonicStage Backup Tool. 3. Insert the music CD into the optical drive you use to read CDs. Depending upon your computer model, this could be a CD-ROM drive, CD-RW drive, a DVD-ROM drive, a DVD-RW drive, or a Combo Drive. On computer models that have both a read-only optical drive (CD-ROM or DVD-ROM) and an optical writing drive (CD-RW or DVD-RW), put the CD into the read-only optical drive. 4. Select your CD drive in the Retrieve from drive list. 5. On computer models that have both a read-only optical drive (CD-ROM or DVD-ROM) and an optical writing drive (CD-RW or DVD-RW), select the optical writing drive in the Write to drive list. 6. Click Start. 7. If a Reading complete message appears, remove the original source CD from the optical writing drive and insert a blank CD-R disc. 8. Click OK. Page 54
-
 1
1 -
2
-
3
-
4
-
5
-
6
-
7
-
8
-
9
-
10
-
11
-
12
-
13
-
14
-
15
-
16
-
17
-
18
-
19
-
20
-
21
-
22
-
23
-
24
-
25
-
26
-
27
-
28
-
29
-
30
-
31
-
32
-
33
-
34
-
35
-
36
-
37
-
38
-
39
-
40
-
41
-
42
-
43
-
44
-
45
-
46
-
47
-
48
-
 49
49 -
 50
50 -
 51
51 -
 52
52 -
 53
53 -
 54
54 -
 55
55 -
 56
56 -
 57
57 -
 58
58 -
 59
59 -
60
-
61
-
62
-
63
-
64
-
65
-
66
-
67
-
68
-
69
-
70
-
71
-
72
-
73
-
74
-
75
-
76
-
77
-
78
-
79
-
80
-
81
-
82
-
83
-
84
-
85
-
86
-
87
-
88
-
89
-
90
-
91
-
92
-
93
-
94
-
95
-
96
-
97
-
98
-
99
-
100
-
101
-
102
-
103
-
104
-
105
-
106
-
107
-
108
-
109
-
110
-
111
-
112
-
113
-
114
-
115
-
116
-
117
-
118
-
119
-
120
-
121
-
122
-
123
-
124
-
125
-
126
-
127
-
128
-
129
-
130
-
131
-
132
-
133
-
134
-
135
-
136
-
137
-
138
-
139
-
140
-
141
-
142
-
143
-
144
-
145
-
146
-
147
-
148
-
149
-
150
-
151
-
152
-
153
-
154
-
155
-
156
-
157
-
158
-
159
-
160
-
161
 |
 |