Sony PCV-RS322 VAIO User Guide - Page 122
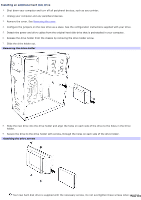
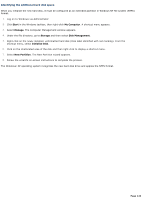
Installing an additional hard disk drive, Removing the drive holder, Attaching the drive screws
 |
View all Sony PCV-RS322 manuals
Add to My Manuals
Save this manual to your list of manuals |
Page 122 highlights
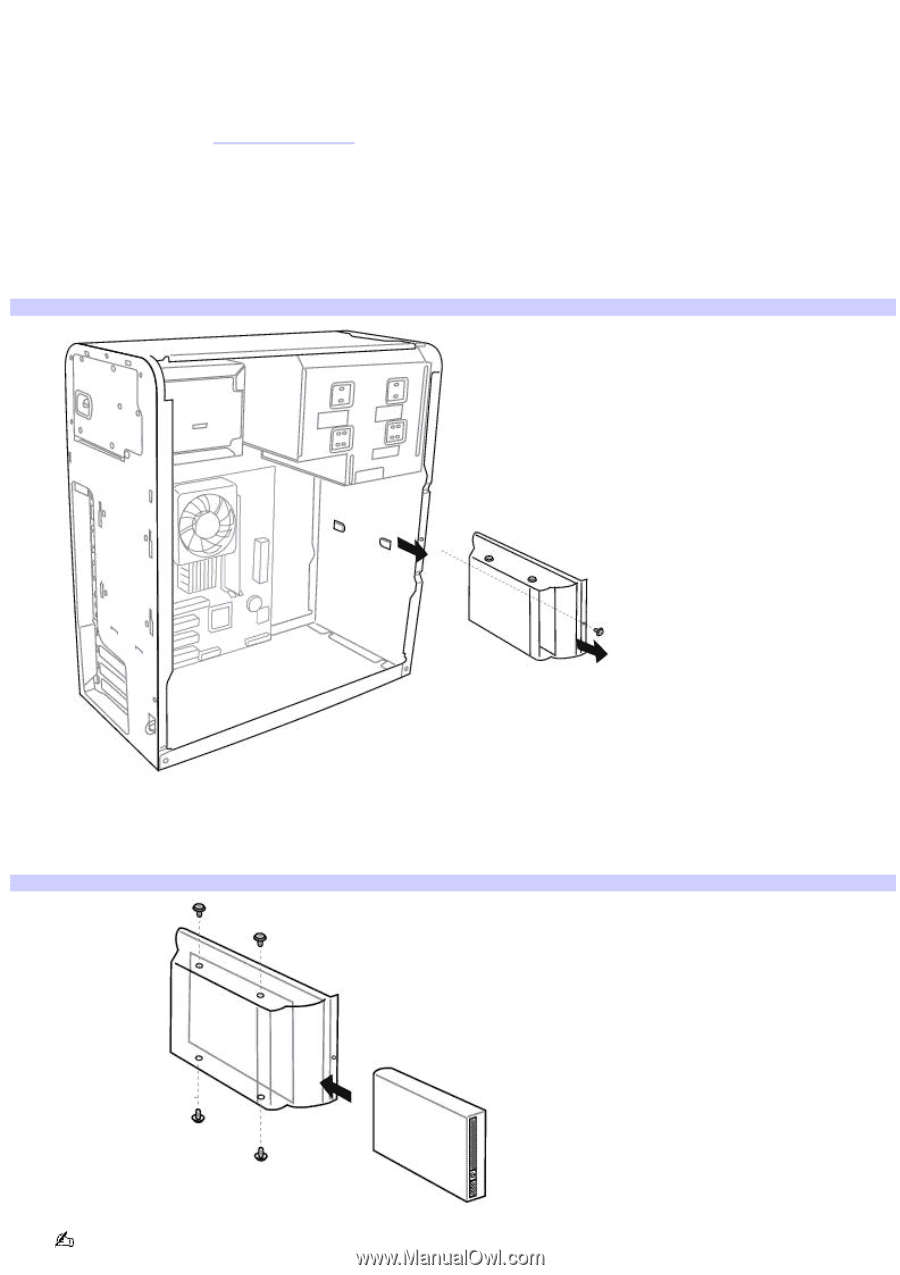
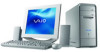
Installing an additional hard disk drive 1. Shut down your computer and turn off all peripheral devices, such as your printer. 2. Unplug your computer and any peripheral devices. 3. Remove the cover. See Removing the cover. 4. Configure the jumpers on the new drive as a slave. See the configuration instructions supplied with your drive. 5. Detach the power and drive cables from the original hard disk drive that is preinstalled in your computer. 6. Release the drive holder from the chassis by removing the drive holder screw. 7. Slide the drive holder out. Rem ov ing the driv e holder 8. Slide the new drive into the drive holder and align the holes on each side of the drive to the holes in the Drive holder. 9. Secure the drive to the drive holder with screws, through the holes on each side of the drive holder. Attaching the driv e screws Your new hard disk drive is supplied with the necessary screws. Do not overtighten these screws when sPeacugrein1g22
-
 1
1 -
2
-
3
-
4
-
5
-
6
-
7
-
8
-
9
-
10
-
11
-
12
-
13
-
14
-
15
-
16
-
17
-
18
-
19
-
20
-
21
-
22
-
23
-
24
-
25
-
26
-
27
-
28
-
29
-
30
-
31
-
32
-
33
-
34
-
35
-
36
-
37
-
38
-
39
-
40
-
41
-
42
-
43
-
44
-
45
-
46
-
47
-
48
-
49
-
50
-
51
-
52
-
53
-
54
-
55
-
56
-
57
-
58
-
59
-
60
-
61
-
62
-
63
-
64
-
65
-
66
-
67
-
68
-
69
-
70
-
71
-
72
-
73
-
74
-
75
-
76
-
77
-
78
-
79
-
80
-
81
-
82
-
83
-
84
-
85
-
86
-
87
-
88
-
89
-
90
-
91
-
92
-
93
-
94
-
95
-
96
-
97
-
98
-
99
-
100
-
101
-
102
-
103
-
104
-
105
-
106
-
107
-
108
-
109
-
110
-
111
-
112
-
113
-
114
-
115
-
116
-
 117
117 -
 118
118 -
 119
119 -
 120
120 -
 121
121 -
 122
122 -
 123
123 -
 124
124 -
 125
125 -
 126
126 -
 127
127 -
128
-
129
-
130
-
131
-
132
-
133
-
134
-
135
-
136
-
137
-
138
-
139
-
140
-
141
-
142
-
143
-
144
-
145
-
146
-
147
-
148
-
149
-
150
-
151
-
152
-
153
-
154
-
155
-
156
-
157
-
158
-
159
-
160
-
161
 |
 |