Sony PCV-RS620G PCV-RS Series Hard Disk Drive Replacement Instructions - Page 2
PCV-RS Series Hard Disk Drive, Replacement Instructions
 |
View all Sony PCV-RS620G manuals
Add to My Manuals
Save this manual to your list of manuals |
Page 2 highlights
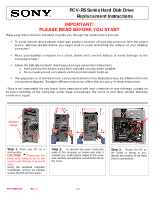
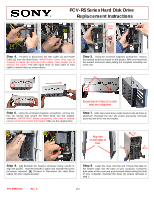
PCV-RS Series Hard Disk Drive Replacement Instructions Remove screw [2] [1] Step 4. Proceed to disconnect the IDE Cable [1] and Power Cable [2] from the Hard Drive. IMPORTANT! Some force may be required to initiate the removal of the cables. Take caution not to damage the cables. Pull with equal force on both sides of each cable to remove them as shown above. Step 5. Using the enclosed magnetic screwdriver, remove the marked screw as shown on the picture. With one hand hold the bracket enclosure while pulling the complete assembly out of the unit. Step 6. Using the enclosed magnetic screwdriver, remove the four (4) screws that secure the Hard Drive into the bracket enclosure. IMPORTANT! Before proceeding, take note of original position of the Drive inside the bracket. Slide out the original drive. Ensure that all 4 holes (2 on each side) are in alignment Step 7. Slide New Hard drive inside bracket with all holes in alignment. Reinstall the four (4) screws previously removed, securing new drive into the bracket. [A] [B] Align tabs on both sides of cover 2 1 1 Step 8. [A] Reinstall the bracket enclosure being careful to align the guides. Hold the bracket in place and reinstall the screw previously removed. [B] Proceed to Reconnect the Hard Drive cables into their original position. Step 9. Lower the cover onto the unit, Ensure that tabs on the bottom edge into the base of your computer. Compress both sides of the cover and push forward while holding the front of your computer. Reinstall the three (3) screws removed in step 1. P/N T99860136 Rev. C 2/2
-
 1
1 -
 2
2
 |
 |
