Sony PCWA-A500 Access Point Help File - Page 41
Peer to Peer mode
 |
View all Sony PCWA-A500 manuals
Add to My Manuals
Save this manual to your list of manuals |
Page 41 highlights
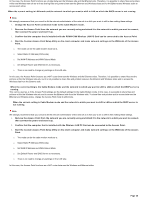
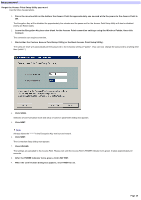
Peer to Peer mode It tak e s tim e to s w itch to the Pe e r to Pe e r m ode . Sw itching to the Peer to Peer mode causes Window s to search the DHCP server on the w ireless netw ork to obtain an IP address. Thus, it w ill take longer if no DHCP server exists. If no response is returned from the DHCP server, an unused IP address in the range of 169.254.0.0 to 169.254.255.255 is assigned (Window s Auto IP feature). No com m unications are available in the Pe e r to Pe e r m ode . The Auto IP may have assigned an IP address in the range from 169.254.0.0 to 169.254.255.255 to other interfaces including Ethernet and i.LINK (SmartConnect). Follow the steps below for checkup. For Windows 98 Second Edition / Windows Me 1. Se le ct Run from the Start m e nu and type "w inipcfg". 2. Click OK. 3. Se le ct an inte rface othe r than Sony PCWA-C100 Wire le s s PC Card. 4. Check the IP address. 5. Verify that no IP address in the range of 169.254.0.0 to 169.254.255.255 is assigned. If you find any interface that is assigned w ith one of the addresses in the range of 169.254.0.0 to 196.254.255.255, follow the steps below to disable the interface. 1. From the Start m enu, select Settings, then Control Panel. 2. Double-click Sys te m . 3. Se le ct the De vice M anage r tab. 4. Double-click Ne tw ork adapte rs . 5. Double-click the de vice that you w ant to dis able (e .g. Inte l 8255x-bas e d PCI Ethe rne t Adapte r(10/100) for PCG-Z505JX). 6. Se le ct "Dis able w ith this hardw are profile ". 7. Click OK. The disabled devices are indicated w ith a cross mark. 8. Click OK to clos e the Sys te m Propertie s dialog box. For Windows 2000 1. From the Start m enu, select Program s, Accessories, then Com m and Prom pt 2. Type "ipconfig /all". 3. Check the IP address of interfaces other than Sony PCWA-C100 Wireless PC Card. 4. Verify that no IP address in the range of 169.254.0.0 to 169.254.255.255 is assigned. If you find any interface that is assigned w ith one of the addresses in the range of 169.254.0.0 to 196.254.255.255, follow the steps below to disable the interface. 1. From the Start m enu, select Settings, then Control Panel. 2. Double-click Sys te m . 3. Se le ct the Hardw are tab. 4. Click the De vice M anage r button. 5. Double-click Ne tw ork adapte rs . 6. Double-click the de vice that you w ant to dis able (e .g. Inte l 8255x-bas e d PCI Ethe rne t Adapte r(10/100) for PCG-Z505JX). 7. Se le ct "Do not us e this de vice [dis able ]" from the De vice us age drop-dow n m e nu. 8. Click OK. The disabled devices are indicated w ith a cross mark. 9. Click to close the De vice M anage r w indow . Page 41
-
 1
1 -
2
-
3
-
4
-
5
-
6
-
7
-
8
-
9
-
10
-
11
-
12
-
13
-
14
-
15
-
16
-
17
-
18
-
19
-
20
-
21
-
22
-
23
-
24
-
25
-
26
-
27
-
28
-
29
-
30
-
31
-
32
-
33
-
34
-
35
-
 36
36 -
 37
37 -
 38
38 -
 39
39 -
 40
40 -
 41
41 -
 42
42 -
 43
43 -
 44
44 -
 45
45 -
 46
46 -
47
-
48
-
49
-
50
-
51
-
52
-
53
-
54
-
55
-
56
-
57
-
58
-
59
-
60
-
61
 |
 |