Sony PCWA-AR800 Quick Start Guide - Page 2
Access Point Function Setup, Con the Wireless Communication, Settings on the Computer - wireless router
 |
View all Sony PCWA-AR800 manuals
Add to My Manuals
Save this manual to your list of manuals |
Page 2 highlights
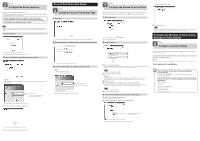
Procedure Check 5 Configure the Router functions Configure the Router functions of the Router Unit. The basic settings to connect to the Internet are described here. For details about the settings, refer to Help on the Router Unit Setup Page. Specific information required to establish an Internet connection is normally provided by your Internet service provider when making the service contract. You may have to refer to this information when setting up the connection, so have the information at hand. Note Depending on your Internet service provider, you may not be allowed to connect a router type access point to your DSL or cable modem. Refer to the provisions of the contract with your Internet service provider for details. 1 Click "Easy Setup". The Wireless Broadband Router setup wizard starts. 2 Follow the instruction on the screen to complete the setup. z Hint If the administrator password is configured in step 2 of the Easy Setup, a user name and password input dialog box appears. Enter "admin" here. Enter the administrator password here, as set in step 2 of the Easy Setup. Enter the administrator user name and password to proceed. When setup is complete, the following screen appears. Access Point Function Setup Procedure Check 6 Display the Access Point Setup Page 1 Click "Scan". Procedure Check 7 Configure the Access Point functions The wireless functions are set in the Wireless Unit. The basic wireless connection settings are described here. For details about the settings, refer to Help the Access Point Setup Page. 1 Click "Easy Setup". The Setup Completed window appears. Access Points are searched for, and any discovered Access Points are displayed in the list. 2 Select the Access Point to configure, and click the "Access Point Setup" button. A user name and password input dialog box appears. 3 In the user name text box, enter "admin", and then click "OK". z Hint • The default password is "admin". • Leave the "Password" text box blank. Enter "admin" here. Leave this text box blank. The Access Point Setup Page appears in a new window. The Easy Setup Page appears. 2 Configure settings. 1 2 3 4 5 1 Enter the network name (SSID). The network name (SSID) is an ID that serves to identify the wireless network. You should enter up to 32 characters. Permissible characters are letters, numbers, and symbols. Note Do not forget the network name (SSID). 2 Set "Encryption (WEP)" to "Enable". z Hint Encryption (WEP) encodes wireless communications and prevents unauthorized access to the network. The encryption key is the password required for WEP communications on an encrypted network. 3 Select "Key Length". 4 Enter the encryption key, and re-enter it again at "WEP Key (Confirmation)" If you select "40 bits" for the "Key Length", enter up to five letters, numbers and symbols. If you select "104 bits" for the "Key Length", enter up to 13 letters, numbers and symbols. Note Do not forget the encryption key. 5 Select the "IEEE 802.11 Mode". 3 Check that the settings are correct, and click "Execute Setup". 1 When finished making settings, click "Next". The Setup Confirmation window appears. 2 Check that the settings are correct, and click "Execute Setup". 3 Close the Web browser. Note When you change the wireless settings, the connection to the Access Point is severed. After performing procedure 7, make sure that you perform procedure 8 to reestablish the connection. Configure the Wireless Communication Settings on the Computer Procedure Check 8 Configure computer settings Configure the wireless communication settings on the computer used for the setup to match the Access Point settings. Configure the network name (SSID) and security settings on the computer to match those set in procedure 7. z Hint Refer to the instructions of your wireless LAN PC card or Wireless LAN Converter for the setting method. This completes the configuration. Refer to Help for details about Wireless Broadband Router settings. To display Help, click or Access Point Setup Page. on the Router Unit Setup Page or the Refer to the Read This First supplement for the following information: • Safety information • Installation • Ethernet cable connection method • Reset to factory defaults • Factory default settings • Status Indicator indications When satisfied with the displayed settings, click here. If you do not want to configure the Access Point, click here. Proceed to procedure 6 to configure the Access Point. If you want to modify the settings, click here to return to the previous window.
-
 1
1 -
 2
2
 |
 |