Sony PCWA-C150S Quick Start Guide - Page 2
Setting up the connection environment - xp
 |
View all Sony PCWA-C150S manuals
Add to My Manuals
Save this manual to your list of manuals |
Page 2 highlights
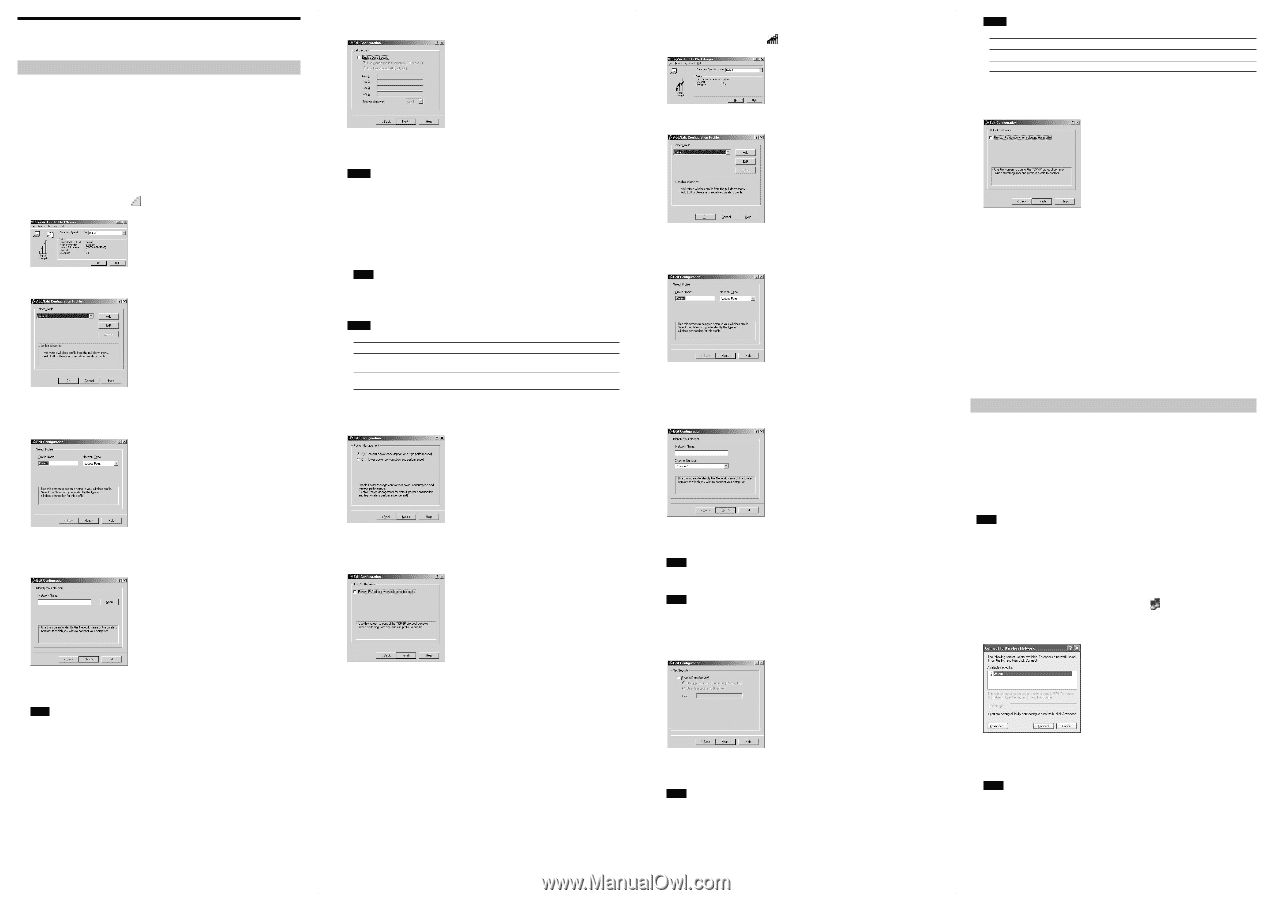
Setting up the connection environment Windows Me or Windows 2000 Establishing communication with the Access Point This section describes how to configure settings for communication with an Access Point. When not using an Access Point, see "Configuring communication settings for Peer-to-Peer Mode". Before configuring the settings, the following tasks must be completed: • The Wireless LAN PC Card must be inserted into the computer. • The Access Point and the computer with the Wireless LAN PC Card must be located within the communication limits of the Access Point (approx. 330 feet), and the Access Point must be turned on. For details, see the Access Point documentation. • Check the Network Name (also called SSID) and the Data Security (also called WEP or Encryption) settings of the Access Point. For details about these settings, consult your network administrator. The factory-default configuration settings for the Access Point are listed in the Access Point documentation. 1 Click the Client Manager icon The Client Manager window appears. on the taskbar. 2 From the "Actions" menu, select "Add/Edit Configuration Profile". The Add/Edit Configuration Profile dialog box appears. 3 Click "Add". The Edit Configuration dialog box appears. z Tip To edit an existing profile, click "Edit". 4 Enter an alphanumeric name for the profile in the "Profile Name" field (letters, numbers, and symbols are allowed). Verify that Access Point is selected in the "Network Type" list, and click "Next". The Identify Your Network window shown below appears. 5 In the "Network Name" field, enter the same Network Name as set for the Access Point. You can also click "Scan" to search for Access Points within communication range. Note The Network Name is case sensitive. Be sure to use the same uppercase/lowercase spelling as at the Access Point. z Tips • If you leave the Network Name field blank, the computer will attempt to connect to an arbitrary Access Point within range. If you enter "ANY" (all in uppercase) in the Network Name field, the computer will attempt to connect to all Access Points within range. • If the "Scan" button is dimmed, an Access Point search cannot be performed. Enter the Network Name set for the Access Point. 6 If you clicked "Scan" in step 5, from the Scan for Network Name dialog box, select the Access Point to which you want to connect, and click "OK". 7 Click "Next". The Set Security window shown below appears. 8 If Data Security (also called WEP or Encryption) is enabled at the Access Point, enter matching setting values for the Wireless LAN PC Card, as described below. Notes • Input is case sensitive. Be sure to use the same uppercase/lowercase spelling as at the Access Point. • The Data Security function serves to prevent unauthorized access to your network. It is strongly recommended that you enable it after having checked that communication can be established. For details about changing the settings of the Access Point, see the documentation of the Access Point. After changing the settings of the Access Point, use Client Manager to change the settings for the Wireless LAN PC Card accordingly. 1. Select the "Enable Data Security" check box. 2. Select the input method for the key (the key is a password for connecting to an Access Point with Data Security enabled): "Use Alphanumeric Characters (0 - 9, a - z, A - Z)" or "Use Hexadecimal (0 - 9, a - f, A - F)". Symbols are also available when you select "Alphanumeric Characters (0-9, a-z, A-Z)". Note If the Access Point still uses the factory default key, it is strongly recommended that you change it after having checked that communication can be established. After changing the settings of the Access Point, use Client Manager to change the settings for the Wireless LAN PC Card accordingly. For details about changing the settings of the Access Point, see the documentation of your Access Point. 3. In the field "Key 1", "Key 2", "Key 3", or "Key 4", type the encryption key set at the Access Point. Notes • Type the number of characters or digits indicated below. Alphanumeric Characters Access Point is encrypted with a 128-bit WEP 13 characters Access Point is encrypted with a 64-bit WEP • Alphanumeric characters are case sensitive. • Alphanumeric characters may include symbols. 5 characters Hexadecimal 26 digits 10 digits 9 Click "Next". The Power Management window shown below appears. 10 Set Power Management to "Off (default power consumption and high performance)" or "On (lower power consumption and performance)", and click "Next". The TCP/IP Behavior window shown below appears. 11 When using one Wireless LAN PC Card for multiple networks, select the "Renew IP Address when selecting this profile" check box, and click "Finish". The Add/Edit Configuration Profile dialog box reappears. 12 Click "OK" to close the Add/Edit Configuration Profile dialog box. The Client Manager window reappears. 13 Click "OK" to close the Client Manager window. 14 With Windows Me, follow the procedure below to renew the IP address allocated to your Wireless LAN PC Card. 1. From the "Start" menu, click "Run". 2. Type "winipcfg" (without quotation marks), and click "OK". The IP Configuration dialog box appears. 3. Select "Sony Wireless PC Card" from the drop-down list, and click "Renew". 4. Confirm the IP address shown in "Adapter Address". 5. Click "OK" to close the IP Configuration dialog box. Configuring communication settings for Peer-to-Peer Mode 1 Click the Client Manager icon The Client Manager window appears. on the taskbar. 2 From the "Actions" menu, select "Add/Edit Configuration Profile". The Add/Edit Configuration Profile dialog box appears. 3 Click "Add". The Edit Configuration dialog box appears. z Tip To edit an existing profile, click "Edit". 4 Enter a desired alphanumeric name into the "Profile Name" field (letters, numbers, and symbols are allowed). 5 In the "Network Type" drop-down list, select "Peer-to-Peer Group", and click "Next". The Indentify Your Network window shown below appears. 6 To create a new network, enter a desired alphanumeric name into the "Network Name" field (letters, numbers, and symbols are allowed). To connect to an existing network, enter the name of that network. Note The Network Name is case sensitive. Be sure to use the correct uppercase/lowercase spelling. 7 Select the channel number from the "Channel Number" drop-down list. Note When creating a new network, you can select any channel number. z Tip When connecting to an existing network, the channel number is selected automatically. 8 Click "Next". The Set Security window shown below appears. 9 When creating a new network or when connecting to an existing network where Data Security (also called WEP or Encryption) is enabled, use the following settings. Note The Data Security function serves to prevent unauthorized access to the network. It is strongly recommended that you enable Data Security. 1. Select the "Enable Data Security" check box. 2. Select the input method for the key (the key is a password for connecting to an Access Point with Data Security enabled): "Use Alphanumeric Characters (0 - 9, a - z, A - Z)" or "Use Hexadecimal (0 - 9, a - f, A - F)". Symbols are also available when you select "Alphanumeric Characters (0-9, az, A-Z)". 3. Type the encryption key in the "Key" field. Notes • Type the number of characters or digits indicated below. Alphanumeric Characters With a 128-bit WEP 13 characters With a 64-bit -WEP 5 characters • Alphanumeric characters are case sensitive. • Alphanumeric characters may include symbols. 10 Click "Next". The TCP/IP Behavior window shown below appears. Hexadecimal 26 digits 10 digits 11 When using one Wireless LAN PC Card for multiple networks, select the "Renew IP Address when selecting this profile" check box, and click "Finish". The Add/Edit Configuration Profile dialog box reappears. 12 Click "OK" to close the Add/Edit Configuration Profile dialog box. 13 Click "OK" to close the Client Manager window. 14 With Windows Me, follow the procedure below to renew the IP address allocated to your Wireless LAN PC Card. (With Windows 2000 this procedure is not necessary.) 1. From the "Start" menu, click "Run". 2. Type "winipcfg" (without quotation marks), and click "OK". The IP Configuration dialog box appears. 3. Select "Sony Wireless PC Card" from the drop-down list, and click "Renew". 4. Confirm the IP address shown in "Adapter Address". 5. Click "OK" to close the IP Configuration dialog box. To confirm whether the connection is established, refer to "In Peer-to-Peer mode, the signal strength is not displayed. How do I tell whether a peer-to-peer connection has been successfully established?" in the Troubleshooting Guide. Windows XP Establishing communication with the Access Point This section describes how to configure settings for communication with an Access Point. For information on settings when not using an Access Point, see Windows XP Help. Before configuring the settings, the following tasks must be completed: • The Wireless LAN PC Card must be inserted into the computer. • The Access Point and the computer with the Wireless LAN PC Card must be located within the communication limits of the Access Point, and the Access Point must be turned on. For details, see the Access Point documentation. • Check the Network Name (also called SSID) and the Data Security (also called WEP or Encryption) settings of the Access Point. For details about these settings, consult your network administrator. The factory-default configuration settings for the Access Point are listed in the Access Point documentation. Note Before configuring the Wireless LAN PC Card, perform the following steps to confirm that the "Use Windows to configure my wireless network settings" check box is selected. This option is selected as the default setting. To confirm that the "Use Windows to configure my wireless network settings" check box is selected: 1. From the "Start" menu, select "Control Panel", and double-click "Network Connections". 2. Right-click "Wireless Network Connection", and click "Properties". 3. Click the "Wireless Network" tab. 4. Confirm that the "Use Windows to configure my wireless network settings" check box is selected. If it is not selected, select the check box. 1 Right-click the Wireless Network Connection icon in the notification area of the taskbar. In the shortcut menu that appears, select "View Available Wireless Networks". The Connect to Wireless Network dialog box appears. 2 Click the Access Point to which you want to connect. 3 If Data Security (also called WEP or Encryption) is enabled at the Access Point, type the encryption key in the "Network key" field. Note • Input is case sensitive. Be sure to use the same uppercase/lowercase spelling as at the Access Point. • The Data Security function serves to prevent unauthorized access to your network. It is strongly recommended that you enable Data Security after having checked that communication can be established. For details about changing the settings of the Access Point, see the documentation of the Access Point. • After changing the settings of the Access Point, change the settings for the Wireless LAN PC Card accordingly. 4 Click "Connect". The computer connects to the Access Point. z Tip For details on making the connection, see Windows XP Help.
-
 1
1 -
 2
2
 |
 |