Sony RDP-M7iPPINK Operating Instructions - Page 2
English, Operations, Startup Guide/Guía de inicio rápido, Español, Operaciones
 |
View all Sony RDP-M7iPPINK manuals
Add to My Manuals
Save this manual to your list of manuals |
Page 2 highlights
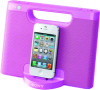
Startup Guide/Guía de inicio rápido AAA/LR03 × 4 * Alkaline battery LR03 Manganese battery R03 * Alkaline batteries are not supplied. Manganese batteries (R03) cannot be used. The unit cannot recharge any batteries. Pilas alcalinas no suministradas. No se pueden usar pilas de manganeso (R03). La unidad no puede recargar ninguna pila. OPR/BATT indicator Indicador OPR/BATT Remote sensor Sensor remoto iPod / − VOLUME + Dock connector Conector de la bandeja On copyrights iPhone, iPod, iPod classic, iPod nano, and iPod touch are trademarks of Apple Inc., registered in the U.S. and other countries. "Made for iPod," and "Made for iPhone" mean that an electronic accessory has been designed to connect specifically to iPod or iPhone, respectively, and has been certified by the developer to meet Apple performance standards. Apple is not responsible for the operation of this device or its compliance with safety and regulatory standards. Please note that the use of this accessory with iPod or iPhone may affect wireless performance. Note This unit is not specified for use with an iPad, and malfunction may result if used with one. The VOLUME + and buttons have a tactile dot. Los botones VOLUME + y tienen un punto táctil. English Operations How to handle an iPod To set an iPod To remove an iPod Notes An iPod in a case or cover can be set in this unit. However, if the case or cover interferes with the connection, remove the case or cover before setting the iPod on the dock connector. When placing or removing the iPod, hold it at the same angle as the dock connector on the unit. Do not pull the iPod forward too far. When placing or removing the iPod, hold the unit securely. Do not twist or bend the iPod as this may result in connector damage. Remove the iPod when transporting it; otherwise, a malfunction may result. If the iPod cannot reach the supporter located in front of the unit, attach the supplied cushion below the supporter. Remote control Before using the supplied remote for the first time, remove the insulation film. Aim the remote at the (Remote sensor) of the unit. The OPR/BATT indicator flashes when the remote's signal is received. / (On/Standby) Turns the unit on/off. The OPR/BATT indicator lights up when the unit is turned on. When using batteries, press the / button on the unit. The / button of the remote works only when the AC adaptor is used. (Play/Pause) Start playing an iPod. Press again to pause/ resume playback. (Forward) Go to the next track. Press and hold while listening to the sound to locate a desired point. (Backward) Go back to the previous track. During playback, this operation returns to the beginning of the current track. To go back to the previous track, press twice. Press and hold while listening to the sound to locate a desired point. MENU Go back to the previous menu. (Up)/ (Down) Select a menu item or track for playback. ENTER Execute the selected menu item or begin playback. VOL +/- (Volume plus/minus) Adjust the volume. Note Some operations may differ or may not be available for different models of iPod. When to replace the battery With normal use, battery life (CR2025) should last for about 6 months. When the remote can no longer operate the unit, replace the battery with a new one. side facing up Note If you are not going to use the remote for a long time, remove the battery to avoid any damage that may be caused by leakage and corrosion. Compatible iPod/ iPhone models The compatible iPod/iPhone models are as follows. Update the software of the iPod/iPhone to the latest version before using it with this unit. iPod touch (4th generation) iPod touch (3rd generation) iPod touch (2nd generation) iPod nano (6th generation)* iPod nano (5th generation) iPod nano (4th generation) iPod nano (3rd generation) iPod classic iPhone 4S iPhone 4 iPhone 3GS iPhone 3G * The iPod nano (6th generation) cannot be controlled by the remote when the command of "MENU and "ENTER" is pressed. Operating an iPod 1 Set an iPod on the dock connector. The dock connector can be tilted slightly. For details, see "How to handle an iPod." 2 Press . When using batteries, press / on the unit, then press . The iPod begins playback. You can operate the connected iPod via this unit or the iPod itself. Notes If a pop-up message appears on the display of the iPod touch or iPhone, see "About App." If the battery of the iPod is extremely low, charge it for a while before operation. Sony cannot accept responsibility in the event that data recorded to an iPod is lost or damaged when using an iPod connected to this unit. For details of environmental conditions for operating the iPod, check the website of Apple Inc. To remove the iPod For details, see "How to handle an iPod." To adjust the volume Press VOLUME +/− (VOL +/− on the remote). Tip The OPR/BATT indicator flashes three times when the sound is set to either maximum or minimum volume. To charge an iPod (AC only) You can use the unit as a battery charger for an iPod when the power is supplied by the AC adaptor. Charging begins when the iPod is connected to the unit. The charging status appears in the display on the iPod. For details, refer to the user's guide of the iPod. Connecting optional components You can enjoy the sound from an optional component, such as a portable digital music player, through the speakers of this unit. Be sure to turn off the power of each component before making any connections. 1 Firmly connect the line output jack of a portable digital music player (or other component) to the AUDIO IN jack on the back of the unit, using a suitable audio connecting cable (not supplied). 2 Press to turn on the unit. 3 Turn the connected component on. 4 Play the connected component. The sound from the connected component is output from the speakers of this unit. Notes The necessary type of audio connecting cable depends on the optional component. Make sure to use the correct type of cable. If the volume level is low, adjust the volume of the unit first. If the volume is still too low, adjust the volume of the connected component. When playing an optional component connected to the AUDIO IN jack, stop playback of an iPod. Disconnect the audio connecting cable from the unit when it is not in use. The VOL + and buttons have a tactile dot. About App A dedicated Dock App for iPod touch/iPhone available at Apple App Store. Search for "D-Sappli" and download the free App to find out more about the functions. Features D-Sappli includes various timer functions: Alarm, Music Play Timer, and Sleep Timer. You can set up to 10 alarms, using songs in iPod or Preset Sound in D-Sappli for the alarm sound. The Music Play Timer allows you to play/pause desired music at a desired time. The Sleep Timer allows you to specify a time at which to stop music playback. The Music Play Timer and Sleep Timer work in combination with the power supply of the unit. Music Play Timer, Sleep Timer and Alarm are available only when D-Sappli is activated. D-Sappli also includes a clock display enlarge feature. Notes If the App to link with this unit is not downloaded to your iPod touch/iPhone, a pop-up message prompting you to download D-Sappli may appear repeatedly. Deactivate the App's link function to stop the pop-up message. To deactivate the App's link function: Connect the AC adaptor, and then press / to turn off the unit. Remove your iPod touch/iPhone from the dock connector. While holding down , also press and hold / on the unit for at least 2 seconds. (The OPR/BATT indicator flashes twice when the function is deactivated.) To re-activate the App's link function, repeat the above steps. (The OPR/BATT indicator flashes once when the function is activated.) Español Operaciones Cómo manejar un iPod Para colocar un iPod Para extraer un iPod Notas En esta unidad, se puede colocar el iPod con su estuche o funda. Sin embargo, si el estuche o funda interfieren con la conexión, retírela antes de colocar el iPod en el conector de la bandeja. Cuando coloque o retire el iPod, sujételo en el mismo ángulo que el conector de la bandeja de la unidad. No tire del iPod demasiado hacia delante. Al colocar o extraer el iPod, sujete la unidad con firmeza. No gire ni incline el iPod ya que se podría dañar el conector. Extraiga el iPod al transportarlo; de otra manera se podrían causar daños. Si el iPod no logra alcanzar el soporte ubicado en la parte delantera del equipo, aplique la almohadilla suministrada por debajo del soporte. Control remoto Antes de utilizar el control remoto suministrado por primera vez, extraiga la película de aislamiento. Apunte el control remoto al (sensor remoto) de la unidad. El indicador OPR/BATT parpadea cuando se recibe la señal del control remoto. Los botones VOL + y tienen un punto táctil. / (Encendido/Modo de espera) Apaga/enciende la unidad. El indicador OPR/ BATT se enciende cuando se enciende la unidad. Cuando utilice las baterías, presione el botón / de la unidad. El botón / del control remoto funciona únicamente cuando se utiliza el adaptador de ca. (Reproducir/Pausa) Inicie la reproducción del iPod. Pulse de nuevo para pausar/reanudar la reproducción. (Avanzar) Avance a la pista siguiente. Pulse sin soltar mientras escucha el sonido hasta llegar al punto que desee. (Retroceder) Vuelva a la pista anterior. Durante la reproducción, esta operación vuelve al principio de la pista actual. Para volver a la pista anterior, púlselo dos veces. Pulse sin soltar mientras escucha el sonido hasta llegar al punto que desee. MENU Vuelva al menú anterior. (Arriba)/ (Abajo) Seleccione un elemento de menú o una pista para reproducir. ENTER Active el elemento del menú seleccionado o inicie la reproducción. VOL +/- (Volumen más/menos) Ajuste el volumen. Nota Algunas operaciones pueden no coincidir o no estar disponibles según el modelo de iPod. Cuándo se debe cambiar la batería En condiciones normales de uso, la vida útil de la batería (CR2025) debería ser de unos 6 meses. Cuando la unidad ya no funcione con el control remoto, sustituya la batería por una nueva. este lado hacia arriba Nota Si no va a utilizar el control remoto durante un período de tiempo prolongado, retire la batería para evitar que se produzcan daños por fugas o corrosión. Modelos de iPod/ iPhone compatibles A continuación, se indican los modelos de iPod/ iPhone compatibles. Actualice el software del iPod/iPhone a la última versión antes de utilizar esta unidad. iPod touch (4ª generación) iPod touch (3ª generación) iPod touch (2ª generación) iPod nano (6ª generación)* iPod nano (5ª generación) iPod nano (4ª generación) iPod nano (3ª generación) iPod classic iPhone 4S iPhone 4 iPhone 3GS iPhone 3G * El iPod nano (6ª generación) no puede controlarse con el control remoto cuando se presiona "MENU y "ENTER". Sobre los derechos de autor iPhone, iPod, iPod classic, iPod nano y iPod touch son marcas comerciales de Apple Inc., registradas en los EE.UU. y otros países. "Made for iPod" y "Made for iPhone" significa que un accesorio electrónico se diseñó para conectarse específicamente a un iPod o iPhone, respectivamente, y que cuenta con la certificación del desarrollador para cumplir con los estándares de rendimiento de Apple. Apple no se responsabiliza por el funcionamiento de este dispositivo ni por el cumplimiento de los estándares regulatorios y de seguridad. Tenga en cuenta que el uso de este accesorio con un iPod o iPhone puede afectar el rendimiento inalámbrico. Nota Esta unidad no está diseñada para usar con un iPad; esto podría causar un mal funcionamiento. Reproducción de un iPod 1 Coloque un iPod en el conector de la bandeja. El conector de la bandeja puede inclinarse un poco. Para más detalles, ver "Cómo manejar un iPod". 2 Pulse . Cuando utilice baterías, presione / de la unidad, luego presione . El iPod comienza a reproducir. Puede utilizar el iPod conectado mediante los botones de la unidad o del propio iPod. Notas Si aparece un mensaje emergente en la pantalla del iPod touch o iPhone, consulte "Acerca de App". Si la batería del iPod está casi agotada, cárguela antes de utilizarlo. Sony declina toda responsabilidad en el caso de la pérdida o corrupción de datos grabados en el iPod al utilizarlo conectado a esta unidad. Para obtener información detallada sobre las condiciones ambientales para utilizar el iPod, visite el sitio web de Apple Inc. Para extraer el iPod Para más detalles, ver "Cómo manejar un iPod". Para ajustar el volumen Pulse VOLUME +/− (VOL +/− en el control remoto). Sugerencia El indicador OPR/BATT parpadea tres veces cuando el sonido se ajusta en el volumen máximo o mínimo. Para cargar un iPod (sólo ca) Puede utilizar la unidad como un cargador de batería del iPod cuando el adaptador de ca suministre la energía. La carga comienza cuando el iPod se conecta a la unidad. El estado de carga aparece en la pantalla del iPod. Para obtener más información, consulte el manual del usuario del iPod. Conexión de componentes opcionales Es posible disfrutar del sonido de un componente opcional, como un reproductor de música digital portátil, a través de los altavoces de la unidad. Asegúrese de apagar todos los componentes antes de realizar las conexiones. 1 Conecte con firmeza la toma de salida de línea de un reproductor de música digital portátil (u otro componente) a la toma AUDIO IN de la parte trasera de la unidad mediante un cable de conexión de audio adecuado (no suministrado). 2 Pulse para encender la unidad. 3 Encienda el componente conectado. 4 Reproduzca el componente conectado. El sonido del componente conectado se emite a través de los altavoces de esta unidad. Notas El tipo de cable de conexión de audio requerido depende del componente opcional. Asegúrese de utilizar el cable correcto. Si el nivel del volumen es bajo, ajuste primero el volumen de la unidad. Si el volumen sigue siendo demasiado bajo, entonces ajuste el volumen del componente conectado. Cuando reproduzca un componente opcional conectado a la toma AUDIO IN, detenga la reproducción del iPod. Desconecte el cable de conexión de audio si no está utilizando la unidad. Acerca de App Existe una aplicación de bandeja específica disponible para iPod touch/iPhone en la tienda "Apple App Store". Busque "D-Sappli" y descargue la aplicación gratuita para obtener más información sobre las funciones. Características "D-Sappli" incluye varias funciones de temporizador: alarma, "Music Play Timer" y "Sleep Timer". Puede programar hasta 10 alarmas, y usar las canciones en el iPod o los sonidos preestablecidos en "D-Sappli" para el tono de alarma. "Music Play Timer" le permite reproducir y pausar la música que quiere y cuando quiere. "Sleep Timer" le permite especificar un horario para detener la reproducción de música. "Music Play Timer" y "Sleep Timer" funcionan en combinación con el suministro de energía de la unidad. Las funciones "Music Play Timer", "Sleep Timer" y alarma están disponibles sólo cuando "D-Sappli" está activado. "D-Sappli" incluye a su vez una función de ampliación de la pantalla de reloj. Notas Si la App que se enlaza a esta unidad no se descargó al iPod touch/iPhone, aparecerá repetidamente un mensaje emergente instando al usuario a descargar "D-Sappli". Desactive la función enlace de Apps para poner fin al mensaje emergente. Para desactivar la función enlace de Apps: Conecte el adaptador de ca y presione / para apagar la unidad. Extraiga su iPod touch/ iPhone del conector de la bandeja. Mientras mantiene apretado , también presione y sujete / de la unidad durante al menos 2 segundos. (El indicador OPR/BATT parpadea dos veces cuando la función está desactivada). Para volver a activar la función enlace de Apps, repita los pasos anteriores. (El indicador OPR/ BATT parpadea una vez cuando la función está activada).
-
 1
1 -
 2
2
 |
 |
