Sony RDPX200iP Operating Instructions - Page 2
English, Operations, Other useful functions, Español, Operaciones, Otras funciones útiles
 |
View all Sony RDPX200iP manuals
Add to My Manuals
Save this manual to your list of manuals |
Page 2 highlights
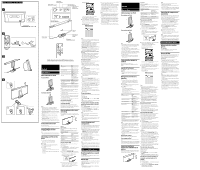
Startup Guide/Guía de inicio rápido ̔ ̕ AUDIION ̖ ̗ iPod indicator Indicador del iPod Power indicator Indicador de encendido Bluetooth indicator Indicador de Bluetooth Audio-in indicator Indicador de Entrada de audio MEGA BASS indicator Indicador de MEGA BASS Remote sensor Sensor remoto Supporter Soporte Dock Connector Conector de la bandeja Docking Tray Bandeja de acoplamiento VOLUME + (VOL + on the remote control) and buttons have a tactile dot. Los botones VOLUME + (VOL + en el control remoto) y tienen un punto táctil. English Operations How to handle an iPod To set an iPod To remove an iPod Notes An iPod in a case or cover can be set in this unit. However, if the case or cover interferes with the connection, remove the case or cover before setting the iPod on the Dock Connector. When placing or removing the iPod, hold it at the same angle as the Dock Connector on the unit. Do not pull the iPod forward too far. When placing or removing the iPod, hold the unit securely. Do not twist or bend the iPod, as this may result in connector damage. Remove the iPod when transporting it; otherwise, a malfunction may result. If the iPod does not reach the supporter on the front of the unit, attach the supplied cushion below the supporter. To Press Pause playback To resume play, press again. Go to the next track (forward) on the remote Go back to the previous track (backward)* on the remote Locate a point while listening to (forward) or the sound (backward) on the remote while playing and hold until you find the desired point. Go back to the previous menu MENU on the remote Select a menu item or a track for playback (up)/ (down) on the remote Execute the selected menu item ENTER on the remote or begin playback * During playback, this operation returns you to the beginning of the current track. To go back to the previous track, press twice. Notes If a pop-up message appears on the display of the iPod touch, iPhone or iPad, see "About App." Some operations may differ or may not be available on some models of iPod. If the battery of the iPod is extremely low, charge it for a while before operation. Sony cannot accept responsibility in the event that data recorded to an iPod is lost or damaged when using the iPod connected to this unit. For details of environmental conditions for operating an iPod, check the website of Apple Inc. To remove the iPod For details, see "How to handle an iPod." To charge an iPod You can use the unit as a battery charger for an iPod. Charging begins when the iPod is connected to the unit. The charging status appears in the display on the iPod. For details, refer to the user's guide of the iPod. Operating by wireless music streaming By using the Bluetooth connection, you can listen to the sound from an iPod or other Bluetooth device with the unit wirelessly. To turn the unit on/off Press (On/Standby). The power indicator lights up when the unit is turned on. Adjusting the volume Press VOLUME +/− (VOL +/− on the remote). Tip The power indicator flashes three times in green when the sound is set to either maximum or minimum volume. Operating an iPod on the Dock 1 Set the iPod on the Dock Connector. The Dock Connector can be tilted slightly. For details, see "How to handle an iPod." 2 Press . 3 Press iPod to activate the function for iPod. The iPod indicator lights up. 4 Press . The iPod begins to play back. If the iPod does not start playing back, operate directly on the iPod. You can operate the connected iPod via this unit or the iPod itself. Pairing What is pairing? Bluetooth devices need to be "paired" with each other beforehand. Once Bluetooth devices are paired, there is no need for pairing again, unless pairing information is deleted. Bluetooth indicator Status Bluetooth indicator (blue) Bluetooth off Off Bluetooth on but not connected Flashes slowly Pairing mode Flashes quickly Connected or communicating Lights up To pair with an iPod Keep the iPod and the unit within 1 meter (3 ft) of each other for this operation. 1 Press . 2 Press BLUETOOTH ( on the remote) to turn on the Bluetooth function when the Bluetooth indicator is off. The Bluetooth indicator flashes slowly. 3 Press and hold BLUETOOTH ( on the remote). When pairing starts, a double-beep sound will be heard and the Bluetooth indicator will flash quickly. Pairing mode of the unit is activated. 4 Perform the pairing procedure on the iPod to detect the unit. Select "Settings General Bluetooth" and turn on the Bluetooth function. The Bluetooth indicator lights up. Example: iPhone 4S A list of detected devices appears on the display. The unit is displayed as "RDP-X200iP." If "RDP-X200iP" is not displayed, repeat from step 3. 5 Select "RDP-X200iP" on the display of the iPod while the Bluetooth indicator flashes quickly. When "Connected" appears on the display of the iPod, pairing and connection are complete. Example: iPhone 4S You can set up to 10 alarms, using songs in iPod or Preset Sound in D-Sappli for the alarm sound. Music Play Timer allows you to play/pause desired music at a desired time. Sleep Timer allows you to specify a time at which to stop music playback. Alarm, Music Play Timer and Sleep Timer work in combination with the power supply of the unit. Alarm, Music Play Timer and Sleep Timer are available only when D-Sappli is activated. D-Sappli also includes a clock display enlarge feature. Notes If the App to link with this unit is not downloaded to the iPod touch/iPhone/iPad, a pop-up message prompting you to download D-Sappli may appear repeatedly. Deactivate the App's link function to stop the pop-up message. To deactivate the App's link function: Connect the AC adaptor, and then press / to turn off the unit. Remove the iPod touch/iPhone/iPad from the Dock Connector. While holding down , also press and hold / on the unit for at least 2 seconds. (The power indicator flashes twice when deactivated.) To re-activate the App's link function, repeat the above steps. (The power indicator flashes once when activated.) Notes The operation and display may differ depending on the model of iPod and/or software version. For details, refer to the user's guide of the iPod. Pairing mode is canceled after about 5 minutes. If pairing mode is canceled halfway, start over from step 3. If pairing is not complete, start over from step 3. To pair with another iPod, repeat steps 1 to 5. In step 3, if a double-beep sound is not heard or the Bluetooth indicator does not flash quickly, press and hold BLUETOOTH ( on the remote) again. If you turn off the unit or the iPod before the Bluetooth connection is complete, pairing information will not be memorized, and pairing will not be completed. Notes on pairing with a Bluetooth device other than iPod When pairing with a Bluetooth device other than iPod, after step 3, pass code input may be required in your Bluetooth device. In this case, input "0000." The operation and display may differ depending on the Bluetooth device and/or software version. For details, refer to the user's guide of the Bluetooth device. To listen to sound Keep the iPod and the unit within 10 meters (about 30 ft) of each other for this operation. Check the following before operating the unit. The Bluetooth function of the iPod is on. Pairing of the unit and the iPod is complete. If pairing is not completed, perform pairing again. (See "To pair with an iPod.") 1 Press . 2 Press BLUETOOTH ( on the remote) to turn on the Bluetooth function. The last connected iPod will be reconnected automatically when the Bluetooth function is turned on. 3 Select your desired music, video, game, etc., to play on the iPod. For details, refer to the user's guide of the iPod. Tips If the last connected iPod does not reconnect automatically, press BLUETOOTH ( on the remote). If it still does not reconnect, select the model name of this unit from the iPod. (Perform steps 4 to 5 in "To pair with an iPod.") To connect an alternative iPod, which has previously been paired with this unit, press BLUETOOTH ( on the remote) to disconnect the currently connected iPod. Then select the model name of the unit from the alternative iPod you want to connect. You can charge the iPod on the dock while listening to music via Bluetooth connection. If the volume level is low, adjust the volume of the unit first. If the volume is still too low, adjust the volume of the Bluetooth device. To finish listening Terminate the Bluetooth connection by any of the following operations. Turn off the unit. Turn off the iPod. Press BLUETOOTH ( on the remote), iPod, or AUDIO IN. Operate the iPod to terminate the connection. For details, refer to the user's guide of the iPod. To clear the list of models alreadypaired and memorized in the unit 1 Press . 2 Press BLUETOOTH ( on the remote) to turn on the Bluetooth function. 3 Press and hold BLUETOOTH and VOLUME − on the unit at the same time. The MEGA BASS indicator flashes. Notes You can perform step 3 to clear the list even during Bluetooth connection. This operation cannot be performed when the unit is pairing. To pair with this unit again, delete the model name of this unit from the iPod and perform pairing again. (See "To pair with an iPod.") Connecting optional components You can enjoy the sound from an optional component, such as a portable digital music player, through the speakers of this unit. Be sure to turn off the power of each component before making any connections. 1 Firmly connect the line output jack of the portable digital music player (or other component) to the AUDIO IN jack on the back of the unit, using a suitable audio connecting cable (not supplied). 2 Press to turn on the unit. 3 Press AUDIO IN to activate the Audio-in function. The Audio-in indicator lights up. 4 Turn the connected component on. 5 Play the connected component. The sound from the connected component is output from the speakers of this unit. Notes The necessary type of audio connecting cable depends on the optional component. Be sure to use the correct type of cable. If the volume level is low, adjust the volume of the unit first. If the volume is still too low, adjust the volume of the connected component. Other useful functions Reinforcing the bass sound Press MEGA BASS. The MEGA BASS indicator lights up. To return to normal sound, press the button again. About App A dedicated Dock App for iPod touch/iPhone/iPad available at Apple App Store. Search for "D-Sappli" and download the free App to find out more about the functions. Features D-Sappli includes various timer functions: Alarm, Music Play Timer and Sleep Timer. Español Operaciones Cómo manejar un iPod Para colocar un iPod Para extraer un iPod Asociación ¿Qué es la asociación? Los dispositivos Bluetooth deben ser "asociados" entre sí con antelación. Una vez que los dispositivos Bluetooth están asociados, no hay necesidad de volver a hacerlo, a menos que se elimine la información de asociación. Indicador de Bluetooth Estado Indicador de Bluetooth(azul) Bluetooth apagado Apagado Bluetooth encendido pero sin Parpadeo lento conexión Modo de asociación Parpadeo rápido Conectado o en comunicación Encendido Para asociar a un iPod Mantenga el iPod y la unidad a una distancia de 1 metro (3 pies) uno del otro para esta operación. 1 Pulse . 2 Presione BLUETOOTH ( en el control remoto) para encender la función Bluetooth cuando el indicador de Bluetooth está apagado. El indicador de Bluetooth parpadea lentamente. 3 Mantenga presionado BLUETOOTH ( en el control remoto). Cuando se inicie la asociación, escuchará un sonido de dos tonos y el indicador de Bluetooth parpadeará rápidamente. El modo de asociación de la unidad está activado. Notas En esta unidad, se puede colocar el iPod con su estuche o funda. Sin embargo, si el estuche o funda interfieren con la conexión, retírelos antes de colocar el iPod en el conector de la bandeja. Al colocar o extraer el iPod, sosténgalo en el mismo ángulo que el conector de la bandeja de la unidad. No jale mucho el iPod hacia adelante. Al colocar o extraer el iPod, sujete la unidad con firmeza. No gire ni incline el iPod ya que podría dañarse el conector. Extraiga el iPod al transportarlo; de otra manera se podrían causar daños. Si el iPod no llega al soporte ubicado en el frente de la unidad, conecte la almohadilla suministrada que está debajo del soporte. 4 Realice el procedimiento de asociación en el iPod para detectar la unidad. Seleccione "Configuración General Bluetooth" y encienda la función Bluetooth. Se enciende el indicador de Bluetooth. Ejemplo: iPhone 4S Para encender/apagar la unidad Presione (Encendido/En espera). El indicador de alimentación se ilumina al encender la unidad. Ajuste del volumen Pulse VOLUME +/− (VOL +/− en el control remoto). Sugerencia El botón de encendido parpadea tres veces en verde cuando el sonido se ajusta en el volumen máximo o mínimo. Aparece una lista de los dispositivos detectados en la pantalla. La unidad se visualiza como "RDP-X200iP". Si no visualiza "RDP-X200iP", repita el proceso desde el paso 3. 5 Seleccione "RDP-X200iP" en la pantalla del iPod mientras el indicador de Bluetooth parpadea rápidamente. Cuando en la pantalla del iPod aparezca "Conectado", se habrá completado la asociación y la conexión. Ejemplo: iPhone 4S Manejo de un iPod en la bandeja 1 Coloque el iPod en el conector de la bandeja. El conector de la bandeja puede inclinarse un poco. Para más detalles, consulte "Cómo manejar un iPod". 2 Pulse . 3 Presione iPod para activar la función para iPod. Se enciende el indicador del iPod. 4 Pulse . El iPod comienza la reproducción. Si el iPod no comienza la reproducción, opere directamente desde el iPod. Puede utilizar el iPod conectado mediante los botones de la unidad o del propio iPod. Para Pausar la reproducción Avanzar a la pista siguiente Volver a la pista anterior Ubicar un tramo mientras escucha el sonido Volver al menú anterior Seleccionar un elemento del menú o una pista para reproducir Activar el elemento del menú seleccionado o iniciar la reproducción Pulse Para reanudar la reproducción, presione nuevamente. (avanzar) en el control remoto (retroceder)* en el control remoto (avanzar) o (retroceder) en el control remoto durante la reproducción y mantener presionado hasta encontrar el tramo deseado. MENU en el control remoto (arriba)/ (abajo) en el control remoto ENTER en el control remoto * Durante la reproducción, esta operación vuelve al principio de la pista actual. Para volver a la pista anterior, púlselo dos veces. Notas Si aparece un mensaje emergente en la pantalla del iPod touch, del iPhone o del iPad, consulte "Acerca de App". Es posible que algunas operaciones difieran o no estén disponibles en ciertos modelos de iPod. Si la batería del iPod está casi agotada, cárguela antes de utilizarlo. Sony declina toda responsabilidad en el caso de la pérdida o corrupción de datos grabados en el iPod al utilizarlo conectado a esta unidad. Para obtener información detallada sobre las condiciones ambientales para utilizar el iPod, visite el sitio web de Apple Inc. Para extraer el iPod Para más detalles, consulte "Cómo manejar un iPod". Para cargar un iPod Puede utilizar la unidad como un cargador de batería del iPod. La carga comienza cuando el iPod se conecta a la unidad. El estado de carga aparece en la pantalla del iPod. Para obtener más información, consulte el manual del usuario del iPod. Operación mediante transmisión inalámbrica de música Mediante la conexión Bluetooth, puede escuchar el sonido desde un iPod u otro dispositivo Bluetooth con la unidad mediante conexión inalámbrica. Notas El funcionamiento y la pantalla pueden variar dependiendo del modelo de iPod y/o de la versión del software. Para obtener más información, consulte el manual del usuario del iPod. El modo de asociación se cancela luego de 5 minutos. Si se cancela el modo de asociación a la mitad de la operación, comience nuevamente desde el paso 3. Si el modo de asociación no se completa, comience nuevamente desde el paso 3. Para asociar con otro iPod, repita los pasos 1 a 5. En el paso 3, si no se escucha un sonido de dos tonos o si el indicador de Bluetooth no parpadea rápidamente, mantenga presionado BLUETOOTH ( en el control remoto) nuevamente. Si apaga la unidad o el iPod antes de que la conexión Bluetooth se haya completado, la información de asociación no se memorizará y no se completará la asociación. Notas sobre la asociación de un dispositivo Bluetooth distinto del iPod Al hacer la asociación con un dispositivo Bluetooth distinto del iPod, luego del paso 3, puede ser necesario ingresar un código de acceso en el dispositivo Bluetooth. En este caso ingrese "0000". El funcionamiento y la pantalla pueden variar dependiendo del dispositivo Bluetooth y/o de la versión del software. Para obtener más información, consulte el manual del usuario del dispositivo Bluetooth. Para escuchar el sonido Mantenga el iPod y la unidad a una distancia de 10 metros (cerca de 30 pies) uno del otro para esta operación. Antes de operar la unidad, compruebe lo siguiente. La función Bluetooth del iPod está encendida. La asociación entre la unidad y el iPod se ha completado. Si la asociación no se completa, repita el proceso. (Consulte "Para asociar a un iPod".) 1 Pulse . 2 Pulse BLUETOOTH ( en el control remoto) para encender la función Bluetooth. El iPod conectado por última vez se volverá a conectar automáticamente cuando se active la función Bluetooth. 3 Seleccione la música, el video, los juegos, etc. que desea reproducir en el iPod. Para obtener más información, consulte el manual del usuario del iPod. Sugerencias Si el último iPod conectado no se vuelve a conectar automáticamente, pulse BLUETOOTH ( en el control remoto). Si aún no se conecta, seleccione el nombre del modelo de esta unidad desde el iPod. (Realice los pasos 4 a 5 descritos en "Para asociar a un iPod".) Para conectar un iPod alternativo, que ya ha sido asociado previamente a esta unidad, pulse BLUETOOTH ( en el control remoto) para desconectar el iPod conectado. A continuación, seleccione el nombre del modelo de la unidad desde el iPod alternativo al que desea conectarse. Puede cargar el iPod en la bandeja mientras escucha música mediante la conexión Bluetooth. Si el nivel de volumen es bajo, ajuste primero el volumen de la unidad. Si el volumen sigue siendo muy bajo, ajuste el volumen del dispositivo Bluetooth. Para terminar de escuchar Finalice la conexión Bluetooth mediante cualquiera de las siguientes operaciones. Apague la unidad. Apague el iPod. Pulse BLUETOOTH ( en el control remoto), iPod, o AUDIO IN. Utilice el iPod para finalizar la conexión. Para obtener más información, consulte el manual del usuario del iPod. Para borrar la lista de modelos ya asociados y memorizados en la unidad 1 Pulse . 2 Pulse BLUETOOTH ( en el control remoto) para encender la función Bluetooth. 3 Mantenga presionado BLUETOOTH y VOLUME − simultáneamente en la unidad. El indicador MEGA BASS parpadea. Notas Puede realizar el paso 3 para borrar la lista, incluso durante la conexión Bluetooth. Esta operación no puede llevarse a cabo cuando se está asociando la unidad. Para asociar esta unidad de nuevo, elimine el nombre del modelo de esta unidad desde el iPod y vuelva a realizar la asociación. (Consulte "Para asociar a un iPod".) Conexión de componentes opcionales Es posible disfrutar del sonido de un componente opcional, como un reproductor de música digital portátil, a través de los altavoces de la unidad. Asegúrese de apagar todos los componentes antes de realizar las conexiones. 1 Conecte con firmeza la toma de salida de línea del reproductor de música digital portátil (u otro componente) a la toma AUDIO IN en la parte trasera de la unidad mediante un cable de conexión de audio adecuado (no suministrado). 2 Pulse para encender la unidad. 3 Presione AUDIO IN para activar la función Entrada de audio. Se enciende el indicador de Entrada de audio. 4 Encienda el componente conectado. 5 Reproduzca el componente conectado. El sonido del componente conectado se emite a través de los altavoces de esta unidad. Notas El tipo de cable de conexión de audio requerido depende del componente opcional. Asegúrese de utilizar el cable correcto. Si el nivel del volumen es bajo, ajuste primero el volumen de la unidad. Si el volumen sigue siendo demasiado bajo, entonces ajuste el volumen del componente conectado. Otras funciones útiles Refuerzo de los sonidos graves Pulse MEGA BASS. El indicador MEGA BASS se enciende. Para volver al sonido normal, pulse el botón de nuevo. Acerca de App Existe una aplicación de bandeja específica disponible para iPod touch/iPhone/iPad en la tienda Apple App Store. Busque "D-Sappli" y descargue la aplicación gratuita para obtener más información sobre las funciones. Características D-Sappli incluye varias funciones de temporizador: Alarm, Music Play Timer y Sleep Timer. Puede configurar hasta 10 alarmas, utilizando canciones en el iPod o el sonido predeterminado en D-Sappli para el sonido de la alarma. Music Play Timer le permite reproducir y poner en pausa la música que quiere y cuando quiere. Sleep Timer le permite especificar un horario para detener la reproducción de música. Alarm, Music Play Timer y Sleep Timer funcionan en combinación con el suministro de energía de la unidad. Alarm, Music Play Timer y Sleep Timer están disponibles solamente cuando se activa D-Sappli. D-Sappli incluye a su vez una función de ampliación de la pantalla de reloj. Notas Si la App que se enlaza a esta unidad no se descargó al iPod touch/iPhone/iPad, aparecerá repetidamente un mensaje emergente instando al usuario a descargar D-Sappli. Desactive la función de enlace de Apps para poner fin al mensaje emergente. Para desactivar la función de enlace de Apps: Conecte el adaptador de ca, y luego presione / para apagar la unidad. Retire el iPod touch/iPhone/iPad del conector de la bandeja. Mientras mantiene presionado , también mantenga presionado / en la unidad durante al menos 2 segundos. (El indicador de encendido parpadea dos veces al desactivarse.) Para volver a activar la función de enlace de Apps, repita los pasos anteriores. (El indicador de encendido parpadea una vez al activarse.)
-
 1
1 -
 2
2
 |
 |
