Sony RDR VX511 Operating Instructions - Page 63
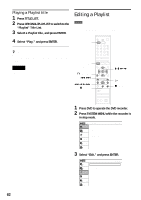
Select Edit Scene, and press ENTER., Select Edit Playlist
 |
UPC - 027242681354
View all Sony RDR VX511 manuals
Add to My Manuals
Save this manual to your list of manuals |
Page 63 highlights
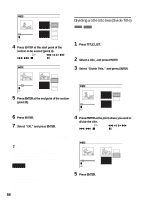
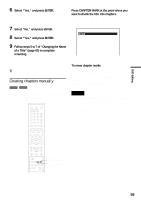
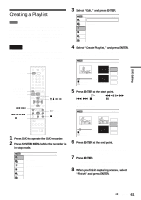
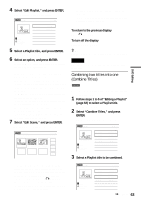
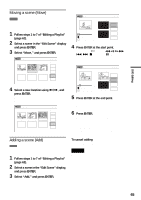
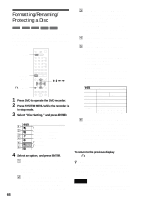
DVD Editing 4 Select "Edit Playlist," and press ENTER. The "Playlist" Title List appears. Playlist 1/2 No. Title 01 CH 32 02 CH 96 10:10 AM Length Edit 00:05:04 > 00:00:51 > T CH 32 May/02/2005 03:25 PM 5 Select a Playlist title, and press ENTER. The sub-menu appears. 6 Select an option, and press ENTER. Select from the following options. For details, see the pages in parentheses. "Title Erase": Erases the title. Select "OK" when asked for confirmation. "Chapter Erase": Allows you to select chapters in the Playlist title to erase (page 57). "Title Name": Allows you to rename the title (page 60). "A-B Erase": Allows you to select sections in the title to erase (page 57). "Edit Scene": Allows you to re-edit scenes in the Playlist title. Go to step 7. "Divide Title": Divides the title in two at a desired point (page 58). "Combine Titles": Allows you to combine two titles into one (page 63). 7 Select "Edit Scene," and press ENTER. The display for editing scenes appears. Edit Scene 10:10 AM Scene No.1 / 3 Playlist No.01 Check 01 00:00:34 02 00:00:10 03 00:04:20 Erase Modify Move Add "Move": Allows you to change scene order (page 65). "Add": Allows you to add other scenes before a selected scene (page 65). To return to the previous display Press O RETURN. To turn off the display Press SYSTEM MENU. z Hint The Resume Play function will work for scene playback. Note Once the disc is finalized, you cannot edit Playlist titles on the disc. Combining two titles into one (Combine Titles) -RWVR You can select a Playlist title and combine it with another Playlist title. 1 Follow steps 1 to 5 of "Editing a Playlist" (page 62) to select a Playlist title. The sub-menu appears. 2 Select "Combine Titles," and press ENTER. The next title below is also selected. Playlist 1/4 T CH 32 May/02/2005 03:25 PM No. Title 01 CH 32 02 CH 96 03 CH 95 04 CH 97 10:10 AM Length Edit 00:05:04 > 00:00:51 > 01:59:00 > 00:58:56 > 3 Select a Playlist title to be combined. "Check": Allows you to preview a scene. Starts playback of the selected scene when you press ENTER. The display returns to the "Edit Scene" display when the playback finishes or when you press O RETURN. "Erase": Erases a scene (page 64). "Modify": Allows you to change the start and end point of a scene (page 64). Playlist 3/4 T CH 95 May/15/2005 11:30 PM No. Title 01 CH 32 02 CH 96 03 CH 95 04 CH 97 10:10 AM Length Edit 00:05:04 > 00:00:51 > 01:59:00 > 00:58:56 > ,continued 63
-
 1
1 -
2
-
3
-
4
-
5
-
6
-
7
-
8
-
9
-
10
-
11
-
12
-
13
-
14
-
15
-
16
-
17
-
18
-
19
-
20
-
21
-
22
-
23
-
24
-
25
-
26
-
27
-
28
-
29
-
30
-
31
-
32
-
33
-
34
-
35
-
36
-
37
-
38
-
39
-
40
-
41
-
42
-
43
-
44
-
45
-
46
-
47
-
48
-
49
-
50
-
51
-
52
-
53
-
54
-
55
-
56
-
57
-
 58
58 -
 59
59 -
 60
60 -
 61
61 -
 62
62 -
 63
63 -
 64
64 -
 65
65 -
 66
66 -
 67
67 -
 68
68 -
69
-
70
-
71
-
72
-
73
-
74
-
75
-
76
-
77
-
78
-
79
-
80
-
81
-
82
-
83
-
84
-
85
-
86
-
87
-
88
-
89
-
90
-
91
-
92
-
93
-
94
-
95
-
96
-
97
-
98
-
99
-
100
-
101
-
102
-
103
-
104
-
105
-
106
-
107
-
108
-
109
-
110
-
111
-
112
-
113
-
114
-
115
-
116
-
117
-
118
-
119
-
120
-
121
-
122
-
123
-
124
 |
 |