Sony SPP-ID971 Operating Instructions
Sony SPP-ID971 - Cordless Telephone Manual
 |
View all Sony SPP-ID971 manuals
Add to My Manuals
Save this manual to your list of manuals |
Sony SPP-ID971 manual content summary:
- Sony SPP-ID971 | Operating Instructions - Page 1
3-867-313-21 (1) Cordless Telephone Operating Instructions US Mode d'emploi FR SPP-ID971 ©1999 by Sony Corporation - Sony SPP-ID971 | Operating Instructions - Page 2
To avoid electrical shock, do not open the cabinet. Refer servicing to qualified personnel only. INDUSTRY CANADA NOTICE NOTICE: The Industry Number of all the devices does not exceed 5. IMPORTANT INSTRUCTION TO USERS Your model (SPP-ID971) has been approved by the Industry Canada. Note Operation - Sony SPP-ID971 | Operating Instructions - Page 3
Understanding the Caller ID service 27 When you receive a call 6 Step 2: Setting up the base unit 28 Looking at the Caller ID list 9 Step 3: Preparing the battery pack 11 Step 4: power sources 39 Maintenance 40 Troubleshooting 43 Specifications 44 Index 26 Paging Table of contents 3US - Sony SPP-ID971 | Operating Instructions - Page 4
things to set up the base unit, including finding the best location for the base unit. Base unit Step 3 (pages 9 to 10) Then, insert the battery pack into the handset and charge it for more than 12 hours. Handset Step 4 (pages 11 to 13) Finally, enter the area code to use - Sony SPP-ID971 | Operating Instructions - Page 5
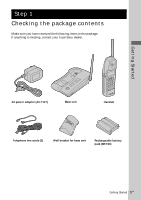
Make sure you have received the following items in the package. If anything is missing, contact your local Sony dealer. Getting Started AC power adaptor (AC-T127) Base unit Handset Telephone line cords (2) Wall bracket for base unit Rechargeable battery pack (BP-T23) Getting Started 5US - Sony SPP-ID971 | Operating Instructions - Page 6
Step 2 Setting up the base unit Do the following steps: • Choose the best location • Connect the base unit • Choose the dialing mode Choose the best location Where you place the base unit affects the reception quality of the handset. Away from noise sources such as a window by a street with - Sony SPP-ID971 | Operating Instructions - Page 7
Connect the base unit If you want to hang the base unit on the wall, see page 38. 3 Getting Started Hook the cord. To an AC outlet To DC IN 9V 2 AC power adaptor (supplied AC-T127) 1 Telephone line cord To the (supplied) telephone outlet To LINE 1 Connect the telephone line cord to the LINE - Sony SPP-ID971 | Operating Instructions - Page 8
you can unplug the AC power adaptor easily. + - Polarity of the plug Tip If your telephone outlet is not modular, contact your telephone service company for assistance. Modular Choose the dialing mode For the telephone to work properly, select an appropriate dialing mode (tone or pulse). DIAL - Sony SPP-ID971 | Operating Instructions - Page 9
side facing up. The CHARGE lamp lights up when the handset is properly seated on the charge terminals of the base unit. Charge the battery pack for more than 12 hours so that the battery is fully charged. The CHARGE lamp remains lit even after charging is completed. continued Getting Started 9US - Sony SPP-ID971 | Operating Instructions - Page 10
even after 12 hours of charging, the usable life of the battery has expired and needs replacement. Contact your local Sony authorized dealer or service center, and ask for a Sony BP-T23 rechargeable battery pack. Note Battery life may vary depending on usage condition and ambient temperature. 10US - Sony SPP-ID971 | Operating Instructions - Page 11
Getting Started Step 4 Entering the area code When you use this phone for the first time, or move to an area that has a different area code, you must enter your home area code. Otherwise, you cannot use some functions of this phone and the Caller ID functions. This is also necessary because the - Sony SPP-ID971 | Operating Instructions - Page 12
Step 4: Entering the area code (continued) Notes • If the home area code is already entered, it appears on the display in step 4. To enter a different home area code, see "To change the home area code" below. • Do not allow more than 20 seconds to elapse between each step of the procedure. Tips • - Sony SPP-ID971 | Operating Instructions - Page 13
Getting Started 5 Press Jog Dial. "ENTER AREA CODE" appears on the display. 6 Enter three digits of the local area code using the dialing keys. 7 Press (PGM). You will hear a long confirmation beep. Notes • If the local area code is already entered, it appears on the display in step 5. To enter a - Sony SPP-ID971 | Operating Instructions - Page 14
when there is a "NEW" data in the Caller ID list. 3 MESSAGES lamp (p. 36) Flashes when you have messages. 4 CHARGE lamp (p. 9) Lights while the battery is being charged. 5 LINE lamp (p. 16, 18) Lights when the cordless handset is in use. 6 DIAL MODE switch (p. 8) Selects pulse or tone dialing - Sony SPP-ID971 | Operating Instructions - Page 15
(p. 16, 18) Lets you make or receive a call. 5 Dialing keys (p. 16) 6 Battery compartment (p. 9) 7 TONE button (p. 16) Allows you to switch temporarily to tone dialing. (p. 18, 35) Switches to a second call if you have "call waiting" service, or lets you make a new call. qs OFF button (p. 16) Allows - Sony SPP-ID971 | Operating Instructions - Page 16
Basics Making calls 1 Pick up the handset from the base unit. (*TONE) (REDIAL) VOL switch 2 Press (TALK) and wait until "TALK" appears on the display. The display also shows the operation duration in hours, minutes and seconds. The dialing keys light up for five seconds. You will then hear a - Sony SPP-ID971 | Operating Instructions - Page 17
receive a call. After this initial 10 - 15 minutes, you may be able to use the phone, but the battery duration will be very short; thus it is recommended that you fully charge the battery before the next usage. Redialing 1 Press (TALK) and wait until "TALK" appears on the display. The dialing keys - Sony SPP-ID971 | Operating Instructions - Page 18
caller's number and/or name appears on the display when you receive a call (see page 27) or when another call comes in by "call waiting" service. • the ringer sound changes to a higher tone if the call matches the number stored in the Phone Directory (memory match function; see page 27). 18US - Sony SPP-ID971 | Operating Instructions - Page 19
by scrolling through the Phone Directory, in which up to 50 phone numbers can be stored. Storing phone numbers and names Example: to store "SONY" "123-4567". Turn Press 1 Press (PGM). (Be sure not to press (TALK).) The dialing keys light up for five seconds. DIRECTORY AREA RINGER Telephone - Sony SPP-ID971 | Operating Instructions - Page 20
which is counted as one digit. When the phone number of 17 digits or more has been entered , the phone number appears in two lines. SONY 1234567 1234567890123456 12 6 Press (PGM). You will hear a long confirmation beep, and the name and the number are stored. The display goes off. Notes • If - Sony SPP-ID971 | Operating Instructions - Page 21
1 and 2 in "Making calls from the Phone Directory" on page 22. SONY 1234567 2 Press Jog Dial. DIAL EDIT ERASE 1234567 3 Turn Jog Dial up hear a long confirmation beep and the name and/or the number is changed. SONY 1234567 SMITH 1234567 Tip When the phone number of 17 digits or more has been - Sony SPP-ID971 | Operating Instructions - Page 22
(continued) Erasing a memory location 1 Displaythenameandphonenumberyouwant to erase by doing steps 1 and 2 in "Making calls from the Phone Directory". 2 Press Jog Dial. SONY 1234567 DIAL EDIT ERASE 1234567 3 Turn Jog Dial up to make "ERASE" flash and press Jog Dial. ERASE NO YES 1234567 4 Turn - Sony SPP-ID971 | Operating Instructions - Page 23
names appear in the following order when you turn Jog Dial up or down. • Alphabetical order: ABC...XYZ y symbols y * y # y 0 - 9 • Initial character: To search for "SONY" for example, press (7) and then turn Jog Dial to search through the names starting with P, Q, R, S or 7. Telephone Features 23US - Sony SPP-ID971 | Operating Instructions - Page 24
Setting the ringer type You can select a ringer type of the handset from four type. Turn Press 1 Press (PGM). 2 Turn Jog Dial up to make "RINGER" flash. DIRECTORY AREA RINGER 3 PressJogDial. The current ringer type appears. RINGER 1 SELECTED 4 Press one of the dialing keys ((1) to (4)) to - Sony SPP-ID971 | Operating Instructions - Page 25
receive calls if another telephone connected to the same line rings to inform you on incoming calls. To turn the ringer on again Follow the instructions described in "Setting the ringer type" on page 24. Telephone Features Telephone Features 25US - Sony SPP-ID971 | Operating Instructions - Page 26
Paging You can page the handset from the base unit. Note that you cannot page if the handset is in use. To Page Press (HANDSET LOCATOR). The handset rings for about one minute. To stop ringing, press (OFF) on the handset. Tip You can page the handset even when "RINGER" is set to "RINGER OFF". 26US - Sony SPP-ID971 | Operating Instructions - Page 27
call The phone number appears on the display with the date and time as shown in the following example. If your Caller ID service includes the caller name service, the caller's name also appears on the display (up to 15 letters). Caller's name Caller's phone number The date and time received SMITH - Sony SPP-ID971 | Operating Instructions - Page 28
Looking at the Caller ID list The phone stores the data of the last 20 calls received including "OUT OF AREA" and "PRIVATE" calls. It keeps track of all calls received; even if they were not answered. Viewing the Caller ID list You can look through the Caller ID list to check the phone number and/ - Sony SPP-ID971 | Operating Instructions - Page 29
one call. Erasing data from the Caller ID list Old data will be erased automatically when a 21st call comes in, but you can also manually erase unnecessary data one by one or erase the entire list. To erase the phone number one by one 1 Displaythephonenumberyouwanttoerase from the Caller ID list - Sony SPP-ID971 | Operating Instructions - Page 30
Looking at the Caller ID list (continued) To erase the entire list at once 1 Display any Caller ID data. SMITH JOHN 1-201-123-4567 2 Press Jog Dial. DIAL PGM ERASE 1-201-123-4567 3 Turn Jog Dial up to make "ERASE" flash and press Jog Dial. ERASE NO YES ALL 1-201-123-4567 4 Turn Jog Dial up to - Sony SPP-ID971 | Operating Instructions - Page 31
Using the Caller ID list By using the Caller ID list, you can call back a phone number from the Caller ID list easily, or store numbers from the Caller ID list into the Phone Directory. Calling back a number from the Caller ID list Turn Press 1 Displaythephonenumberyou want to call from the - Sony SPP-ID971 | Operating Instructions - Page 32
Using the Caller ID list (continued) Storing a number of the Caller ID list into the Phone Directory 1 Displaythenameandphonenumberyouwant to store from the Caller ID list (see page 28). 2 Confirm the number and press Jog Dial. 3 Turn Jog Dial up to make "PGM" flash and press Jog Dial. The cursor - Sony SPP-ID971 | Operating Instructions - Page 33
To change the number of digits of the phone number If the number of digits of the phone number in the Caller ID list is different from the actual phone number, you need to adjust the number of digits of the phone number to call back or store into the PhoneDirectory . 1 While the phone number from - Sony SPP-ID971 | Operating Instructions - Page 34
Using the Caller ID list (continued) When the local area code matches SMITH JOHN 201-123-4567 SMITH JOHN 1-123-4567 SMITH JOHN 1-201-123-4567 SMITH JOHN 123-4567 2 Continue the operation to call or store the phone number with the correct number of digits (pages 31 and 32). Notes • Youneedto - Sony SPP-ID971 | Operating Instructions - Page 35
though you now have a "Caller ID with Visual Call Waiting" compatible phone, unless you subscribe to the combined "Caller ID with Visual Call Waiting" service, you will not be able to see the name and number of the second caller. When a new call comes in while you are talking, you - Sony SPP-ID971 | Operating Instructions - Page 36
. For details on the availability of this service, please ask your telephone company. If the MESSAGES lamp remains flashing If this lamp does not go off (e.g. When you retrieve your messages with other phones), you can go off the lamp manually. To go off the MESSAGES lamp 1 Press (PGM). 2 Press - Sony SPP-ID971 | Operating Instructions - Page 37
). The first time this phone receives a voice mail message, it will set itself to the FSK service and will lock out the stutter service if your telephone company is in FSK service. When you move or change your telephone company, you need to reset this phone. To reset, perform the following procedure - Sony SPP-ID971 | Operating Instructions - Page 38
Additional Information Mounting the base unit on a wall 1 Hang-up tab 2 AC power adaptor cord Telephone line cord 1 Raise the hang-up tab. 2 Plug the telephone line cord to the LINE jack and the AC power adaptor to the DC IN 9V jack, and hook the cords. Use the shorter cord for mounting. 3 - Sony SPP-ID971 | Operating Instructions - Page 39
, do not continue to use it. Contact your local Sony dealer for replacement. On power failure During a power interruption, you cannot make or receive calls. Maintenance On handling • Do not attempt to disassemble the casing. Refer servicing to qualified personnel only. • Do not put foreign objects - Sony SPP-ID971 | Operating Instructions - Page 40
use this troubleshooting guide to help you remedy the problem. Should any problem persist, consult your nearest Sony dealer. Making the telephone line cord is securely connected to the telephone outlet. • Make sure the battery is fully charged (page 9). The phone does not connect at • Make sure the - Sony SPP-ID971 | Operating Instructions - Page 41
number (pages 19). The caller's name and/or phone number does not appear on the display. • Make sure you have subscribed to Caller ID service. • Caller ID service may not work when the phone is connected to a Private Branch Exchange (PBX). • The call is made through company which does not offer - Sony SPP-ID971 | Operating Instructions - Page 42
Troubleshooting (continued) Power source/battery Symptom The CHARGE lamp does not light up when you place the handset to charge. The battery duration is short. Remedy • Wipe the charge terminals of the base unit and the handset with a soft cloth for better contact of the charge terminals. • - Sony SPP-ID971 | Operating Instructions - Page 43
channel 30 channels Dial signal Tone, 10 PPS (pulse) selectable Supplied accessories See page 5. Handset Power source Rechargeable battery pack BP-T23 Battery life Standby: Approx. 7 days Talk: Approx. 6 hours Dimensions Approx. 58 x 177 x 46 mm (w/h/d), antenna excluded (approx. 2 3⁄8 x 7 x 1 13⁄16 - Sony SPP-ID971 | Operating Instructions - Page 44
handset volume 16, 18 Area code 11 B Battery pack charging 9 duration 10 C Call waiting service 18, 35 Caller ID 27 Caller ID list 32 T, U Tone dialing dialing mode 8 switching to 16 Troubleshooting 40 V, W, X, Y, Z Visual message waiting service 36 Volume handset 16, 18 44US Additional Information - Sony SPP-ID971 | Operating Instructions - Page 45
- Sony SPP-ID971 | Operating Instructions - Page 46
aux conditions énoncées ci-dessus n'empêche pas la dégradation du service dans certaines situations. Les réparations de matériel homologué doivent être êntre garanti lors de l'uilisation de ce téléphone. CODE DE SECURITE Votre SPP-ID971 a reçu un code de sécurité numérique permanent et unique. Ce - Sony SPP-ID971 | Operating Instructions - Page 47
service Caller ID 5 Etape 1 : Vérification du contenu du carton d'emballage 6 Etape 2 : Installation du poste de base 9 Etape 3 : Préparation de la batterie Entretien 24 Sélection du type de sonnerie 40 Guide de dépannage 25 Mise hors service de la sonnerie du combiné 43 Spécifications - Sony SPP-ID971 | Operating Instructions - Page 48
suivantes pour installer le poste de base, et avant tout trouver l'emplacement idéal. Poste de base Etape 3 (pages 9 à 10) Ensuite, insérez la batterie dans le combiné et chargez-la pendant au moins 12 heures. Combiné Etape 4 (pages 11 à 13) Finalement, enregistrez le code de zone pour pouvoir - Sony SPP-ID971 | Operating Instructions - Page 49
d'emballage Assurez-vous que le carton d'emballage contient bien tous les accessoires suivants. Si un accessoire manque, contactez votre revendeur Sony. Informations préliminaires Adaptateur secteur (AC-T127) Poste de base Combiné Cordons de ligne téléphonique (2) Applique murale pour le poste - Sony SPP-ID971 | Operating Instructions - Page 50
Etape 2 Installation du poste de base Procédez de la façon suivante: • Choisissez l'emplacement idéal • Raccordez le poste de base • Choisissez le mode de numérotation Choisissez l'emplacement idéal L'emplacement du poste affecte la qualité de la réception du combiné. à l'écart de téléviseurs et - Sony SPP-ID971 | Operating Instructions - Page 51
Raccordez le poste de base Si vous voulez le suspendre au mur, reportez-vous à la page 38. 3 Informations préliminaires Accrochez le cordon. A une prise secteur A DC IN 9V 2 Adaptateur secteur (fourni AC-T127) A la prise de téléphone 1 Cordon de ligne téléphonique (fourni) A LINE 1 Raccordez - Sony SPP-ID971 | Operating Instructions - Page 52
Etape 2 : Installation du poste de base (suite) Remarques • Utilisez seulement l'adaptateur secteur fourni ACT127 à l'exclusion de tout autre. • Raccordez l'adaptateur secteur à une source d'alimentation toujours sous tension. • Placez le poste de base le plus près possible d'une prise murale pour - Sony SPP-ID971 | Operating Instructions - Page 53
l'endroit ou à l'envers. Le témoin CHARGE s'allume si le combiné repose correctement sur les plots de charge du poste de base. Chargez la batterie pendant plus de 12 heures pour qu'elle soit pleine. Le témoin CHARGE reste allumé lorsque la recharge est terminée. suite Informations préliminaires 9FR - Sony SPP-ID971 | Operating Instructions - Page 54
qu'elle est usée et qu'elle doit être remplacée. Contactez votre revendeur ou un service après-vente agréé Sony et demandez une batterie rechargeable Sony BP-T23. Remarque L'autonomie de la batterie varie selon les conditions d'utilisation et la température ambiante. 10FR Informations préliminaires - Sony SPP-ID971 | Operating Instructions - Page 55
Informations préliminaires Etape 4 Enregistrement de l'indicatif de zone La première fois que vous utilisez ce téléphone ou si vous allez dans une région ayant un autre indicatif de zone, vous devrez enregistrer l'indicatif régional, sinon vous ne pourrez pas utiliser certaines fonctions de ce - Sony SPP-ID971 | Operating Instructions - Page 56
Etape 4 : Enregistrement de l'indicatif de zone (suite) Remarques • Si l'indicatif régional est déjà enregistré, il apparaîtra sur l'afficheur à l'étape 4. Pour enregistrer un autre indicatif régional, reportez-vous à"Pour changer l'indicatif régional"ci-dessous. • Chaque étape de la procédure doit - Sony SPP-ID971 | Operating Instructions - Page 57
Informations préliminaires 5 Appuyez sur la molette. "ENTER AREA CODE"apparaît sur l'afficheur. 6 Saisissez les trois chiffres de l'indicatif local avec les touches de composition. 7 Appuyez sur (PGM). Un long bip de confirmation est audible. Remarques • Si l'indicatif local est déjà enregistré, il - Sony SPP-ID971 | Operating Instructions - Page 58
("NEW") dans la liste Caller ID. 3 Témoin MESSAGES (p. 36) Clignote en présence de messages. 4 Témoin CHARGE (p. 9) S'allume lorsque la batterie est chargée. 5 Témoin LINE (p. 16, 18) S'allume lorsque le combiné est utilisé. 6 Commutateur DIAL MODE (p. 8) Pour sélectionner la numérotation décimales - Sony SPP-ID971 | Operating Instructions - Page 59
ou émettre un appel. 5 Touches de composition (p. 16) 6 Logement de la batterie (p. 9) 7 Touche TONE (p. 16) Pour passer provisoirement à la numérotation décimale , 35) Pour prendre un second appel si vous êtes abonné au service "appel en attente", ou pour appeler une autre personne. qs Touche OFF - Sony SPP-ID971 | Operating Instructions - Page 60
Opérations de base Emission d'un appel 1 Décrochez le combiné du poste de base. (*TONE) (REDIAL) Autres fonctions 2 Appuyez sur (TALK) et attendez que "TALK" apparaisse sur l'afficheur. Commutateur VOL L'afficheur indique la durée de la communication en heures, minutes et secondes. Les touches - Sony SPP-ID971 | Operating Instructions - Page 61
Lorsque ces 10-15 minutes se sont écoulées, vous pouvez utiliser le téléphone, mais l'autonomie de la batterie sera très courte. Il est conseillé de recharger complètement la batterie avant de réutiliser le téléphone. Recomposition d'un numéro 1 Appuyez sur (TALK) et attendez que"TALK"apparaisse sur - Sony SPP-ID971 | Operating Instructions - Page 62
, deux brefs bips sont audibles. Conseil "** RINGING **" apparaît aussi sur l'afficheur pour vous signaler un appel entrant. Si vous avez souscrit un abonnement au service Caller ID • Le numéro et/ou le nom de l'appelant apparaîtront sur l'afficheur lorsque vous recevrez un appel (voir page 27) ou - Sony SPP-ID971 | Operating Instructions - Page 63
contenir 50 numéros de téléphone au maximum. Mémorisation de numéros de téléphone et de noms Tournez Appuyez Exemple: Pour mémoriser "SONY" "123-4567". 1 Appuyez sur (PGM). (Ne pas appuyer sur (TALK).) Les touches de composition s'allument pendant cinq secondes. DIRECTORY AREA RINGER Fonctions - Sony SPP-ID971 | Operating Instructions - Page 64
pause comprises, car chacune compte comme un caractère. Si le numéro de téléphone a 17 chiffres ou plus, il apparaîtra sur deux lignes. SONY 1234567 1234567890123456 12 6 Appuyez sur (PGM). Un long bip de confirmation est audible et le nom et le numéro sont mémorisés. L'afficheur s'éteint - Sony SPP-ID971 | Operating Instructions - Page 65
numéro depuis le répertoire téléphonique" à la page 22. SONY 1234567 2 Appuyezsurlamolette. DIAL EDIT ERASE 1234567 3 Tournez la molette confirmation est audible et le nom et/ou le numéro de téléphone est changé. SONY 1234567 SMITH 1234567 Conseil Si le numéro de téléphone a 17 caractères ou - Sony SPP-ID971 | Operating Instructions - Page 66
bas. Pour rechercher en indiquant le caractère initial: Appuyez sur la touche de composition correspondant au caractère souhaité puis tournez la molette. SONY 1234567 3 Appuyez sur la molette. DIAL EDIT ERASE 1234567 4 Appuyez une nouvelle fois sur la molette. Le numéro de téléphone est compos - Sony SPP-ID971 | Operating Instructions - Page 67
lorsque vous tournez la molette vers le haut ou le bas. • Ordre alphabétique: ABC...XYZ y symbols y * y # y 0 - 9 • Caractère initial: Pour rechercher "SONY"par exemple, appuyez sur (7) puis tournez la molette pour rechercher les noms commençant par P, Q, R, S ou 7. Fonctions du téléphone 23FR - Sony SPP-ID971 | Operating Instructions - Page 68
Sélection du type de sonnerie Vous avez le choix entre quatre types de sonnerie pour le combiné. Tournez Appuyez 1 Appuyez sur (PGM). 2 Tournez la molette pour faire clignoter "RINGER". DIRECTORY AREA RINGER 3 Appuyezsurlamolette. Le type de sonnerie actuel apparaît. RINGER 1 SELECTED 4 Appuyez - Sony SPP-ID971 | Operating Instructions - Page 69
Mise hors service de la sonnerie du combiné 1 Effectuezlesétapes1à3delapage24. 2 Appuyez sur (0). de téléphone pour vous signaler les appels entrants. Pour remettre la sonnerie en service Suivez les instructions décrites dans "Sélection du type de sonnerie" de la page 24. Fonctions du télé - Sony SPP-ID971 | Operating Instructions - Page 70
Appel du combiné Vous pouvez appeler le combiné depuis le poste de base. Ce n'est pas possible lorsque le combiné est en communication. Pour appeler le combiné Appuyez sur (HANDSET LOCATOR). Le combiné sonne pendant une minute. Pour arrêter la sonnerie, appuyez sur (OFF)sur le combiné. Conseil Vous - Sony SPP-ID971 | Operating Instructions - Page 71
la réception d'un appel Le numéro de téléphone apparaît sur l'afficheur avec la date et l'heure, comme indiqué dans l'exemple ci-dessous. Si le service Caller ID inclut le nom, le nom de l'appelant sera aussi affiché (15 lettres au maximum). Nom de l'appelant Numéro de téléphone de l'appelant - Sony SPP-ID971 | Operating Instructions - Page 72
Consultation de la liste Caller ID Le téléphone mémorise les données des 20 derniers appels, y compris des appels "OUT OF AREA" et "PRIVATE". Il conserve une trace de tous les appels reçus, même ceux auxquels vous n'avez pas répondu. Affichage de la liste Caller ID Vous pouvez afficher la liste - Sony SPP-ID971 | Operating Instructions - Page 73
A propos du symbole "*" SMITH JOHN * 1-201-123-4567 "*" apparaît si plus de deux appels ont été émis par le même numéro de téléphone. Les données les plus anciennes seront remplacées par les plus récentes et les appels ne compteront que pour un seul appel. Effacement des données de la liste Caller - Sony SPP-ID971 | Operating Instructions - Page 74
Consultation de la liste Caller ID (suite) Pour effacer la liste complète 1 Affichezdesdonnéesquelconquedelaliste Caller ID. 2 Appuyezsurlamolette. SMITH JOHN 1-201-123-4567 DIAL PGM ERASE 1-201-123-4567 3 Tournezlamoletteverslehautpourfaire clignoter "ERASE" et appuyez sur la molette. ERASE NO - Sony SPP-ID971 | Operating Instructions - Page 75
Utilisation de la liste Caller ID En utilisant la liste Caller ID vous pourrez rappeler facilement un numéro de la liste ou mémoriser un numéro de la liste dans le répertoire téléphonique. Rappel d'un numéro de la liste Caller ID 1 Affichezlenumérodetéléphone Tournez Appuyez que vous voulez - Sony SPP-ID971 | Operating Instructions - Page 76
Utilisation de la liste Caller ID (suite) Mémorisation d'un numéro de la liste Caller ID dans le répertoire téléphonique 1 Affichezlenom etlenumérodetéléphoneque vous voulez mémoriser depuis la liste Caller ID (voir page 28). SMITH JOHN 1-201-123-4567 2 Vérifiezlenuméroetappuyezsurlamolette. - Sony SPP-ID971 | Operating Instructions - Page 77
Changement du nombre de chiffres du numéro de téléphone Si le nombre de chiffres du numéro de téléphone de la liste Caller ID est différent de celui du numéro de téléphone proprement dit, vous devrez le corriger pour le rappeler ou le mémoriser dans le répertoire téléphonique. 1 Lorsque le numéro - Sony SPP-ID971 | Operating Instructions - Page 78
Utilisation de la liste Caller ID (suite) Si l'indicatif local correspond SMITH JOHN 201-123-4567 SMITH JOHN 1-123-4567 SMITH JOHN 1-201-123-4567 SMITH JOHN 123-4567 2 Continuez l'opération pour appeler ou mémoriser le numéro de téléphone comportant le nombre de chiffres correct (voir pages 31 - Sony SPP-ID971 | Operating Instructions - Page 79
appel en attente visible", vous ne pourrez pas voir le nom et le numéro de téléphone si vous n'avez pas souscrit un abonnement au service unique. Lorsqu'un nouvel appel est reçu pendant une communication, vous entendez deux brefs bips. Le nom et/ou le numéro de téléphone du - Sony SPP-ID971 | Operating Instructions - Page 80
Remarque Vous ne pourrez pas utiliser cette fonction si vous n'avez pas souscrit un abonnement à ce service auprès de votre compagnie de téléphone. Pour les détails sur la disponibilité de ce service, adressez-vous à votre compagnie de téléphone. Si le témoin MESSAGES continue de clignoter Si le - Sony SPP-ID971 | Operating Instructions - Page 81
). La première fois que ce téléphone reçoit un message vocal, il se réglera sur le service MDF et exclura le service intermittent si votre compagnie de téléphone fait partie du service MDF. Lorsque vous déménagez ou changez de compagnie de téléphone, vous devez réinitialiser ce téléphone. Pour ce - Sony SPP-ID971 | Operating Instructions - Page 82
Informations complémentaires Fixation murale du poste de base 1 Contacteur du combiné 2 Cordon d'adaptateur secteur 1 Levez le contacteur du combiné. 2 Branchez le cordon de ligne téléphonique sur la prise LINE et l'adaptateur secteur sur la prise DC IN 9V et accrochez les cordons. Utilisez le - Sony SPP-ID971 | Operating Instructions - Page 83
batteries. • Ne démontez pas les batteries. Sécurité • Ne pliez et ne tordez pas le cordon de façon excessive et ne posez pas d'objets lourds dessus. • Si le cordon ou la fiche sont endommagés, ne l'utilisez plus. Consultez votre revendeur Sony avant de le remettre en service. • N'introduisez rien - Sony SPP-ID971 | Operating Instructions - Page 84
guide pour essayer de la résoudre. Si le problème persiste, consultez votre revendeur Sony la prise de téléphone. • Assurez-vous que la batterie est pleine (page 9). La connexion est impossible • sonne pas. • Assurez-vous que la sonnerie est en service (page 25). • La pile est peut-être faible - Sony SPP-ID971 | Operating Instructions - Page 85
les données Caller ID apparaissent. Le nom de l'appelant et/ou le • Assurez-vous d'avoir souscrit un abonnement au numéro de téléphone service "Caller ID avec appel en attente visible"(page n'apparaissent pas sur l'afficheur 35). lors d'un second appel. • Assurez-vous que personne n'utilise un - Sony SPP-ID971 | Operating Instructions - Page 86
Batterie Guide de dépannage (suite) Symptôme Le témoin CHARGE ne s'allume pas lorsque vous posez le combiné pour le charger. L'autonomie de la batterie ès. • La batterie a été chargée moins de 12 heures (coupure de courant, etc.) • La durée de service de la pile expire et la batterie doit être - Sony SPP-ID971 | Operating Instructions - Page 87
Approx. 58 x 177 x 46 mm (l/h/p) sans l'antenne (approx. 2 3⁄8 x 7 x 1 13⁄16 pouces) Antenne : Approx. 72 mm (approx. 2 7⁄8 pouces) Poids Approx. 270 g (approx. 9,5 onces) batterie comprise Poste de base Source d'alimentation CC 9 V avec adaptateur secteur AC-T127 Temps de recharge de la - Sony SPP-ID971 | Operating Instructions - Page 88
26 B Batterie rechargeable Autonomie de base 6 F Fixation murale du poste de base 38 G, H Guide de dépannage 40 I, J, K, L Identification des éléments 14 Indicatif pertoire téléphonique 19 S, T, U Service d'indication visuelle den messages en attente 36 Service Double appel 18, 35 Sonnerie Réglage
-
 1
1 -
 2
2 -
 3
3 -
 4
4 -
 5
5 -
 6
6 -
 7
7 -
8
-
9
-
10
-
11
-
12
-
13
-
14
-
15
-
16
-
17
-
18
-
19
-
20
-
21
-
22
-
23
-
24
-
25
-
26
-
27
-
28
-
29
-
30
-
31
-
32
-
33
-
34
-
35
-
36
-
37
-
38
-
39
-
40
-
41
-
42
-
43
-
44
-
45
-
46
-
47
-
48
-
49
-
50
-
51
-
52
-
53
-
54
-
55
-
56
-
57
-
58
-
59
-
60
-
61
-
62
-
63
-
64
-
65
-
66
-
67
-
68
-
69
-
70
-
71
-
72
-
73
-
74
-
75
-
76
-
77
-
78
-
79
-
80
-
81
-
82
-
83
-
84
-
85
-
86
-
87
-
88
 |
 |

3-867-313-
21
(1)
©1999 by Sony Corporation
FR
Operating Instructions
Mode d‘emploi
SPP-ID971
US
Cordless
Telephone