Sony SRF HM33 Operating Instructions - Page 1
Sony SRF HM33 - Walkman FM/AM Stereo Headphone Radio Manual
 |
UPC - 027242579279
View all Sony SRF HM33 manuals
Add to My Manuals
Save this manual to your list of manuals |
Page 1 highlights
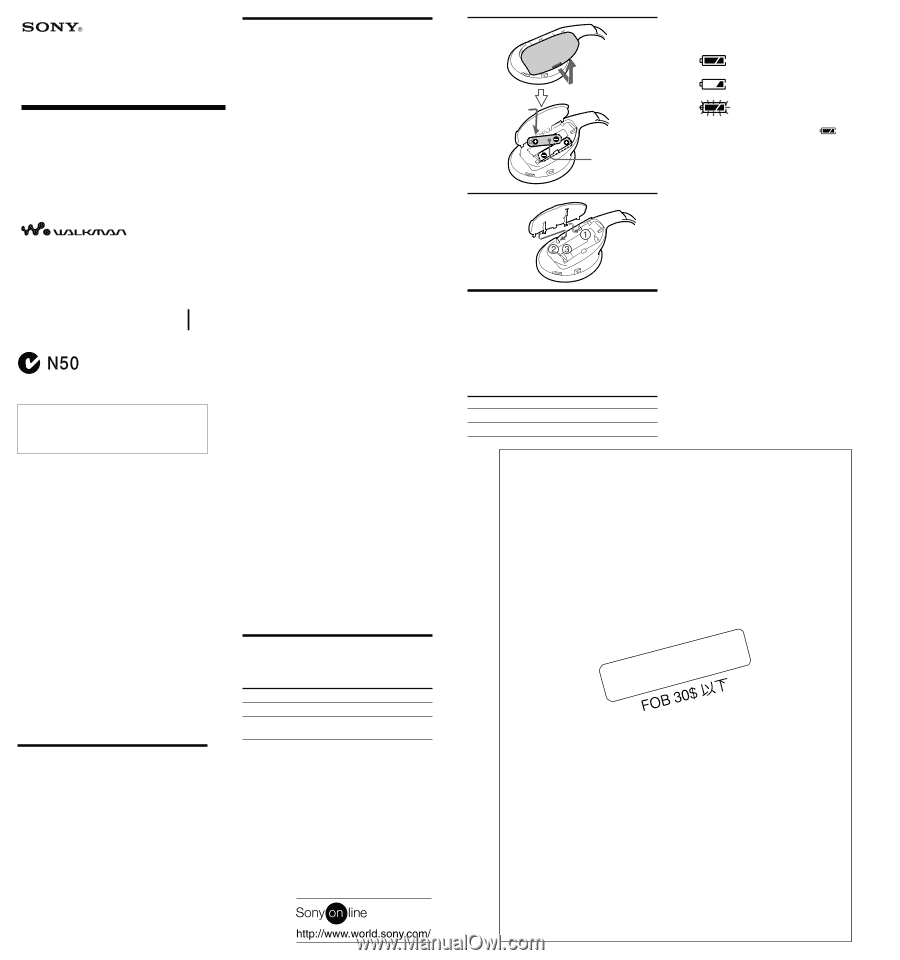
3-229-361-11(1) FM Stereo/AM PLL Synthesized Headphone Radio Operating Instructions FM/AM WALKMAN SRF-HM33 Sony Corporation © 2001 Printed in Thailand WARNING You are cautioned that any changes or modifications not expressly approved in this manual could void your authority to operate this equipment. INFORMATION This equipment has been tested and found to comply with the limits for a Class B digital device, pursuant to Part 15 of the FCC Rules. These limits are designed to provide reasonable protection against harmful interference in a residential installation. This equipment generates, uses, and can radiate radio frequency energy and, if not installed and used in accordance with the instructions, may cause harmful interference to radio communications. However, there is no guarantee that interference will not occur in a particular installation. If this equipment does cause harmful interference to radio or television reception, which can be determined by turning the equipment off and on, the user is encouraged to try to correct the interference by one or more of the following measures: - Reorient or relocate the receiving antenna. - Increase the separation between the equipment and receiver. - Connect the equipment into an outlet on a circuit different from that to which the receiver is connected. - Consult the dealer or an experienced radio/TV technician for help. Features • A total of 20 channels can be preset, 15 FM channels and 5 AM channels. • MEGA BASS for dynamic bass sound • Digital clock display • Adjustable double headbands designed to fit your head • FM flexible antenna • Light reflector to reflect car lights at night for your safety. • SENS (sensitivity) LOCAL/DX selector for better reception Notes on AM channel step The AM channel step differs depending on the area. See "Changing AM Channel Step". Precautions • Operate the unit only on 3V DC with two size AAA(R03) batteries. • Avoid exposure to temperature extremes, direct sunlight, moisture, sand, dust or mechanical shock. Never leave in a car parked in the sun. • Should any solid object or liquid fall into the unit, remove the batteries and have the unit checked by a qualified personnel before operating it any further. • In vehicles or buildings, radio reception may be difficult or noisy. Try listening near a window. • Since a strong magnet is used for the speakers, keep personal credit cards using magnetic coding or spring-wound watches away from the unit to prevent possible damage from the magnet. • To clean the casing, use a soft cloth dampened with a mild detergent solution. • This product is not designed to be waterresistant, so you should take care to use the unit when raining, snowing or in a watersplash place. Notes on Headphones Road safety Do not use headphones while driving, cycling, or operating any motorized vehicle. It may create a traffic hazard and is illegal in many areas. It can also be potentially dangerous to play your headphones at high volume while walking, especially at pedestrian crossings. You should exercise extreme caution or discontinue use in potentially hazardous situations. Preventing hearing damage Avoid using headphones at high volume. Hearing experts advise against continuous, loud and extended play. If you experience a ringing in your ears, reduce volume or discontinue use. Caring for others Keep the volume at a moderate level. This will allow you to hear outside sounds and to be considerate to people around you. Warning If there is lightning when you are using the unit, take off the headphones immediately. If you have any questions or problems concerning your unit, please consult your nearest Sony dealer. Specifications Time display: 12-hour system Frequency range: Band FM AM Frequency range 87.5 - 108 MHz 530 - 1 710 kHz 531 - 1 710 kHz Channel step 0.1 MHz 10 kHz 9 kHz Headphone type: Dynamic Power output 5 mW + 5 mW (at 10 % harmonic distortion) Power requirements 3V DC, two size AAA (R03) batteries Mass: Approx. 150 g (5 oz) incl. batteries Design and specifications are subject to change without notice. A L(left) Size AAA (R03) × 2 B L(left) Insert the # side of the battery first. Installing the Batteries (See Fig. A) 1 Open the battery compartment lid and install two batteries (not supplied). When the batteries are first installed, "AM 12:00" flashes in the display. Once the current time is set, the flashing stops. (See "Setting the Clock") 2 Close the lid. Battery Life (Approx. hours) When using FM AM Sony alkaline size AAA (LR03) 43 62 Sony size AAA (R03) 18 28 You can check the remaining battery power in the display. The indicators are as follows: Indicator Full strength x Weakening x Exhausted. Replace with the new batteries. When you set POWER to ON after installing the new batteries, the indicator changes to " ". When the batteries become exhausted, the unit will give a long beep and then turn off. Note Do not take more than 60 seconds to replace the battery, otherwise, your clock setting and preset stations will be deleted from the memory. Should that happen, reset the functions again. Notes on batteries • Do not charge the dry batteries. • Do not carry the dry batteries with coins or other metallic objects. It can generate heat if the positive and negative terminals of the batteries are accidentally contacted by a metallic object. • When you are not going to use the unit for a long time, remove the batteries to avoid damage from battery leakage and corrosion. • Do not use different types of batteries at the same time. • When you replace the batteries, replace all with new ones. If the battery compartment lid comes off (See Fig. B) The battery compartment lid is designed to come off when opened with excessive force. To put it back on, see the illustration. 1 Insert the right hook of the lid into the right hole in the unit. 2 Hang the left hook on the left upper part of the compartment. 3 Slide the left hook toward the left hole in the unit. LIM(IPToErDtaWbleAARuRdAiNo)TY
-
 1
1 -
 2
2
 |
 |