Sony SRFHM10 Operating Instructions - Page 2
Setting the Clock, Wearing the Headphone, Radio, Playing the Radio, Improving the Reception, Obtain
 |
UPC - 027242684072
View all Sony SRFHM10 manuals
Add to My Manuals
Save this manual to your list of manuals |
Page 2 highlights
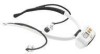
Neckband TUNE - TUNE +* Driver unit MODE/ENTER VOL - MEGA BASS/ CLOCK VOL +* * The TUNE + and VOL + have a tactile dot. B Driver unit POWER C D Setting the Clock The display will flash "AM 12:00" when a battery is first inserted. 1 Set POWER to OFF to turn off the power. 2 Hold down MEGA BASS/CLOCK for more than 2 seconds. A beep sounds and the hour flashes in the display. AM 3 Press TUNE + or - until the correct hour appears in the display. Each press changes the digit(s) by one. When you keep the button pressed, the digit(s) change rapidly. 4 Press MEGA BASS/CLOCK. A beep sounds and the minutes start to flash. Repeat step 3 to set the minutes. After setting, press MEGA BASS/CLOCK again. Two beeps sound, ":" starts flashing, and the clock starts from 0 seconds. If you press MODE/ENTER while setting, the clock, the clock setting will be canceled. AM Note While setting the clock, you must perform each step within 65 seconds, or the clock setting mode will be canceled. Wearing the Headphone Radio 1 Wear the neckband around the back of your head. (See Fig. B.) 2 Wear the headphones with the Driver unit marked L in your left ear, and the Driver unit marked R in your right. (See Fig. C-1) 3 Adjust the angle of the neckband to fit the headphones on your ears. (See Fig. C-2) How to install the earbuds correctly (See Fig. D) If the earbuds do not fit your ears correctly, low-bass sound may not be heard. To enjoy better sound quality, adjust the earbuds position to sit on your ears comfortably or push them into the inside of your ears so that they fit your ears snugly. If the earbuds do not fit your ears, try ones of other size. Playing the Radio - Manual Tuning 1 Set POWER to ON (DX) to turn on the power. 2 If "P" is displayed, press MODE/ENTER so that "P" disappears. Pressing MODE/ENTER will switch over between manual tuning mode and preset tuning mode. 3 Press TUNE + or - to select the desired frequency. If you hold down TUNE + or -, the frequency changes rapidly. When the frequency matches the broadcast frequency, the broadcast will be received. 4 Adjust the volume using VOL + or -. To turn off the radio, set POWER to OFF. Improving the Reception Set POWER to LOCAL if interference is prevalent and reception is too strong. Under normal conditions, set it to DX. Note If POWER is set to LOCAL under normal conditions, reception sensitivity will decrease. Obtain Powerful Bass Sound Press MEGA BASS/CLOCK. "MB" indication appears in the display when the MEGA BASS function is on. The MEGA BASS function intensifies the bass sound for richer quality audio reproduction. Presetting Your Favorite Station - Preset Tuning You can preset up to 15 FM stations. You can also delete a preset station, whether it is factory-set or preset by yourself. Presetting a Station 1 Follow steps 1 to 3 in "Playing the Radio" and manually tune in to the station you wish to preset. 2 Hold down MODE/ENTER until the preset number flashes. A preset number without a preset station will flash. When all the preset numbers are set to stations, the following occurs: • Initialized (factory-set): "1" flashes and "P" appears. • After tuning in a preset station: The next preset number after the one last preset flashes and "P" appears. P 3 Press TUNE + or - to select the number you wish to preset, then press MODE/ENTER. When you select the preset number using TUNE + or -, "P" appears if that number has a preset station. If it has no preset station, only the number flashes and "P" does not appear. When you press MODE/ENTER, the selected preset number lights up in the display. Example: Display window when you assign FM 87.5 MHz to preset number 2. P To preset another station, repeat the above steps. To change a preset station, assign a new station. The previous station will be canceled. To cancel the presetting mode, set POWER to OFF. Note If you do not press TUNE + or -, or MODE/ENTER within 65 seconds, the preset tuning mode will be canceled. Tuning in to a Preset Station 1 Set POWER to ON (DX) to turn on the power. 2 Press MODE/ENTER so that "P" and preset number appear. 3 Press TUNE + or - to select the desired preset number. 4 Adjust the volume using VOL + or -. To turn off the radio, set POWER to OFF. Deleting a Preset Station 1 Follow steps 1 and 2 in "Tuning in to a Preset Station". 2 Press TUNE + or - to select the preset number to be deleted. 3 Hold down MODE/ENTER for more than 4 seconds until "P", " " and the preset number flash. preset number to P be deleted 4 While the letters and the preset number are flashing, press MODE/ ENTER. The station set to the preset number just before the deleted station will be displayed. To delete other stations, repeat steps 2 to 4. If all the preset stations are deleted, "P -" appears in the display. To cancel the deleting mode, set POWER to OFF while "P", " preset number are flashing. " and the
-
 1
1 -
 2
2
 |
 |
